List all hyperlinks in worksheet programmatically
Table of Contents
- List all hyperlinks in worksheet programmatically
- Find cells containing formulas with literal (hardcoded) values
- Extract cell references populated with values - VBA
- Locate a shape in a workbook
- Move a shape - VBA
- Create links to all sheets in a workbook
- Create links to all visible worksheets in a workbook
- Create links to all hidden worksheets in a workbook
- Creates links to all sheets, tables, pivot tables and named ranges
1. List all hyperlinks in worksheet programmatically
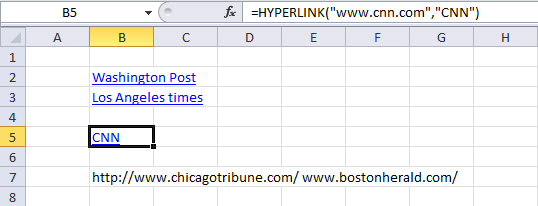
The macro in this blog post lists all hyperlinks in a worksheet. It also lists all words beginning with "http" or "www". It grabs the hyperlink even if you have a hyperlink function in a cell.
Example, this sheet has two regular hyperlinks (B2:B3) and one hyperlink function (B5) and two web addresses (B7).
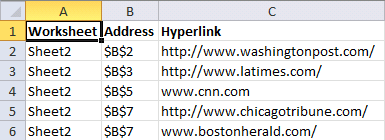
This is what the macro returns, the worksheet name in column A. Cell address in column B and the hyperlink in column C.
What's on this webpage
- VBA macro - list all hyperlinks in the worksheet
- Where to put the code?
- How to start macro?
- What happens when I run the macro?
- How do I list all hyperlinks in a workbook?
- How to disable automatic hyperlinking in Excel?
- Get Excel file
1.1. VBA Macro- list all hyperlinks in the worksheet
'Name macro
Sub ListHyperlinks()

'The SET statement allows you to save an object reference to a variable
'Save activesheet to object Asheet
Set Asheet = ActiveSheet

'Insert a new worksheet and save to object Nsheet
Set Nsheet = Sheets.Add

'Save values Worksheet, Address, and Hyperlink to cell range A1:C1
Nsheet.Range("A1:C1") = Array("Worksheet", "Address", "Hyperlink")

'Change to bold font
Nsheet.Range("A1:C1").Font.Bold = True

'Save 0 (zero) to variable i
i = 0

'Iterate through each cell in UsedRange
'UsedRange returns a Range object that represents the used range on the specified worksheet.
For Each cell In Asheet.UsedRange

'Enable error handling
On Error Resume Next

'Check if cell has a hyperlink and save the hyperlink to variable lnk
lnk = cell.Hyperlinks(1).SubAddress

'Check if no error has occurred
If Err = 0 Then

'Save worksheet name to column A based on variable i
Nsheet.Range("A2").Offset(i, 0) = Asheet.Name

'Save cell address to column B based on variable i
Nsheet.Range("B2").Offset(i, 0) = cell.Address

'Save hyperlink address to column C based on variable i
Nsheet.Range("C2").Offset(i, 0) = cell.Hyperlinks(1).Address

'Add 1 to variable i and save result to variable i
i = i + 1

'Go here if an error has occurred
Else

'Check if formula begins with "=HYPERLINK("
If Left(cell.Formula, 11) = "=HYPERLINK(" Then

'Split formula and save to variable strArray
strArray = Split(cell.Formula, Chr(34))

'Save worksheet name to column A based on variable i
Nsheet.Range("A2").Offset(i, 0) = Asheet.Name

'Save cell address to column B based on variable i
Nsheet.Range("B2").Offset(i, 0) = cell.Address

'Save hyperlink address to column C based on variable i
Nsheet.Range("C2").Offset(i, 0) = strArray(1)

'Add 1 to variable i and save result to variable i
i = i + 1

'Go here if formulas does not begin with "=HYPERLINK("
Else

'Split cell into an array based on default delimiting value (space character) and save to array variable strArray
strArray = Split(cell)

'Iterate through each value in array strArray
For Each vl In strArray

'Check if array value is equal to http or www
If Left(vl, 4) = "http" Or Left(vl, 3) = "www" Then

'Save worksheet name to column A based on variable i
Nsheet.Range("A2").Offset(i, 0) = Asheet.Name

'Save cell address to column B based on variable i
Nsheet.Range("B2").Offset(i, 0) = cell.Address

'Save hyperlink address to column C based on variable i
Nsheet.Range("C2").Offset(i, 0) = vl

'Add 1 to variable i and save result to variable i
i = i + 1
End If
Next vl
End If
End If

'Disable error handling
On Error GoTo 0
Next cell

'Change column widths for A:C
Nsheet.Columns("A:C").AutoFit

End Sub
1.2. Where to put the code?
- Press Alt +F11 to open the Visual Basic Editor (VBE).
- Press with left mouse button on "Insert" on the top menu.
- Press with mouse on "Module" to insert a module.
- Paste VBA code to code window.
- Exit VB Editor Alt + Q.
Save workbook with file extension *.xlsm (macro-enabled workbook).
1.3. How to start macro?
- Press Alt+F8, a dialog box appears.
- Press with left mouse button on "ListHyperlinks" to select the macro name.
- Press with left mouse button on "Run" button to run the selected macro.
1.4. What happens when I run the macro?
- A new worksheet is inserted.
- The worksheet is populated with hyperlink data.
- Macro ends.
1.5. How do I find all hyperlinks in a workbook?
This macro allows you to find links in all worksheets in the active workbook.
Sub ListHyperlinksInWB()

Set Nsheet = Sheets.Add
Nsheet.Range("A1:C1") = Array("Worksheet", "Address", "Hyperlink")
Nsheet.Range("A1:C1").Font.Bold = True

i = 0
For Each sh In ActiveWorkbook.Worksheets
If sh.Name <> Nsheet.Name Then

For Each cell In sh.UsedRange
On Error Resume Next
lnk = cell.Hyperlinks(1).SubAddress
If Err = 0 Then
Nsheet.Range("A2").Offset(i, 0) = sh.Name
Nsheet.Range("B2").Offset(i, 0) = cell.Address
Nsheet.Range("C2").Offset(i, 0) = cell.Hyperlinks(1).Address
i = i + 1
Else
If Left(cell.Formula, 11) = "=HYPERLINK(" Then
strArray = Split(cell.Formula, Chr(34))
Nsheet.Range("A2").Offset(i, 0) = sh.Name
Nsheet.Range("B2").Offset(i, 0) = cell.Address
Nsheet.Range("C2").Offset(i, 0) = strArray(1)
i = i + 1
Else
strArray = Split(cell)
For Each vl In strArray
If Left(vl, 4) = "http" Or Left(vl, 3) = "www" Then
Nsheet.Range("A2").Offset(i, 0) = sh.Name
Nsheet.Range("B2").Offset(i, 0) = cell.Address
Nsheet.Range("C2").Offset(i, 0) = vl
i = i + 1
End If
Next vl
End If
End If
On Error GoTo 0
Next cell
End If
Next sh

Nsheet.Columns("A:C").AutoFit

End Sub
1.6. How to disable automatic hyperlinking in Excel?
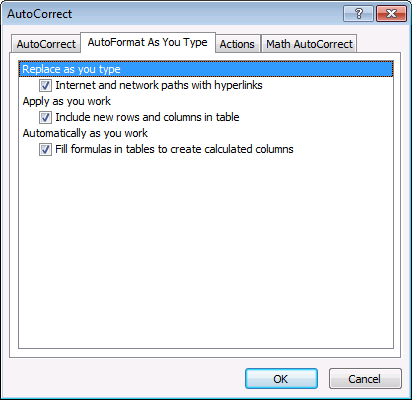
Tip! If you want to stop automatic hyperlinking (Excel 2010) follow these steps:
- Press with left mouse button on "File" on the ribbon
- Press with left mouse button on "Options"
- Press with left mouse button on "Proofing"
- Press with left mouse button on "AutoCorrect Options..."
- Go to "Autoformat as you type" on the menu
- Disable "Internet and network paths with hyperlinks"
2. Find cells containing formulas with literal (hardcoded) values

This article describes different ways to locate literal or hardcoded values in formulas. The image above shows the result from a macro that iterates through each worksheet in a given workbook looking for hardcoded values in formulas.
A link is generated and the formula itself is displayed if a hardcoded value is found.
What's on this webpage
- Find hardcoded values in formulas (Conditional Formatting)
- How can I locate cells containing formulas with literal values?
- How to use the User Defined Function with Conditional Formatting
- Find hardcoded values in formulas across worksheets
- Where to put the code?
- How to run the macro
- Get Excel file
2.1. Find hardcoded values in formulas (Conditional Formatting)

I found this UDF in David Hager's Excel Experts E-letter (EEE) on J Walkenbach's website. You need to apply conditional formatting with a formula that uses the User Defined Function described below.
Conditional Formatting highlights cells with formulas containing hardcoded values, the image above shows which cells contain hardcoded values. They are highlighted green. For example, cell C3 contains the following formula:
=SUM(A2:A5, 5)
The second argument in the SUM function is a hardcoded value, cell C3 is highlighted.
Note, Conditional Formatting is super-volatile and may slow down your workbook considerably. It only highlights cells, you need to find the highlighted cells yourself.
I recommend the macro in section 2. The macro creates a new worksheet and lists all formulas containing hardcoded values as well as links to those cells.
'Name User Defined Function
Function CellUsesLiteralValue(Cell As Range) As Boolean

'Check if cell has not a formula
If Not Cell.HasFormula Then

'Save boolean value FALSE to variable CellUsesLiteralValue
CellUsesLiteralValue = False

'Continue here if cell has a formula
Else

'Use like operator to determine if cell formula contains hardcoded values, it returns TRUE if found.
'Characters enclosed in brackets allows you to match any single character in the string.
' The hashtag matches any single digit, the asterisk matches zero or more characters
CellUsesLiteralValue = Cell.Formula Like "*[=^/*+-/()<>, ]#*"
End If
End Function
VBA: Range Formula property | Like Operator | HasFormula property | Declare Range object | If then statement
2.1.1 How can I locate cells containing formulas with literal values?
Use the UDF as your conditional formatting formula, I will explain exactly how in the next section below if you are interested. It accepts a single cell as an argument. It returns True if the cell's formula contains an operator followed by a numerical digit. In other words, it identifies cells that have a formula that contains a literal numeric value.
You can test each cell in the range, and highlight it if the function returns True. The UDF with conditional formatting highlights cells containing formulas with literals, column C. You can get an excel file at the end of this post if you are interested in this technique.
I have bolded all literal values in the formulas, column E. It seems to work with nested formulas also. Boolean values can be expressed as TRUE/FALSE but also 1/0 in Excel. Note, some formulas are built to have hard-coded arguments, like col_index_num in the VLOOKUP function.
2.1.2 How to use the User Defined Function with Conditional Formatting

- Go to the worksheet you want to search.
- Press with left mouse button on the button containing a triangle to select all cells on the worksheet, see image above.
- Go to tab "Home" on the ribbon if you are not already there.
- Press with left mouse button on "Conditional Formatting" button, see image above. A pop-up menu appears.
- Press with left mouse button on "New Rule...", see image above. A dialog box shows up on the screen.

The image above shows the wrong cell reference C2, it should be A1. - Press with left mouse button on "Use a formula to determine which cells to format".
- Type following formula: =CellUsesLiteralValue(A1)
- Press with left mouse button on "Format..." button. Another dialog box appears.
- Go to tab "Fill".
- Pick a color.
- Press with left mouse button on "OK" button.
- Press with left mouse button on "OK" button again.
2.2. Find hardcoded values in formulas across worksheets
I have a large workbook and I am in a hurry!
The authors want you to use it as conditional formatting formula to spot cells containing formulas with literal values, that can be tedious work with a large workbook. I would like to show you how to use the udf to build a list of all cells containing literal values, from an entire workbook.
This picture above shows you what my macro below returns, first a new sheet is inserted. It is then populated with links to all cells containing formulas with literals and their corresponding formulas.
I have reused some parts of Rick Rothstein's macro.
'Name macro
Sub FindLiteralsInWorkbook()

'Dimension variables and declare data types
Dim C As Range, A As Range, Addresses As String, i As Single
Dim cell As Range

'Add worksheet to workbook
Sheets.Add

'The SET statement allows you to save an object reference to a variable, in this case the active worksheet
Set x = ActiveSheet

'Save text "Link" to cell A1.
x.Range("A1") = "Link"

'Save text "Formula" to cell B1.
x.Range("B1") = "Formula"

'Save number 1 to variable i.
i = 1

'Iterate through worksheets in active workbook
For Each sh In ActiveWorkbook.Worksheets

    'Enable error handling
    On Error Resume Next

    'Find cells containing constants and save to object C
    Set C = sh.Cells.SpecialCells(xlConstants)

    'Check if C is empty
    If C Is Nothing Then

      'Find cells containing formulas and save to object C
      Set C = sh.Cells.SpecialCells(xlFormulas)

    'Continue here if C is not empty
    Else

      'Returns the union of the two cell ranges and saves to object C
      Set C = Union(C, sh.Cells.SpecialCells(xlFormulas))
    End If

    'Iterate through all the ranges in a multiple-area selection.
    For Each A In C.Areas

      'Iterate through all cells in cell range A
      For Each cell In A

         'Use User Defined Function to determine if cell contains at least one hardcoded value
         If CellUsesLiteralValue(cell) = True Then

              'Add 1 to variable i
              i = i + 1

              'Create a hyperlink based on the cell address
              x.Hyperlinks.Add Anchor:=x.Range("A" & i), _
              Address:=ActiveWorkbook.Path & "\" & ActiveWorkbook.Name, _
              SubAddress:=sh.Name & "!" & cell.Address, _
              TextToDisplay:=sh.Name & "!" & cell.Address
              x.Range("B" & i) = "'" & cell.Formula
         End If

      'Continue with next cell
      Next cell

    'Continue with next cell range
    Next A

    'Disable error handling
    On Error GoTo 0

'Continue with next worksheet
Next sh

'Resize column A:E widths
x.Columns("A:E").AutoFit
End Sub
VBA: SpecialCells(xlConstants) | Union | Areas
2.3. Where to put the code?

- Copy User Defined Function CellUsesLiteralValue.
- Go to the VB Editor (Alt + F11).
- Go to the menu and press with left mouse button on Insert.
- Press with left mouse button on Module.
- Paste UDF to your workbook's code module
- Copy macro FindLiteralsInWorkbook
- Paste to the module. Both the UDF and macro should now be visible in the module, see image above.
- Return to Excel.
2.4. How to run the macro

- Go to tab Developer on the ribbon.
- Press with left mouse button on "Macros" button.
- Press with left mouse button on "FindLiteralsInWorkbook" and then press with left mouse button on "Run".
Recommended reading
3. Extract cell references populated with values - VBA

This article demonstrates a macro that returns cell references for cell ranges populated with values on a worksheet.
I have to combine 200 columns into one list. I know. I tried steps from 'Combine cell ranges into a single range while eliminating blanks' UDF, but looks like typing the formula itself is going to be a big deal. Any advice?
(To give a bit of a background, I am trying to compare 200 columns to one column of data and figured it would be easier if I combine all 200 into one column and then compare, it would be easy).
What you will learn in this article
- Create a macro that extracts cell references of populated cells in a worksheet.
- Save the answer from an inputbox to a variable.
- Loop through populated cells in a column.
- How to use the currentregion property with an object reference.
- Iterate through worksheet columns.
- Append values to a variable.
- Add values to a collection variable.
- Insert a new worksheet and save an object reference to a variable.
- Save the result to a given cell.
The following macro moves from column to column and checks for values. If a value is found, the current region property (Ctrl + A) is applied and the cell range address is saved. A new sheet is created and all unique distinct cell references are concatenated using a delimiting character into cell A1.
The current region is a range bounded by any combination of blank rows and blank columns. In other words, the macro creates cell references to all cell ranges populated with values.
3.1 VBA Code
'Name macro
Sub ExtractAddresses()

'Dimension variables and declare data types
Dim sht As Worksheet
Dim CurCell As Range
Dim Adr As New Collection
Dim c As Single
Dim Value As Variant
Dim result As String, delch As String

'Show inputbox and ask for a delimiting character, save to variable delch
delch = InputBox("Delimiting character:")

'The SET statement allows you to save an object reference to a variable
Set CurCell = ActiveSheet.Range("A1")

'Iterate from 1 to the number of columns in your workbook using the FOR NEXT statement
For c = 1 To Columns.Count - 1

    'The SET statement allows you to save an object reference to a variable, in this case it is next populated cell in column A. It returns the last cell if column A has no populated cells.
    Set CurCell = CurCell.End(xlDown)

    'Loop through following lines as long as cell saved to CurCell is not empty.
    Do While CurCell.Value <> ""

        'Check if the length of the address of object CurCell with currentregion property is larger than 0 (zero)
        If Len(CurCell.CurrentRegion.Address) > 0 Then

            'Enable error handling, an error occurs if a cell reference already exists in the collection variable
            On Error Resume Next

            'Save address of currentregion property based on object CurCell to collection variable Adr
            Adr.Add CurCell.CurrentRegion.Address, CStr(CurCell.CurrentRegion.Address)

            'Disable error handling
            On Error GoTo 0
        End If

        'Check if the CurCell row number equals the last row number in workbbok, if so stop Loop
        If CurCell.Row = Rows.Count Then Exit Do

        'The SET statement allows you to save an object reference to a variable, in this case it is the last cell in column A.
        Set CurCell = CurCell.End(xlDown)
    Loop

        'Save an object reference to the next cell to the right based on variable c to variable CurCell
        Set CurCell = Range("A1").Offset(0, c)

'Continue with next number
Next c

'Iterate through each value saved in collection variable Adr
For Each Value In Adr
    'Add value to string variable result using variable delch as a delimiting character
    result = result & delch & Value

'Continue with next value in collection
Next Value

'Add a new sheet and save a reference to variable sht
Set sht = Sheets.Add

'Save text in string result to cell A1
sht.Range("A1") = Right(result, Len(result) - 1)
End Sub
3.2 Where to put the code?
- Copy above VBA code.
- Press Alt + F11 to open the Visual Basic Editor.
- Select your workbook in the Project Explorer.
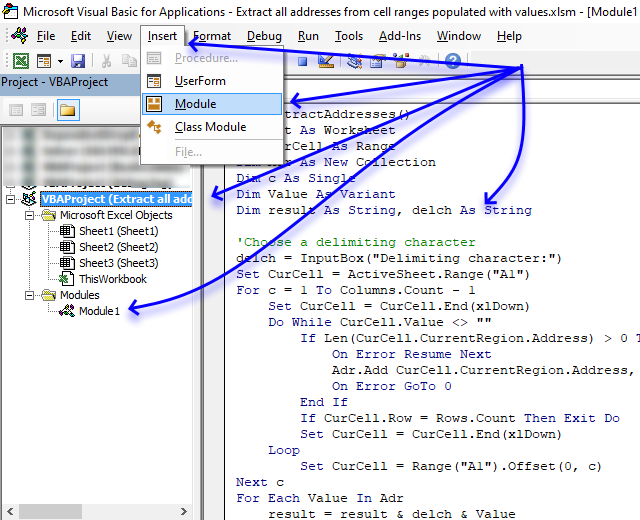
- Press with left mouse button on "Insert" on the menu.
- Press with left mouse button on "Module" to create a code module named Module1 that will be displayed below "Modules" in the Project Explorer.
- Paste VBA code to the code window, see image above.
- Return to Excel.
Note, save your workbook with file extension *.xlsm (macro-enabled) to attach the VBA code to the workbook.
3.3 How to use the macro

The animated image above shows how to run the macro.
- Press Alt + F8 to open the macro dialog box.
- Select ExtractAddresses.
- Press with mouse on button "Run".
- The macro asks for a delimiting character.
- The macro creates a new worksheet and populates cell A1 with cell references containing values. These cell references have a comma as a delimiting character.
4. Locate a shape in a workbook

This article demonstrates how to locate a shape in Excel programmatically based on the value stored in the shape. The image above shows a worksheet that allows you to specify a value in cell B1 and a button that runs a macro.
What's on this page
- Locate a shape
- Locate a named range/Excel Table
- Locate a chart
- List all charts in a workbook
4.1. Locate a shape
The macro iterates through all worksheets in the workbook and then iterates through all shapes in each worksheet to find a shape with the given text value.
The macro then activates the worksheet containing that particular shape, selects the shape, and moves to the location of that shape.
Question:
I need an Excel macro where I can enter a number (value) into cell B1, press with left mouse button on the button below, and the page will automatically go to the corresponding shape, with that same number.
How to use the workbook
- Enter the number you want to look for in cell B1.
- Press with left mouse button on "Find shape" button shown in the image above.

- The macro finds the shape and goes to that worksheet and location.
VBA Code
'Name macro
Sub FindShape()

'Dimension variables and declare data types
Dim sht As Worksheet
Dim shp As Shape

'Iterate through worksheets in active workbook
For Each sht In ActiveWorkbook.Worksheets

    'Iterate through shapes in each worksheet
    For Each shp In sht.Shapes

        'Check if shape text meets condition in cell B1
        If shp.TextFrame.Characters.Text = Worksheets("Sheet1").Range("B1").Value Then

            'Activate worksheet
            sht.Activate

            'Select shape
            shp.Select

            'Scroll to row containing shape
            ActiveWindow.ScrollRow = shp.TopLeftCell.Row

            'Scroll to column containing shape
            ActiveWindow.ScrollColumn = shp.TopLeftCell.Column

            'Exit macro
            Exit Sub
        End If
    Next shp
Next sht
End Sub
Where to put the code?

If you want to use the macro in your workbook you need to follow these steps.
- Copy above VBA code.
- Press Alt + F11 to open the Visual Basic Editor.
- Double press with left mouse button on your workbook name (Locate a shape.xlsm) in the Project Explorer.
- Press with left mouse button on "Insert" on the menu.
- Press with left mouse button on "Module" to create a module in your workbook.
- Paste VBA code to code window, see above image.
4.2. Locate an Excel Table or a named range

To find a specific Excel Table in a Workbook is easy as long as you know the name of it. Type the name in the name box at top left corner of your Excel window, see image above.
This will take you instantly to the Excel Table even if it is located in another worksheet. If you don't know the name of the Excel Table I recommend you use the "Name Manager" to find the Excel Table you are looking for.
- Go to tab "Formulas" on the ribbon.
- Press with mouse on "Name Manager" button.

- The "Name Manager" shows the names of all Excel Tables and named ranges in your workbook along with the worksheet and cell references.
The VBA code below demonstrates how to locate an Excel Table or a named range programmatically.
'Name macro
Sub Macro1()

'Go to named range named "BBC", this will also work with cell references and Excel Tables
Application.Goto Reference:="BBC"
End Sub
4.3. Locate a shape/chart by name

The following macro iterates through all shapes and charts in your workbook looking for the name "Chart 1". When found it goes to that particular worksheet and to the exact location of the shape or chart.
'Name macro
Sub FindChart()

'Dimension variables and data types
Dim sht As Worksheet
Dim shp As Shape

'Iterate through all worksheets in active workbook
For Each sht In ActiveWorkbook.Worksheets

    'Iterate through all shapes in worksheet
    For Each shp In sht.Shapes

        'Check if name is "Chart 1"
        If shp.Name = "Chart 1" Then

            'Activate worksheet
            sht.Activate

            'Select chart
            shp.Select

            'Go to row that matches the chart location
            ActiveWindow.ScrollRow = shp.TopLeftCell.Row

            'Go to column that matches the chart location
            ActiveWindow.ScrollColumn = shp.TopLeftCell.Column

            'End macro
            Exit Sub
        End If

    'Continue with next shape
    Next shp

'Continue with next worksheet
Next sht
End Sub
4.4. List all names of shapes and charts in a workbook

This macro creates a list in worksheet "List" of all shape and chart names in your workbook. It also lists their corresponding cell address and what worksheet they are on.
The list is created in column A and B in worksheet "List", you can change this location, if you prefer, in the macro below.
'Name macro
Sub ListShapes()

'Dimesnion variables and declare data types
Dim sht As Worksheet
Dim shp As Shape, r As Integer

'Save 0 (zero) to variable r
r = 0

'Iterate through each worksheet in the active workbook
For Each sht In ActiveWorkbook.Worksheets

    'Iterate through each shape
    For Each shp In sht.Shapes

        'Save shape name to column A based on variable r
        Worksheets("List").Range("A1").Offset(r, 0) = shp.Name

        'Save shape name to column B based on variable r
        Worksheets("List").Range("B1").Offset(r, 0) = sht.Name & "!" & shp.TopLeftCell.Address

        'Add 1 to the number saved in variable r
         r = r + 1

    'Continue with next shape
    Next shp
Next sht
End Sub
5. Move a shape - VBA

This article demonstrates how to move a shape, a black arrow in this case, however, you can use whatever shape you want, using VBA code. Select a cell containing the button name, and the black arrow instantly points to the corresponding button.
What's on this page
- How to change the location of a shape on worksheet
- How to get the top and left value of a shape?
- How to find out the width and height of a shape?
- Get Excel file
5.1. How to change the location of a shape on worksheet
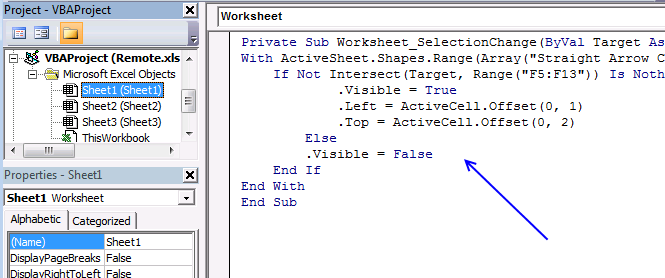
I made a simple picture from an old remote I found, see image above. The macro is actually event code placed in a worksheet module, I will describe this in detail.
The VBA code checks that the selected cell is in cell range F5:F13. If true, then it reads the coordinates on the same row. The shape is then moved to that location. Get the workbook and try it out.
The arrow is hidden if the selected cell is not one of the cells in cell range F5:F13.
5.1.1 VBA code
'Event code is started if a cell is selected
Private Sub Worksheet_SelectionChange(ByVal Target As Range)

'The With ... End With statement allows you to write shorter code by referring to an object only once instead of using it with each property.
With ActiveSheet.Shapes.Range(Array("Straight Arrow Connector 42"))

    'Make sure the selected cell is in cell range F5:F13
    If Not Intersect(Target, Range("F5:F13")) Is Nothing Then

            'Make the shape visible
            .Visible = True

            'Change the number of points between the shape and the row numbers
            .Left = ActiveCell.Offset(0, 1)

            ''Change the number of points between the shape and the column letters
            .Top = ActiveCell.Offset(0, 2)
        Else

        'Hide the shape
        .Visible = False
    End If
End With
End Sub
Make sure you change the shape name if your shape has a different name. To check the shape name select it and read the name from the name box, see the image below.

You can find the name the top left corner "Straight Arrow Connector 42" which matches the name in the macro.
5.1.2 Where to put the event code?
- Press with right mouse button on on a worksheet tab at the bottom of the Excel window. Make sure it is the worksheet you want to use.
- Press with mouse on "View Code".
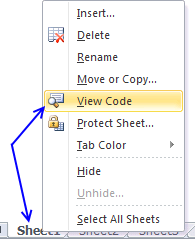
- Paste code to the worksheet module.
- Exit VB Editor and return to Excel.
5.1.3 Animated image
I created a small animated image that shows what happens when you press with left mouse button on each cell in cell range F5:F13, note that the shape is hidden if you press with left mouse button on a cell outside cell range F5:F13.
5.2. How to get the top and left value of a shape?

The following macro shows a message box with the left and top points of shape "Straight Arrow Connector 42".
'Name macro
Sub Position()

'The With ... End With statement allows you to write shorter code by referring to an object only once instead of using it with each property.
With ActiveSheet.Shapes("Straight Arrow Connector 42")

'Show a message box containing top and left points
MsgBox "Left: " & .Left & " Top: " & .Top
End With
End Sub
5.2.1 Where to put the macro code?

- Press Alt + F11 to open the Visual Basic Editor.
- Press with mouse on "Insert" on the top menu.
- Press with mouse on "Module".
- Copy above VBA code and paste to code window.
- Exit VB Editor and return to Excel.
5.2.2 How to run the macro?

You can link assign the macro to the shape which will start the macro each time you press with left mouse button on shape. You can also press shortcut keys Alt + F8 to open the macro dialog box and start the macro from there.
- Press with right mouse button on on shape "Straight Arrow Connector 42".
- Press with mouse on "Assign macro".
- A dialog box appears, press with left mouse button on the macro you want to assign.

- Press with left mouse button on the OK button.
5.3. How to find out the width and height of a shape?

The following macro displays a message box containing the height and width of shape "Straight Arrow Connector 42".
Sub Size()
With ActiveSheet.Shapes("Straight Arrow Connector 42")
MsgBox "Height: " & .Height & " Width: " & .Width
End With
End Sub
Put this macro in a module just like the other macro above, this is not event code.
6. Create links to all sheets in a workbook

The macro inserts hyperlinks to all worksheets in your workbook except the current worksheet.
6.1 Video
Watch a video where I explain how to use the macro
6.2 VBA code
Sub CreateLinksToAllSheets()
Dim sh As Worksheet
Dim cell As Range
For Each sh In ActiveWorkbook.Worksheets
    If ActiveSheet.Name <> sh.Name Then
        ActiveCell.Hyperlinks.Add Anchor:=Selection, Address:="", SubAddress:= _
        "'" & sh.Name & "'" & "!A1", TextToDisplay:=sh.Name
        ActiveCell.Offset(1, 0).Select
    End If
Next sh
End Sub
6.3 Explaining vba code
Sub CreateLinksToAllSheets()
All macros start with Sub and end with End Sub.
Dim sh As Worksheet
This line declares sh as a worksheet object.
Dim cell As Range
Cell is declared a range object. A range object can contain a single cell or multiple cells.
For Each sh In ActiveWorkbook.Worksheets
Each worksheet in active workbook is stored in sh, one by one.
If ActiveSheet.Name <> sh.Name Then
This If ... then line avoids linking to active worksheet.
ActiveCell.Hyperlinks.Add Anchor:=Selection, Address:="", SubAddress:= _
sh.Name & "!A1", TextToDisplay:=sh.Name
Create a hyperlink to current worksheet sh in active cell.
ActiveCell.Offset(1, 0).Select
Select next cell below active cell.
End If
Next sh
Go back to the "For each" statement and store next worksheet in sh worksheet object.
End Sub
Stop macro
Back to top
6.4 Where to put the code?
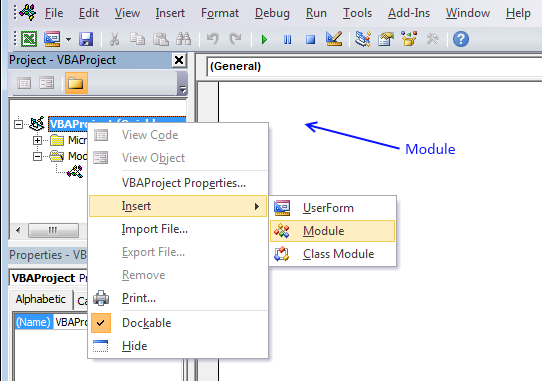
- Press Alt+F11 to open the Visual Basic Editor (VBE).
- Press with the right mouse button on your workbook name in the project explorer, see image above.
A context menu appears. - Press "Insert" and another popup menu appears.
- Press "Module" to insert a new module.
- Copy and paste the VBA macro code above to the newly created code module in your workbook.
6.5 How to run the macro
- Select a cell where you want to begin inserting hyperlinks.
- Press Alt + F8 to view macros.
- Select CreateLinksToAllSheets and then press with left mouse button on the "Run" button.
6.6 Get Excel file
7. Create links to all visible worksheets in a workbook

The image above shows the output of a macro named CreateLinksToAllVisibleSheets. There are two hidden worksheets in this workbook: "hidden" and "Annual report 2011".
The macro returns only hyperlinks of visible worksheets in column A, see the image above.
'Name macro
Sub CreateLinksToAllVisibleSheets()

'Dimension variables and declare data types
Dim sh As Worksheet

'Go through all worksheets in the current workbook
For Each sh In ActiveWorkbook.Worksheets

    'Check if current worksheet name is not equal to the worksheet in variable sh AND is visible
    If ActiveSheet.Name <> sh.Name And sh.Visible = True Then

        'Create hyperlink in the selected cell
        ActiveCell.Hyperlinks.Add Anchor:=Selection, Address:="", SubAddress:= _
        "'" & sh.Name & "'" &  "!A1", TextToDisplay:=sh.Name

        'Select next cell below
        ActiveCell.Offset(1, 0).Select
    End If

'Continue with next worksheet
Next sh
End Sub
7.1 Get Excel file
8. Create links to all hidden worksheets in a workbook

The image above shows a workbook with two hidden worksheets "hidden" and "Annual report 2011". The macro created two hyperlinks in cells A2:A3.
The hyperlinks don't work, the worksheets are hidden and you can't navigate to those worksheets unless you unhide them.
'Name macro
Sub CreateLinksToAllHiddenSheets()

'Dimension variables and declare data types
Dim sh As Worksheet

'Go through all worksheets in the current workbook
For Each sh In ActiveWorkbook.Worksheets

    'Check if current worksheet name is not equal to the worksheet in variable sh AND is not visible
    If ActiveSheet.Name <> sh.Name And sh.Visible = False Then

        'Create hyperlink in the selected cell
        ActiveCell.Hyperlinks.Add Anchor:=Selection, Address:="", SubAddress:= _
        "'" & sh.Name & "'" & "!A1", TextToDisplay:=sh.Name

        'Select next cell below
        ActiveCell.Offset(1, 0).Select
    End If

'Continue with next worksheet
Next sh
End Sub
8.1 Get Excel file
Recommended articles
Recommended articles
In this post, I am going to demonstrate how to automatically create a new sheet in the current workbook and […]
Recommended articles
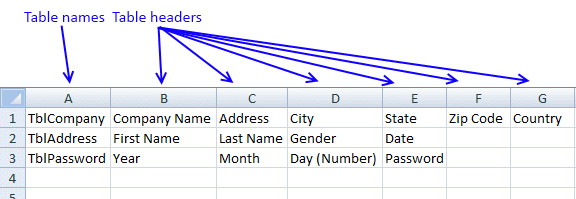
The following macro inserts a new sheet to your workbook and lists all Excel defined Tables and corresponding Table headers […]
9. Creates links to all sheets, tables, pivot tables and named ranges
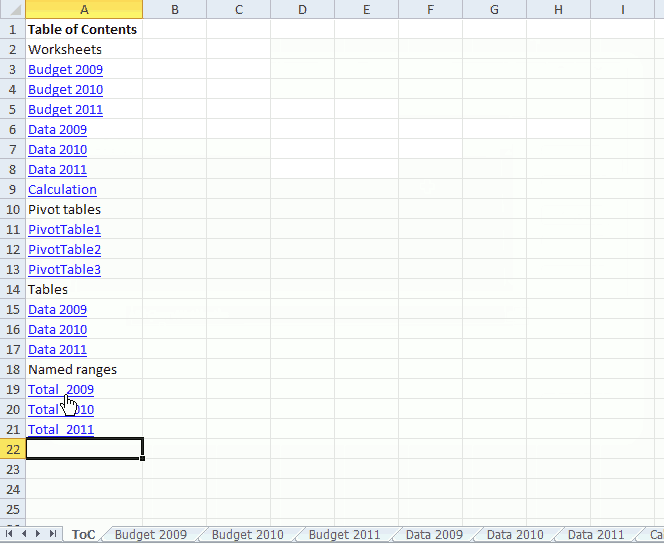
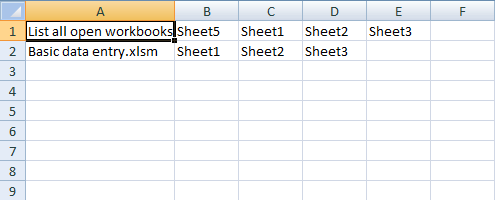
This article demonstrates a macro that automatically populates a worksheet with a Table of Contents, it contains hyperlinks to worksheets, Pivot tables, Excel defined Tables and named ranges.
The hyperlinks allow you to navigate quickly to any of the Excel objects mentioned above.
What you will learn in this article
- Iterate through worksheets in the active workbook.
- Iterate through Pivot Tables in the active worksheet.
- Iterate through Excel defined Tables in the active worksheet.
- Iterate through named ranges in the active workbook.
- Create hyperlinks programmatically.
- Change column width so the content fits.
- Save text value to a cell using VBA.
- Bold cell text programmatically.
- Select the next cell below using VBA.
How to use macro

The animated image above demonstrates the macro.
- Select a destination cell on a worksheet you want to populate.
- Go to tab "Developer" on the ribbon.
- Press with left mouse button on the "Macros" button and the Macro dialog box appears.
- Select macro CreateToC.
- Press with left mouse button on "Run" button.
- The macro creates hyperlinks to all worksheets, pivot tables, Excel defined Tables and named ranges in the active workbook.
- The macro ends.
VBA code
'Name macro
Sub CreateToC()

'Dimension variables and declare data types
Dim sh As Worksheet
Dim cell As Range
Dim pt As PivotTable
Dim tbl As ListObject
Dim nms As Name

'Populate selected cell with "Table of Contents"
ActiveCell.Value = "Table of Contents"

'MAke the selected cell bolded
ActiveCell.Font.Bold = True

'Select the next cell below
ActiveCell.Offset(1, 0).Select

'Save text Worksheets to selected cell
ActiveCell.Value = "Worksheets"

'Select the next cell below
ActiveCell.Offset(1, 0).Select

'Iterate through each worksheet in active workbook
For Each sh In ActiveWorkbook.Worksheets

    'Make sure the worksheet name is not equal to the currently selected worksheet
    If ActiveSheet.Name <> sh.Name Then

        'Add hyperlink to selected cell with worksheet name linking the the worksheet
        ActiveCell.Hyperlinks.Add Anchor:=Selection, Address:="", SubAddress:= _
        "'" & sh.Name & "'" & "!A1", TextToDisplay:=sh.Name

        'Select the next cell below
        ActiveCell.Offset(1, 0).Select
    End If
Next sh

'Save text Pivot tables to selected cell
ActiveCell.Value = "Pivot tables"

'Select the next cell below
ActiveCell.Offset(1, 0).Select

'Iterate through all worksheets in active workbook
For Each sh In ActiveWorkbook.Worksheets

    'Iterate through all pivot tables in worksheet
    For Each pt In sh.PivotTables

        'Add hyperlink to selected cell with pivot table name linking to the pivot table
        ActiveCell.Hyperlinks.Add Anchor:=Selection, Address:="", SubAddress:= _
        "'" & sh.Name & "'!" & pt.TableRange1.Address, TextToDisplay:=pt.Name

        'Select the next cell below
        ActiveCell.Offset(1, 0).Select

    'Continue with next pivot table
    Next pt

'Continue with next worksheet
Next sh

'Save text Tables to selected cell
ActiveCell.Value = "Tables"

'Select the next cell below
ActiveCell.Offset(1, 0).Select


'Iterate through all worksheets in active workbook
For Each sh In ActiveWorkbook.Worksheets

    'Iterate through all Excel defined Tables in worksheet
    For Each tbl In sh.ListObjects

            'Add hyperlink to selected cell with Excel defined Table name linking to the Excel defined Table
            ActiveCell.Hyperlinks.Add Anchor:=Selection, Address:="", SubAddress:= _
            tbl.Name, TextToDisplay:=sh.Name

            'Select the next cell below
            ActiveCell.Offset(1, 0).Select

    'Continue with next Excel defined Table
    Next tbl

'Continue with next worksheet
Next sh

'Save text Named Ranges to selected cell
ActiveCell.Value = "Named ranges"

'Select the next cell below
ActiveCell.Offset(1, 0).Select

'Iterate through all named ranges in workbook
For Each nms In ActiveWorkbook.Names

            'Add hyperlink to selected cell with the name of the named range linking to the the named range
            ActiveCell.Hyperlinks.Add Anchor:=Selection, Address:="", SubAddress:= _
            nms.Name, TextToDisplay:=nms.Name

            'Select the next cell below
            ActiveCell.Offset(1, 0).Select

'Continue with next named range
Next nms

'Change column widths so they fit the content
ActiveSheet.Columns(ActiveCell.Column).AutoFit

End Sub
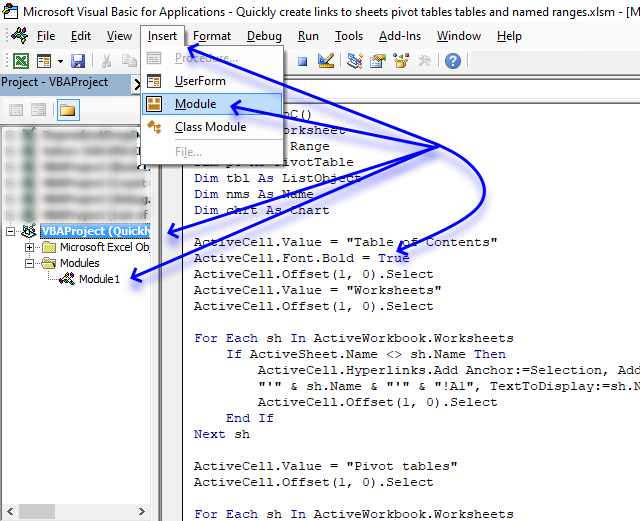
Where to put the code?
- Copy above VBA code.
- Press Alt + F11 to open the Visual Basic Editor.
- Select your workbook in the Project Explorer.
- Press with left mouse button on "Insert" on the menu.
- Press with left mouse button on "Module" to insert a code module.
- Paste VBA code to the code module.
- Return to Excel.
Hyperlinks category
Worksheet category
More than 1300 Excel formulasExcel categories
78 Responses to “List all hyperlinks in worksheet programmatically”
Leave a Reply
How to comment
How to add a formula to your comment
<code>Insert your formula here.</code>
Convert less than and larger than signs
Use html character entities instead of less than and larger than signs.
< becomes < and > becomes >
How to add VBA code to your comment
[vb 1="vbnet" language=","]
Put your VBA code here.
[/vb]
How to add a picture to your comment:
Upload picture to postimage.org or imgur
Paste image link to your comment.
If you do not mind the addresses for the ranges being presented in a different order, then this slightly shorter macro (which uses a completely different underlying method of obtaining the addresses) should also work...
Sub ExtractAddresses()
  Dim C As Range, A As Range, Addresses As String, Delimiter As String
  Delimiter = InputBox("Delimiting character:")
  On Error Resume Next
  Set C = Cells.SpecialCells(xlConstants)
  If C Is Nothing Then
    Set C = Cells.SpecialCells(xlFormulas)
  Else
    Set C = Union(C, Cells.SpecialCells(xlFormulas))
  End If
  On Error GoTo 0
  For Each A In C.Areas
    Addresses = Addresses & ", " & A.Address(0, 0)
  Next
  Worksheets("Sheet2").Range("A1").Value = Mid(Addresses, Len(Delimiter) + 1)
End Sub
One comment about your code. I changed the range C17:C21 to formulas (=F10 copied down) and your code worked fine. Then I forced C17 to return a #REF error (put =F1 in a cell, copied it up one cell to produce the error, and then copied that error cell to C17 and then ran your code again. Your code no longer reported the addresses for C17:C21. That is not the strange part, though (I think your Do statement may be filtering it out)... when I corrected the error by copying C18 up one cell to replace the error cell with a valid formula, your code still did not see the range C17:C21. Even after I used PasteSpecial to turn the formulas back to constants, your code still refused to see the range C17:C21. It is as though once the error was introduced to the range, your code somehow still "saw" the original error on subsequent runs even though it was no longer there! I have no explanation as to why that should be happening.
Just to mention, my code above has no problem with cells containing errors. Also, to make things easier to read, I set my code up to report relative addresses (that is, addresses without the $ signs).
One comment about your code. I changed the range C17:C21 to formulas (=F10 copied down) and your code worked fine. Then I forced C17 to return a #REF error (put =F1 in a cell, copied it up one cell to produce the error, and then copied that error cell to C17 and then ran your code again. Your code no longer reported the addresses for C17:C21. That is not the strange part, though (I think your Do statement may be filtering it out)... when I corrected the error by copying C18 up one cell to replace the error cell with a valid formula, your code still did not see the range C17:C21. Even after I used PasteSpecial to turn the formulas back to constants, your code still refused to see the range C17:C21. It is as though once the error was introduced to the range, your code somehow still "saw" the original error on subsequent runs even though it was no longer there! I have no explanation as to why that should be happening.
That is weird, I get a "Run-time error '13' Type missmatch error" (Excel 2010)
Do While CurCell.Value <> ""
Just to mention, my code above has no problem with cells containing errors. Also, to make things easier to read, I set my code up to report relative addresses (that is, addresses without the $ signs).
That is great, it is incredibly fast too! Really interesting approach.
This line is interesting:
Mid(Addresses, Len(Delimiter) + 1)
If you enter the Mid function in a worksheet, you can´t skip the num_chars argument. At least you need to type a comma.
Mid(text, start_num, num_chars)
becomes
Mid(text, start_num,)
But it always returns a blank cell. That is not the case when used in a macro.
[...] How to create links to all sheets in a workbook [Get Digital Help] [...]
Hello MR Oscar Cronquist!
I have the following query after a long search found some things, but not exactly what I need. I have 25 workbooks with worksheets 8-10. The tables are all quite large. So I found a few macros that do not help me to get the following:
For example: open excel spreadsheet with macro example (book1) and a button to retrieve it (activated) - This workbook is the folder with all the other workbooks, start looking for the word "cucumber" and starts the macro to search all workbooks, worksheets and cells. Then in (book1) as in column A:A to I display exactly what workbook and worksheet which cell is the word or words. After appearing in column A:A search word where I can make a link to a worksheet. Consider the example made of you - how to export worksheets but only for one workbook, but to me it's different. Many thanks in advance.
Example:
C:\Users\Nevi_\Desktop\trii\[Book1.xls]Sheet1
Book4455.xls
Sheet8;E34;G2;B12
Sheet2;A2;b23;AC98
Book12.xls
Which Sheet;Which Cells
Which Sheet;Which Cells
dasds.xls
Which Sheet;Which Cells
Which Sheet;Which Cells
Book124554.xls
Which Sheet;Which Cells
Which Sheet;Which Cells
Bookvsdsdsd.xls
Which Sheet;Which Cells
Which Sheet;Which Cells
Which Sheet;Which Cells
Which Sheet;Which Cells
Which Sheet;Which Cells
Which Sheet;Which Cells
Which Sheet;Which Cells
cucu.xls
Which Sheet;Which Cells
Which Sheet;Which Cells
and next one
and next one
and next one
and next one
Hello Mr. Oscar
that could be a solution to my (for me personally) huge problem?
Thank you
Kosta,
I don´t have an answer for you. Your question is complicated.
HI Oscar,
How did you decide LEFT & TOP pixel..
If I insert a Picture in Sheet.. how can I decide its Left & Top Position..
Regards,
=DEC2HEX(3563)
Debraj Roy,
Assign the following macro to your shape:
Sub Position()
With ActiveSheet.Shapes("Straight Arrow Connector 42")
MsgBox "Left: " & .Left & " Top: " & .Top
End With
End Sub
Press with left mouse button on the shape and a message box shows the coordinates.
You don't have to create a macro to get that information; simply select the shape then, with the shape still selected, go into the VB editor (ALT+F11) and execute this in the Immediate Window (press CTRL+G if you do not see it)...
Thank you for commenting!
Just wanted to point out that you can simplify this line of code...
With ActiveSheet.Shapes.Range(Array("Straight Arrow Connector 42"))to this...
With Shapes("Straight Arrow Connector 42")The one thing about this that may surprise people (it was a surprise to me) is that Shapes does not require a direct reference to the worksheet object that contains it (like it does if you try to use Shapes in a General code Module). My guess at why is because, being the code is located in a [b]Sheet[/b] Module, Shapes can only be defaulting to it.
Rick Rothstein (MVP - Excel),
Thanks for sharing!
Sub Cmdty()
Dim PT As PivotTable
Dim PTcache As PivotCache
Dim pf As PivotField
Dim pi As PivotItem
On Error Resume Next
Sheets.Add
ActiveSheet.Name = "PVT"
Set PTcache = ActiveWorkbook.PivotCaches.Create(xlDatabase, Range("A5,DC6577"))
Set PT = ActiveSheet.PivotTables.Add(PTcache, Range("A1"), "Table")
With PT
.AddFields("GROUP").Orientation = xlRowField
.AddFields("QTY").Orientation = xlDataField
.AddFields("STD").Orientation = xlDataField
.AddFields("MR$").Orientation = xlDataField
.AddFields("FCST").Orientation = xlDataField
.AddFields("PPV").Orientation = xlDataField
End With
End Sub
actually I corrected the code:
...
Sheets("PVT").Select
Set PT = ActiveSheet.PivotTables.Add(PTcache, Range("A1"), "Table")
...
Still to no avail... if you will notice my data range is very long... It's very frustrating I cannot work it out on myself. could you help out on this? Thanks in advance
I am trying to do exactly what your macro describes that it will do. When I run the macro, a list of worksheet names is generated, however, the links do not work and instead I receive a pop-up window stating "This operation has been cancelled due to restrictions in effect on this computer. Please contact your system administrator."
As I am working from a personal computer, and I am the admin, do you happen to know why the links will not work? Or what might prompt this message?
Peter,
https://answers.microsoft.com/en-us/office/forum/office_2007-outlook/cant-open-any-hyperlinks-this-operation-has-been/8815ad6c-0f44-477a-9ffa-beb98109b5a6
[…] Read more: Move a shape (vba) […]
Oscar,
Thank you very much! I was absolutely stuck on something like this for work - creating a hyperlink to a new sheet created. With this, I've implemented a update button and all sheets are automatically hyperlinked. Thank you very much!
Hi, Nice to found this awesome post.
Thanks very much on the guide.
May I know how can I make this VB Code become an Excel Add-In?
So that able to use this function in several Excel files.
Thanks.
^Jason^,
You don´t need an add-in.
I have a perfect blog post for you:
Add your personal excel macros to the ribbon
[…] Welcome to the forum, Take a look at this link it may help find a solution for you. Quickly create links to sheets, tables, pivot tables and named ranges in a workbook | Get Digital He… […]
[…] this: Create links to all sheets in a workbook | Get Digital Help - Microsoft Excel resource I want the same, but with the addition of other data such as the total of the first column of each […]
Hello Oscar,
Your code is just what I was looking for to do a project.
Is there something I can add to stop the list from listing hidden sheets?
I only want visible sheets to list
Thank you
KMR
Got it working just had two remember what to add.
I don't use excel that much.
Thank you.
[…] I have reused some parts of Rick Rothstein´s macro. […]
Given that a Boolean defaults to False, you can simplify your CellUsesLiteralValue function like so...
Function CellUsesLiteralValue(Cell As Range) As Boolean
  If Cell.HasFormula Then
    CellUsesLiteralValue = Cell.Formula Like "*[=^/*+-/()><, ]#*"
  End If
End Function
Actually, if you use the single line form of If..Then, then you can reduce the code to a one-liner (the code area will probably line wrap the single line of code due to its length)...
Well, my previous attempt did not come out so well. I do not understand why, though, as I used the vb code tags as suggested just below the "Leave a Reply" heading. I don't know if this will work or not, but I am going to try. Here is the three-line code without any code tags...
Function CellUsesLiteralValue(Cell As Range) As Boolean
If Cell.HasFormula Then
CellUsesLiteralValue = Cell.Formula Like "*[=^/*+-/()><, ]#*"
End If
End Function
I just noticed in my second posting that the "End If" statement is missing.
That actually looks normal, so here is the one-liner version of it (remember, it might line wrap because of its length)...
Function CellUsesLiteralValue(Cell As Range) As Boolean
  If Cell.HasFormula Then CellUsesLiteralValue = Cell.Formula Like "*[=^/*+-/()><, ]#*"
End Function
Rick Rothstein (MVP - Excel),
thank you for commenting.
Oscar, you had given me this formula to show items that are in Column B, but not in A.Array formula in cell C2:=INDEX($B$1:$B$5, MATCH(0, COUNTIF($C$1:C1, $B$1:$B$5)+COUNTIF($A$1:$A$5, $B$1:$B$5), 0)) + CTRL + SHIFT + ENTER. Copy C2 and paste it down as far as needed.
I added a condition to this formula :
C2:=INDEX($B$1:$B$11, MATCH(0,IF($E$1:$E$11="AB", COUNTIF($C$1:C1, $B$1:$B$11)+COUNTIF($A$1:$A$5, $B$1:$B$11)), 0))
Oscar, so column E is criteria for column B. It works for that one condition. I would like to add a condition for column A, but it's returning the wrong result. See below.
INDEX($B$1:$B$11, MATCH(0,IF(($E$1:$E$11="AB")* $F$1:$E$5="DB") , COUNTIF($C$1:C1, $B$1:$B$11)+COUNTIF($A$1:$A$5, $B$1:$B$11)), 0))
How would you do this?
Seán,
$F$1:$E$5 is a cell ref to to two columns, is this a typo?
Try this:
INDEX($B$1:$B$11, MATCH(0,IF(($E$1:$E$11="AB"), COUNTIF($C$1:C1, $B$1:$B$11)+IF($F$1:$E$5="DB",COUNTIF($A$1:$A$5, $B$1:$B$11),0)), 0))
That was a typo. Will that make a difference to the formula?
Oscar,
I'm comparing the A column to B.
=INDEX($A$1:$A$11, MATCH(0,IF(($B$1:$B$11="AB"),COUNTIF($E$1:E1, $A$1:$A$11)+IF($D$1:$D$11="DB",COUNTIF($C$1:$C$11, $A$1:$A$11),0)), 0))
A B C D
1 DX 1 MN
2 DX 2 MN
3 DX 3 MN
4 AB 4 MN
5 AB 5 DB
6 AB 7 DB
7 AB
Formula Result 4
6
Result should be 6
This is trickier than I thought.
Seán
Oscar it doesn't make sense that it's returning the incorrect result. You want to i loo return an array of numbers after using the if condition. r
Sean,
I don´t understand. Can you send me an example workbook?
https://www.get-digital-help.com/excel-consulting/
I have not had the occasion to work with Hyperlinks in the past, so I cannot be 100% sure this works perfectly, but in my tests, your code and my code seem to return identical results every time, so I have a lot of confidence in my macro. My code has less active lines of code than yours and I believe it will execute slightly faster as it does not look at every cell in the UsedRange, rather, it first looks directly at hyperlinks only, and then it looks at all formulas on the sheet testing them to see if they start with "=HYPERLINK(" or not. Also, my code works slightly different than yours, it is sort of a combination of your two macros. To use it, you first select the sheets you want to process, so if you want a single sheet, select it... if you want only a few sheets, Control+ press with left mouse button on the tabs for the sheets you want... and if you want all the sheets, select the first sheet and then Shift+press with left mouse button on the last sheet. After you have selected the sheets you want to process, then run this macro.
Sub ListHyperlinksToo() Dim N As Long, LastRow As Long, StartCells As Range, Cell As Range Dim NewSheet As Worksheet, WS As Worksheet, HypLnk As Hyperlink, SS As Object On Error GoTo NoHyperlinks Set SS = ActiveWindow.SelectedSheets Sheets(1).Select Set NewSheet = Sheets.Add Set StartCells = NewSheet.Range("A1:C1") StartCells = Array("Worksheet", "Address", "Hyperlink") StartCells.Font.Bold = True For Each WS In SS For Each HypLnk In WS.Hyperlinks N = N + 1 StartCells.Offset(N) = Array(WS.Name, HypLnk.Range.Address, HypLnk.Address) Next N = N + 1 For Each Cell In WS.Cells.SpecialCells(xlFormulas) If Left(Cell.Formula, 11) = "=HYPERLINK(" Then StartCells.Offset(N) = Array(WS.Name, Cell.Address, Split(Cell.Formula, """")(1)) N = N + 1 End If Next Next LastRow = Cells(Rows.Count, "A").End(xlUp).Row StartCells.EntireColumn.Sort Range("A2:A" & LastRow), xlAscending, Range("B2:B" & LastRow), , xlAscending, Header:=xlYes NoHyperlinks: End SubSorry, the above code does not correctly handle interim selected sheets that contain no hyperlinks (it ends the macro too soon). This revised macro does work correctly for those situations, so use it instead of what I posted earlier...
Sub ListHyperlinksToo() Dim N As Long, LastRow As Long, StartCells As Range, Cell As Range Dim NewSheet As Worksheet, WS As Worksheet, HypLnk As Hyperlink, SS As Object Set SS = ActiveWindow.SelectedSheets Sheets(1).Select Set NewSheet = Sheets.Add Set StartCells = NewSheet.Range("A1:C1") StartCells = Array("Worksheet", "Address", "Hyperlink") StartCells.Font.Bold = True On Error GoTo NoHyperlinks For Each WS In SS For Each HypLnk In WS.Hyperlinks N = N + 1 StartCells.Offset(N) = Array(WS.Name, HypLnk.Range.Address, HypLnk.Address) Next N = N + 1 For Each Cell In WS.Cells.SpecialCells(xlFormulas) If Left(Cell.Formula, 11) = "=HYPERLINK(" Then StartCells.Offset(N) = Array(WS.Name, Cell.Address, Split(Cell.Formula, """")(1)) N = N + 1 End If Next Continue: Next LastRow = Cells(Rows.Count, "A").End(xlUp).Row StartCells.EntireColumn.Sort Range("A2:A" & LastRow), xlAscending, Range("B2:B" & LastRow), , xlAscending, Header:=xlYes Exit Sub NoHyperlinks: Resume Continue End SubRick Rothstein (MVP - Excel)
Thank you for your contribution. Always interesting to read your comments.
Hi Oscar,
That code was exactly what I was looking for to for my workbook, excellent.
Thanks,
Your code appears to provide hyperlinks to all my ws.
However, when I press with left mouse button on any hyperlink wherein the ws has a space in the name eg: "Juice, orange, concentrated" I get an error msg saying "Reference is not valid."
WS with single names work fine. eg: "Persimmons"
Can you help me? Thank you.
Hi Quinn, Even I have the same issue. Did you find anyway to resolve this.?
[…] How to create links to all sheets in a workbook [Get Digital Help] […]
[…] How to create links to all sheets in a workbook [Get Digital Help] […]
Many thanks to your kindness & very help information
SAMEH
Hi Oscar,
what is the VBA code to create back button/link in each worksheet which should take me to the original page. And it must be created in all sheets at once.
Thanks in advance.
Kranthi
This macro creates a "Back" link in cell A1 on every sheet except the first sheet.
Sub CreateLinksOnAllSheets() Dim sh As Worksheet Dim cell As Range, i As Integer With ActiveWorkbook For i = 1 To ActiveWorkbook.Worksheets.Count If ActiveSheet.Name <> .Worksheets(i).Name Then .Worksheets(i).Hyperlinks.Add Anchor:= _ .Worksheets(i).Range("A1"), Address:="", SubAddress:= _ "'" & ActiveSheet.Name & "'" & "!A1", TextToDisplay:="Back" End If Next i End With End SubThank your Oscar
**You
Which code I might use after having created the Back button/link and I no longer need them in my worksheets Automatically?
Hi, how can i do this for all the worksheets except for the first 4?
Erin
Sub CreateLinksToAllSheets() Dim sh As Worksheet Dim cell As Range, i As Integer With ActiveWorkbook For i = 5 To ActiveWorkbook.Worksheets.Count If ActiveSheet.Name <> .Worksheets(i).Name Then ActiveCell.Hyperlinks.Add Anchor:=Selection, Address:="", SubAddress:= _ "'" & .Worksheets(i).Name & "'" & "!A1", TextToDisplay:=.Worksheets(i).Name ActiveCell.Offset(1, 0).Select End If Next i End With End SubYou are awesome Oscar! Saved me a whole load of time!
This works great. However, when I add new worksheets, it updates the list automatically. But, it puts the back button in cell H1, not A1 for some reason. When I actually run the macro after adding the new worksheets, it also adds the back button to A1 as well.
Tracy T
However, when I add new worksheets, it updates the list automatically.
The macro is not executed if you add worksheets, to do that you need event code to run the macro automatically.
I am not sure what is going on in your workbook.
I want to create link for visible sheet in workbook. Please send me vba code sir
[…] https://www.get-digital-help.com/find-cells-containing-formulas-with-literal-hard-coded-va… […]
How to start the list in A1 cell rather than activecell?
Clear all the values of A column then return the list to A1 cell instead of activecell?
Leo81457,
Sub CreateLinksToAllSheets() Dim sh As Worksheet Dim cell As Range Worksheets("Overview").Range("A:A") = "" Worksheets("Overview").Range("A1").Select For Each sh In ActiveWorkbook.Worksheets If ActiveSheet.Name <> sh.Name Then ActiveCell.Hyperlinks.Add Anchor:=Selection, Address:="", SubAddress:= _ "'" & sh.Name & "'" & "!A1", TextToDisplay:=sh.Name ActiveCell.Offset(1, 0).Select End If Next sh End SubI have a simple question:
Why post code that has undeclared variables? Most of the time I can figure out what they should be declared as, but in some cases I don't even know that a certain type of variable exists. For example, your variable "lnk" should be declared as...?
Again, my main point is, as a programmer who writes vba code to publish, why publish code that does not work simple because the variables are not declared and not everyone is going to know what to declare them as??
I'd say 'Thanks for the code', but I don't believe that no respectable programmer would make the mistake of coding without variable declarations.
Yoma Ma,
Undeclared variables are automatically variants, I can declare them for you but it won't make any difference except that your macro grows a line or more.
If you think the variables will slow down your workbook feel free to change them accordingly.
Hi OSCar,
Can you help me regarding new macro.
i need back macro from all sheets to mail sheets.
ex.
Sheet1 :Main Index
Sheet2: Table first
Sheet3: Table second
i want if we select table first sheet in first row then go to Mail index
and when select second sheet then go to mail sheet but go to mail sheet row no 2.
Regards
Rahul
What is the reason behind declaring cell as range
dim cell as range
please give me explanation for the same because i am on learning stage so i am confused that why cell is declared as range because without declaring cell as range the above code works very well. so why we declare cell as range
please its my request
clear my confusion
please
Pradeep Singh Rawat,
The variable will be Variant type if you don't declare the variable.
It will work, however, it will use more memory than necessary.
https://exceloffthegrid.com/do-you-have-to-use-dim-to-declare-variables/
sir i think i am asking that without this declaration dim cell as range (without this line of code)the above code works very well so why did you use this line of code dim cell as range
e.g
Sub CreateLinksToAllSheets()
Dim sh As Worksheet
For Each sh In ActiveWorkbook.Worksheets
If ActiveSheet.Name sh.Name Then
ActiveCell.Hyperlinks.Add Anchor:=Selection, Address:="", SubAddress:= _
"'" & sh.Name & "'" & "!A1", TextToDisplay:=sh.Name
ActiveCell.Offset(1, 0).Select
End If
Next sh
End Sub
this code also works very well so what is the need of
Dim cell as range
i think you got my point
Pradeep Singh Rawat,
I have already explained this, declaring variables will save you memory and your macro/udf will be faster.
after pasting the code. which button I have to press for running the code. Please. I have pasted the code by pressing Alt +F11, insering a module. and copying the code. Please guide me how to run the macro.
Hi Oscar, thank you for this article. It is really useful for me. I have just one question. Does exist a way how to update links based on this result? I have an excel where I have a lot of links but we migrated data to different place. So it means that URL address was changed. I used your macro to get all links, I updated all these to the new destination and now I am looking for a way how to update all cells when I have list of all cells where with a new link. Thank you for your tips :) Mirek
Mirek
You can use "Find & Replace" to update your cells with new hyperlinks.
1. Press CTRL + H to open the "Find & Replace" dialog box.
2. Find what: Old url
3. Replace with: New url
4. Press with left mouse button on "Replace All" button to apply changes to all cells on worksheet.
I want to search PDF file in one drive e.g.(F) from a worksheet in Excel with VBA
pleas send me a code if possible
S.E.M
I found this:
https://software-solutions-online.com/how-to-search-a-pdf-for-a-string-using-vba-for-excel/
Hello Oscar,
thank you for this article. It is really useful for me. I am looking for a macro which can search hyperlinks from many excel files which are in a folder. how I should amend this macro to search for files within a folder and give me file name and hyperlink name. Thank you in advanced.
Hi! The code is wonderful - thank you so much. Some have asked this but I can't find the answer in comments: how do you run the macro for visible worksheets only? Thanks
Just wanted to say thanks for sharing this fix for updating worksheet hyperlinks. Been doing it manually for some time and didn't have the knowledge to automate. The VB sub updates all of my 250 sheets in seconds when I was previously taking well over an hour. Looks like this has been out there for sometime and was lucky to find. Thanks again.
I am happy you find it useful, thank you for commenting.
I Want to do hyperlink of all visible sheets from other workbook.
Hi Oscar! Just wanted to first start off and thank you for the wonderful code, and help youre providing for many people out on the web trying to learn atleast some basic vba and code.
I tried your linktoallvisiblesheets, and it worked wonderful. I just had one follow-up question though, is it possible to insert a unique ID- handler in each set in just that code, in say column B, or any other column as well?
It works great for my need and when inserting a new sheet, but it would be great with some sort of Unique ID- per row since im using it for a log?