Working with TEXT BOXES [Form Controls]
What is a Text Box?
A Text Box (Form Control) in Excel is an interactive element that allows users to enter or display text within a worksheet. It is a part of Excel’s Form Controls and can be used for:
- Displaying Static or Dynamic Text – You can link a text box to a cell allowing it to display the value of that cell dynamically.
- User Input – Users can type text into the box.
- Dashboard and Reports – Often used in dashboards for displaying key metrics or dynamically updating values.
- Macros and Interactivity – Can be linked to VBA macros to enhance user interactivity. For example, press with left mouse button on the text box and a specific macro is run.
What's on this page
- Introduction
- Formatting a text box
- Insert a text box
- Position, size and align a text box
- Link text box to cell
- Insert a text box programmatically
- Font and font size (VBA)
- Add or edit text (VBA)
- Position a text box (VBA)
- Resize a text box (VBA)
- Link a macro to a text box (VBA)
- Link text box to cell programmatically (VBA)
- Hide/Show text box (VBA)
- Delete text box (VBA)
- Change text box color (VBA)
- Where to put the VBA code?
- Get excel *.xlsm file
There are more VBA articles in the VBA knowledge base. Text boxes are great for dynamic worksheets, dashboards, or interactive charts. They allow you to build amazing workbooks with minimal effort.
1. Introduction
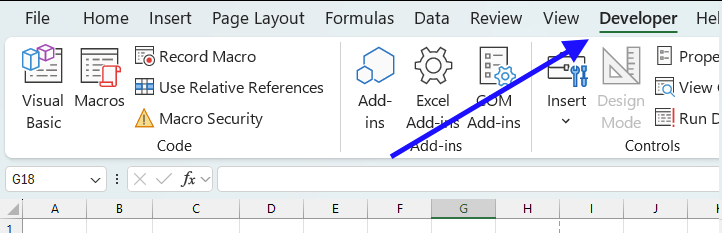
How to enable the "Developer" tab on the ribbon?
Here is how to enable the "Developer" tab:
- Press with left mouse button on "File" located above the ribbon, a new pane appears.
- Press with mouse on the "Options" button to access Excel settings.
- Press with mouse on "Customize Ribbon" and then on the right side press with left mouse button on the checkbox next to the tab "Developer" to enable it.
- Press with left mouse button on "OK" button to apply changes.
- The "Developer" tab is now visible on the ribbon.
What is VBA?
VBA (Visual Basic for Applications) is a programming language developed by Microsoft that is used for automating tasks in Microsoft Office applications such as Excel, Word, and Access. It allows users to create macros, automate repetitive tasks, and enhance Office functionality with custom scripts.
What is the Visual Basic Editor (VBE)?
The Visual Basic Editor (VBE) is an integrated development environment (IDE) within Microsoft Office applications (such as Excel, Word, and Access) that allows users to write, edit, and debug Visual Basic for Applications (VBA) code.
How to open the Visual Basic Editor?
You can open the Visual Basic Editor (VBE) using any of the following methods:
- Method 1: Using Keyboard Shortcut
- Press Alt + F11 on your keyboard.
- The Visual Basic for Applications (VBA) Editor window will open.
- Method 2: Using the Developer Tab
- Press with mouse on the Developer tab in the ribbon.
- Press with left mouse button on Visual Basic to open the VBE.
What are the differences between Form Control and ActiveX Control?
There are two different kinds of text boxes, Form controls and ActiveX Controls. Form controls can only be used on worksheets whereas ActiveX Controls are far more advanced, offers a lot more customization, can be manipulated in more ways using VBA, and can also be used on user forms.
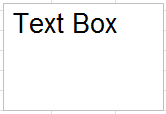
The examples in this post are text boxes from the group Form Controls. A text box is an empty field that can be used to submit data from the user or show data to the user. The image above shows a textbox containing text TextBox.
What is a macro?
Macros are sequences of instructions or actions that can be recorded and replayed in Excel to automate repetitive tasks.
- Automate tasks such as formatting, calculations, data manipulation, or interacting with other workbooks.
- You can record macros using the built-in Excel Macro Recorder, which generates VBA (Visual Basic for Applications) code for the actions you perform in Excel.
- Alternatively, you can write macros manually in the VBA editor for more control and flexibility.
- Macros can be run from the Developer tab, assigned to a button, or triggered through custom VBA code.
2. Formatting a text box

A textbox can be formatted in many different ways.
- Opacity
- background color
- border width
- border color
- font size
- font color
- font
The image above shows a textbox containing text "A textbox", a black border and a blue background. Select the text box you want to format.
To select a textbox press with left mouse button on it with the left mouse button. A selected textbox has white circles around it called sizing handles.
I will explain how to use the sizing handles later in this article. Go to tab "Shape Format" on the ribbon. This allows you to change the background color, border size, border color, etc.

The "Shape Format" tab is only visible on the ribbon if a textbox is selected.
3. Insert a text box

To create a text box simply go to tab "Insert" on the ribbon and press with left mouse button on the "Text box" button.
Now press and hold with the left mouse button where you want to place the text box on the worksheet.
Drag with mouse to size the button. Release left mouse button to create the text box.
4. Position, size and align a text box

Press with left mouse button on with left mouse button to select the text box. Move the mouse cursor to the edge of the text box, the cursor changes.
Press and hold with left mouse button on the border of the text box. Drag with mouse to its new location. Release the mouse button to release the text box.

To resize a textbox you first select the textbox so the sizing handles appear, they are white circles surrounding the textbox.
Press and hold with left mouse button on a sizing handle, then drag with mouse to resize the textbox.
To align a text box to the cell grid, select the text box in order to see the sizing handles. Press and hold the Alt key, press and hold with left mouse button on a sizing handle.
Drag with mouse to align the sizing handle with the cell grid. Release the left mouse button and the Alt key.
5. Link a text box to a cell

These steps show how to link a text box to a cell value. The image above shows a text box linked to cell G3, cell G3 has value "Text value". The text box shows the exact same value as in cell G3.
- Press with left mouse button on the text box to select it.
- Press with left mouse button on in the formula bar, a prompt appears.
- Type the cell reference to a cell you want to link. See the image above.

This makes the text box dynamic meaning if the linked cell value changes the text box cell value changes accordingly. This technique is useful in an interactive dashboard, chart or worksheet.
6. Insert a text box programmatically
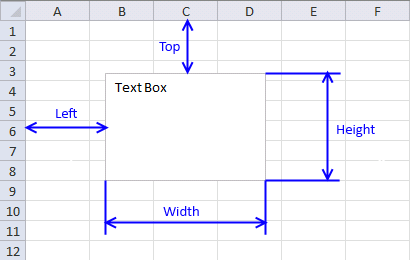
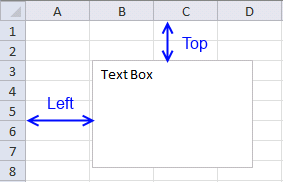
The AddTextBox method allows you to specify the distance from the cell grids top and left border, see picture above.
It also lets you specify the width and height of the textbox you want to create. The macro below inserts a text box on worksheet Sheet1 60 points from the top border and 40 points from the left border. The text box width is 120 points and height is 80 points.
Sub TextBox()
Worksheets("Sheet1").Shapes.AddTextbox(msoTextOrientationHorizontal, _
   60, 40, 120, 80).TextFrame.Characters.Text = "Text Box"
End Sub
I will explain where to put this macro later in this article.
7. Font and font size
The following code changes the font to Arial and font size to 20 of text box "Textbox 1" located on worksheet Sheet1.
'Name macro
Sub ChangeFontSize()

'The With ... End With statement allows you to write shorter code by referring to an object only once instead of using it with each property.
With Worksheets("Sheet1").Shapes("TextBox 1").TextFrame.Characters.Font

'Change font
.Name = "Arial"

'Change font size
.Size = 20
End With
End Sub
 The picture to the right shows text font Arial and font size 20 in text box "Text Box 1" on worksheet Sheet1.
8. Add or edit text
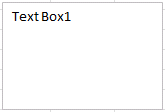 The macro below changes text in the text box named "Shape1" to "Text Box1" on worksheet Sheet1.
'Name macro
Sub ChangeText()

'Change text box text
Worksheets("Sheet1").Shapes("Shape1").TextFrame.Characters.Text _
   = "Text Box1"
End Sub
Position a text box
 The macro below changes the location of text box "TextBox 1" on Sheet1.
50 points from the left border and 30 points from the top border.
'Name macro
Sub PositionShape()

'The With ... End With statement allows you to write shorter code by referring to an object only once instead of using it with each property.
With Worksheets("Sheet1").Shapes("TextBox 1")

   'Move text box 50 points from left worksheet border
   .Left = 50

   ''Move text box 30 points from top worksheet border
   .Top = 30
End With
End Sub
Read more: Move a shape (vba)
9. Resize a text box
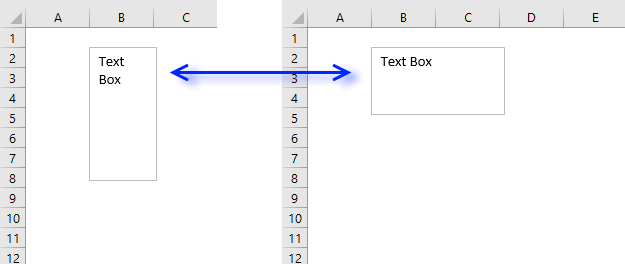
The picture above demonstrates a text box that resizes from height 100 points and width 50 points (left text box) to height 50 points and width 100 points (right text box).
'Name macro
Sub ResizeShape()

'The With ... End With statement allows you to write shorter code by referring to an object only once instead of using it with each property.
With Worksheets("Sheet1").Shapes("TextBox 1")

    'Change text box height to 50
    .Height = 50

    'Change text box width to 100
    .Width = 100
End With
End Sub
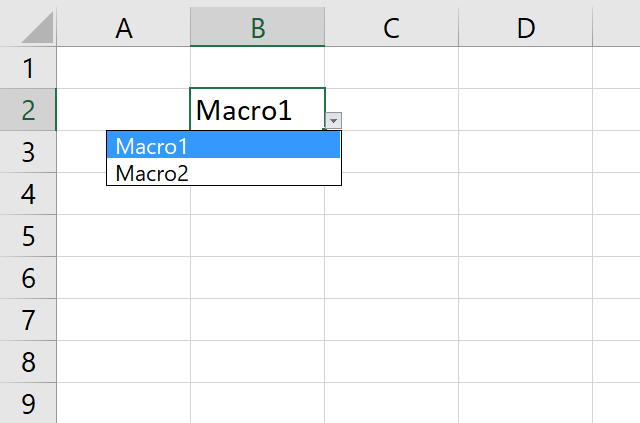
10. Assign a macro to a text box
The text box allows you to link a macro to a text box, what happens is that when a user press with left mouse button ons on a text box the assigned macro runs.
To assign a macro to a specific text box using VBA see following code.
'Name macro
Sub AssignMacro()

'Assign macro named Macro1 to text box named Textbox 1
Worksheets("Sheet1").Shapes("TextBox 1").OnAction = "Macro1"
End Sub
The macro above assigns Macro1 to "TextBox 1" on worksheet Sheet1.
11. Change text box color
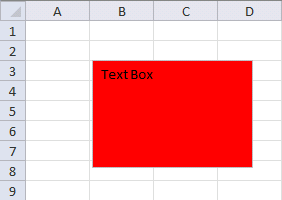 The picture to the right shows "TextBox 1" with the color red.
The macro below changes the color of "TextBox 1" using RGB values.
Sub ColorShape()

'Change background color
Worksheets("Sheet1").Shapes("TextBox 1").Fill.ForeColor.RGB = RGB(255, 0, 0)
End Sub
12. Link text box to cell
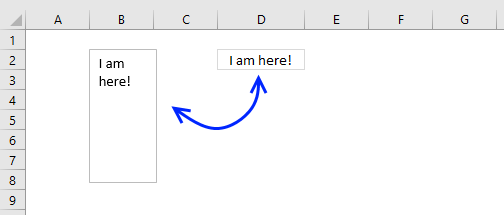
This macro links text box "TextBox 1" to cell D2, the text box will now show the value in cell D2 making it dynamic meaning you can easily change what is shown in the text box by changing the value, for example, with a formula in cell D2.
'Name macro
Sub LinkCell()

'Link cell to text box
Worksheets("Sheet1").TextBoxes("TextBox 1").Formula = "=$D$2"
End Sub
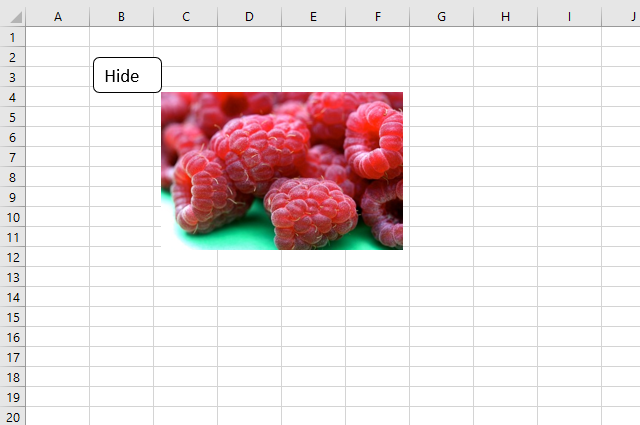
13. Hide/Show text box
The visible property allows you to hide the text box.
This macro hides "TextBox 1" on worksheet Sheet1.
'Name macro
Sub HideTextBox()

'Hide text box named Textbox 1
Worksheets("Sheet1").TextBoxes("TextBox 1").Visible = False
End Sub
14. Delete text box
This macro deletes "TextBox 2" on worksheet Sheet1.
'Name macro
Sub DeleteTextBox()

'Delete text box named Textbox 2
Worksheets("Sheet1").TextBoxes("TextBox 2").Delete
End Sub
15. Where to copy the code?
Follow these steps to insert macro to your workbook.
- Copy macro.
- Go to VB Editor (Alt+F11).
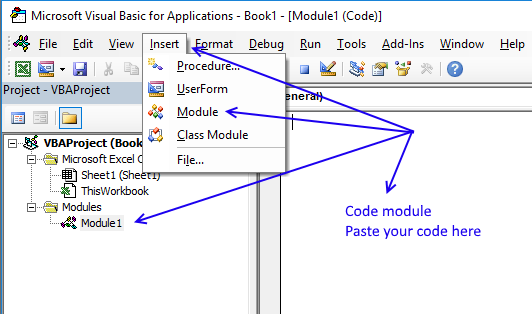
- Press with mouse on "Insert" on the top menu.
- Press with left mouse button on "Module" to insert a module to the workbook.
- Paste macro to the code module.
- Exit VB Editor.
- Save the workbook as a macro-enabled workbook (*.xlsm).
If you don't the macro will be gone the next time you open the workbook.
Recommended articles
ADDTEXTBOX examples
What is a Text Box? A Text Box (Form Control) in Excel is an interactive element that allows users to […]
SHAPES examples
Check boxes in Excel are a great way to make your spreadsheets more interactive. They can be used for task […]
In this article I will demonstrate how to quickly change chart data range utilizing a combobox (drop-down list). The above […]
In this article, I am going to show you how to quickly change Pivot Table data source using a drop-down […]
Rahul asks: I want to know how to create a vlookup sheet, and when we enter a name in a […]
Table of Contents How to create an interactive Excel chart How to filter chart data How to build an interactive […]
This article demonstrates how to insert and use a scroll bar (Form Control) in Excel. It allows the user to […]
Table of Contents List all hyperlinks in worksheet programmatically Find cells containing formulas with literal (hardcoded) values Extract cell references […]
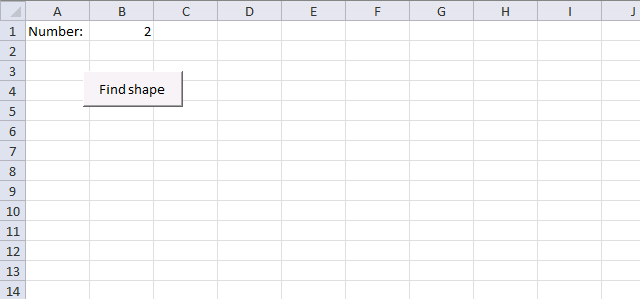
This article demonstrates how to locate a shape in Excel programmatically based on the value stored in the shape. The […]
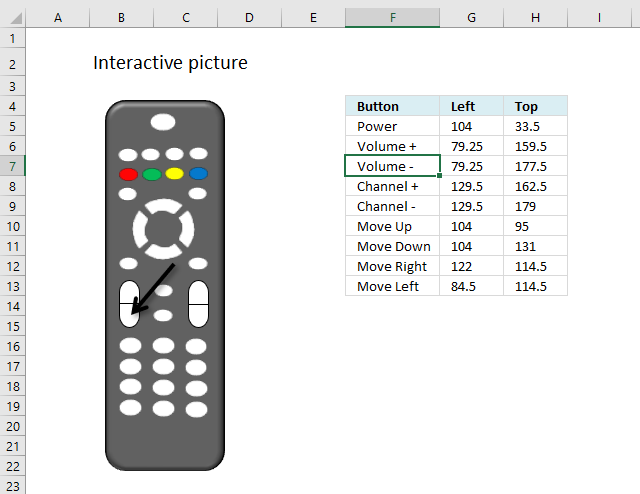
This article demonstrates how to move a shape, a black arrow in this case, however, you can use whatever shape […]
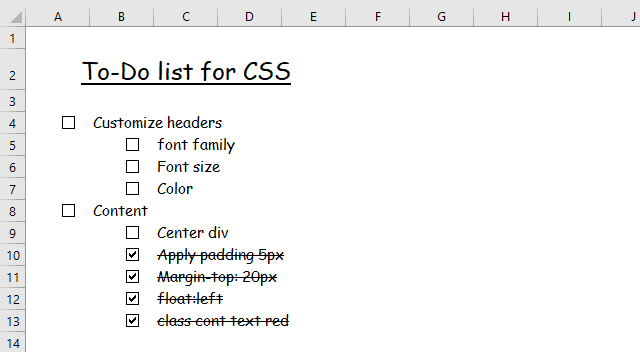
Today I will share a To-do list excel template with you. You can add text to the sheet and an […]
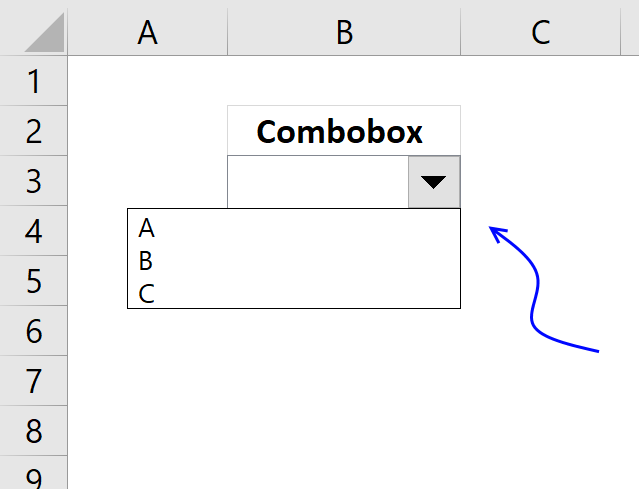
In this tutorial I am going to explain how to: Create a combo box (form control) Filter unique values and […]
Excel defined Tables, introduced in Excel 2007, sort, filter and organize data any way you like. You can also format […]
This article demonstrates how to run a VBA macro using a Drop Down list. The Drop Down list contains two […]
This article explains how to hide a specific image in Excel using a shape as a button. If the user […]
This article demonstrates how the user can run a macro by press with left mouse button oning on a button, […]
This blog post demonstrates how to create, populate and change comboboxes (form control) programmatically. Form controls are not as flexible […]
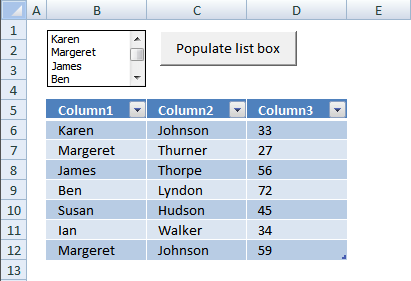
This blog post shows you how to manipulate List Boxes (form controls) manually and with VBA code. Table of Contents […]
What is a Text Box? A Text Box (Form Control) in Excel is an interactive element that allows users to […]
TEXTFRAME examples
Table of Contents How to create an interactive Excel chart How to filter chart data How to build an interactive […]
Table of Contents List all hyperlinks in worksheet programmatically Find cells containing formulas with literal (hardcoded) values Extract cell references […]
This article demonstrates how to locate a shape in Excel programmatically based on the value stored in the shape. The […]
This article demonstrates how to run a VBA macro using a Drop Down list. The Drop Down list contains two […]
This article explains how to hide a specific image in Excel using a shape as a button. If the user […]
This article demonstrates how the user can run a macro by press with left mouse button oning on a button, […]
What is a Text Box? A Text Box (Form Control) in Excel is an interactive element that allows users to […]
Form controls category
This blog post demonstrates how to create, populate and change comboboxes (form control) programmatically. Form controls are not as flexible […]
This article describes how to create a button and place it on an Excel worksheet, then assign a macro to […]
This blog post shows you how to manipulate List Boxes (form controls) manually and with VBA code. Table of Contents […]
Macro category
Table of Contents How to create an interactive Excel chart How to filter chart data How to build an interactive […]

Table of Contents Excel monthly calendar - VBA Calendar Drop down lists Headers Calculating dates (formula) Conditional formatting Today Dates […]
Table of Contents Split data across multiple sheets - VBA Add values to worksheets based on a condition - VBA […]
Excel categories
2 Responses to “Working with TEXT BOXES [Form Controls]”
Leave a Reply
How to comment
How to add a formula to your comment
<code>Insert your formula here.</code>
Convert less than and larger than signs
Use html character entities instead of less than and larger than signs.
< becomes < and > becomes >
How to add VBA code to your comment
[vb 1="vbnet" language=","]
Put your VBA code here.
[/vb]
How to add a picture to your comment:
Upload picture to postimage.org or imgur
Paste image link to your comment.
I can't edit the font information through VBA. I can edit the text using ".TextFrame.Characters.Text", but i cannot edit the font or font size.
When i try i get:
Run-time error '1004':
Unable to set the Name property of the Font class
or
Run-time error '1004':
Unable to set the Size property of the Font class
Here's my code:
'Notes: "FirstWeekNum" is a Text Box Shape on a WorkSheet. "FirstWeekScroll" is a Scrollbar Shape on a WorkSheet 'This works: Worksheets("ANALYSIS").Shapes("FirstWeekNum").TextFrame.Characters.Text = Worksheets("ANALYSIS").Shapes("FirstWeekScroll").ControlFormat.Value 'Neither of the lines following nested lines work: With Worksheets("ANALYSIS").Shapes("FirstWeekNum").TextFrame.Characters.Font .Name = "Arial" .Size = 20 End WithMy bad ... just realized my problem. I'm working with a label instead of a text box. thbpt.