Excel VBA functions
Table of Contents
- Functions
- Statements
- Methods
- Properties
1.1. How to use the ARRAY function
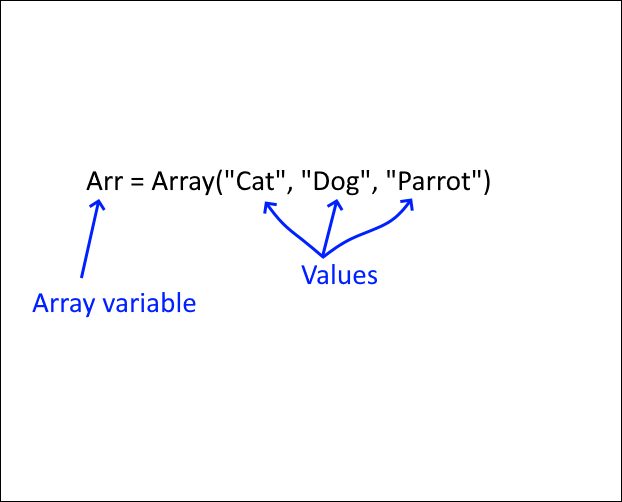
The ARRAY function creates a Variant variable containing array values.
1.1.1 Array Function VBA Syntax
Array(arglist)
1.1.2 Array Function Arguments
| arglist | A list of values. Text strings must have a beginning and ending double quote. The values must be separated by a comma. If omitted a zero-length array is created. |
1.1.3 Array Function example
'Name macro
Sub Macro1()

'Populate array variable
MyArray = Array("Cat", "Dog", "Rabbit")

'For Next statement using lower and upper boundaries of the array variable
For i = LBound(MyArray) To UBound(MyArray)

'Save array value to variable txt and a new line
txt = txt & MyArray(i) & vbNewLine

'Continue with next value
Next i

'Show message box containing contents of variable txt
MsgBox txt

'Exit macro
End Sub
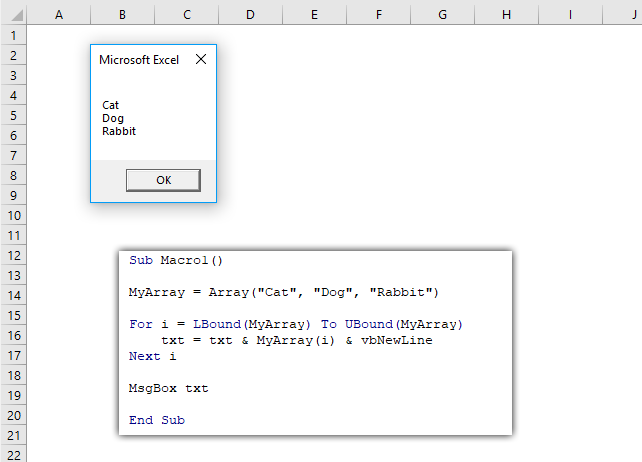
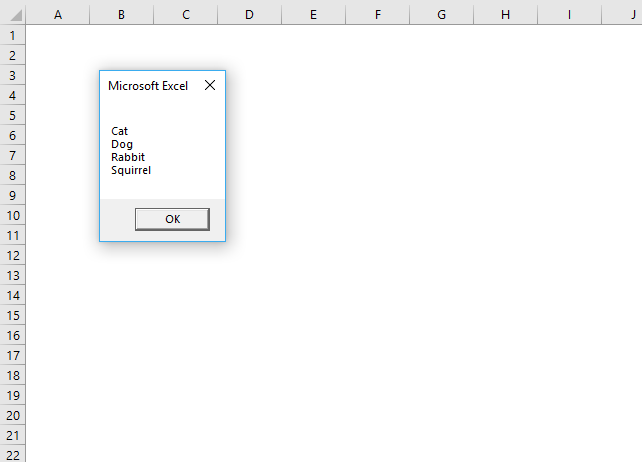
The macro above populates variable MyArray with values Cat, Dog and Rabbit.
A FOR ... NEXT statement loops through the array variable using the Lbound and Ubound function to determine the lower and upper limit of the array.
An ampersand then concatenates the values and lastly, the msgbox shows the concatenated string.
1.1.4 Alternative way to populate an array variable
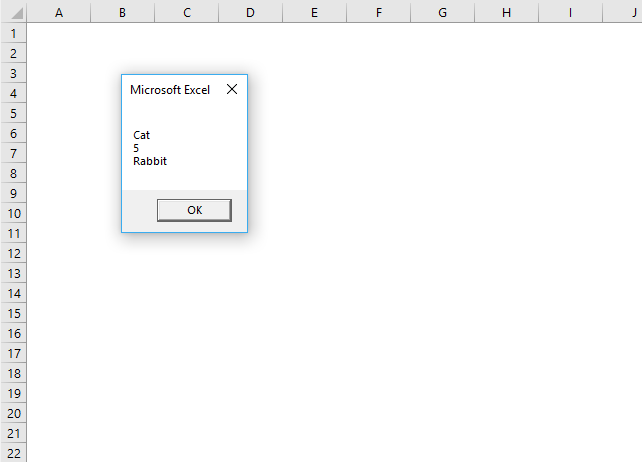
The following macro demonstrates another way to create an array variable. [arglist] means evaluate.
'Name macro
Sub Macro2()

'Populate array variable using brackets and curly brackets
MyArray = [{"Cat", 5, "Rabbit"}]

'For Next statement using lower and upper boundaries of the array variable
For i = LBound(MyArray) To UBound(MyArray)

    'Save array value to variable txt and a new line
    txt = txt & MyArray(i) & vbNewLine

'Continue with next value
Next i

'Show message box containing contents of variable txt
MsgBox txt

'Exit macro
End Sub
1.1.5 Populate a two-dimensional array variable
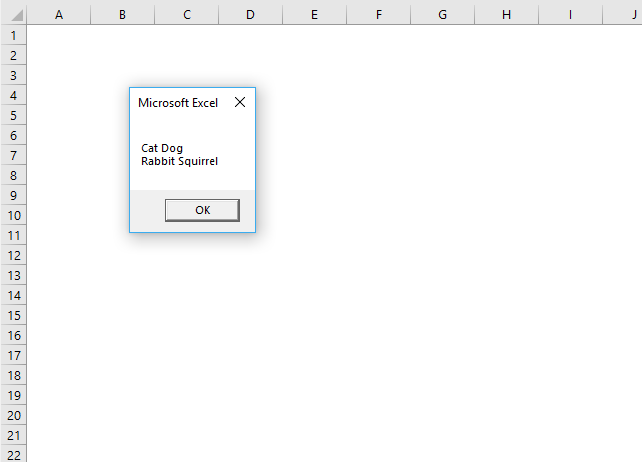
This macro creates array variable MyArray with values in two dimensions.
'Name macro
Sub Macro3()

'Populate array variable using two Array functions
MyArray = Array(Array("Cat", "Dog"), Array("Rabbit", "Squirrel"))

'For Next statement for rows
For r = 0 To 1

    'For Next statement for columns
    For c = 0 To 1

        'Save array value to variable txt and a new line
        txt = txt & MyArray(r)(c) & " "
    'Continue with next value
    Next c

    'Add a new line to variable txt
    txt = txt & vbNewLine

'Continue with next value
Next r

'Show message box containing contents of variable txt
MsgBox txt

'Exit macro
End Sub
1.1.6 Alternative way to populate a two-dimensional array variable
This macro populates array variable MyArray with values in two dimensions using the evaluate characters.
'Name macro
Sub Macro4()

'Populate array variable using brackets and curly brackets
MyArray = [{"Cat", "Dog"; "Rabbit", "Squirrel"}]

'For Next statement for rows using lower and upper boundaries
For r = LBound(MyArray, 1) To UBound(MyArray, 1)

    'For Next statement for columns using lower and upper boundaries
    For c = LBound(MyArray, 2) To UBound(MyArray, 2)

        'Save array value to variable txt and a new line
        txt = txt & MyArray(r, c) & vbNewLine

    'Continue with next value
    Next c

'Continue with next value
Next r

'Show message box containing contents of variable txt
MsgBox txt

'Exit macro
End Sub
1.2. How to use the FIX function
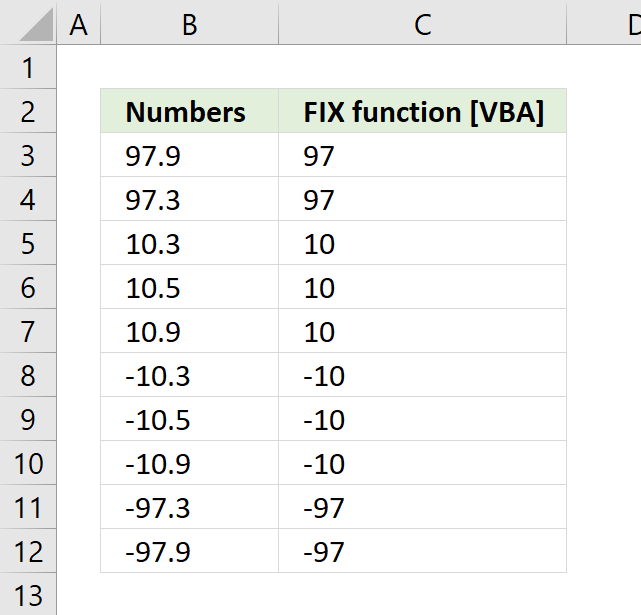
The FIX function removes the decimals from the argument.
Excel Function VBA Syntax
Fix(number)
Arguments
| number | Required. Is a Double or any valid numeric expression. If number is 0 (zero) then 0 (zero) is returned. |
Comments
I used the following macro to show how the Fix function behaves with different arguments.
Sub Macro1()
   For Each cell In Range("B3:B12")
       cell.Offset(, 1) = Fix(cell.Value)
    Next cell
End Sub
Formula equation
Fix(number) = Sgn(number) * Int(Abs(number))
1.3. How to use the INT function
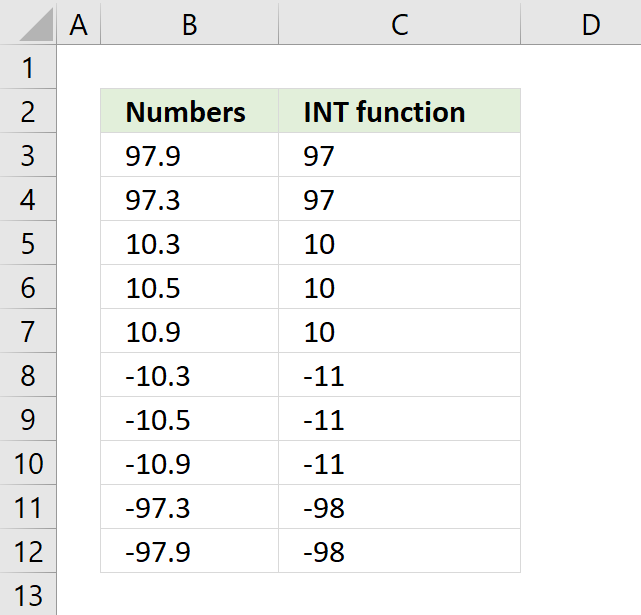
The INT function removes the decimals if the numeric value is above 0 (zero) and returns a negative integer less than or equal to the given argument.
The image above demonstrates how the INT function works. The fractional part of a positive number is removed leaving only the positive integer, example: 10.9 => 10, however, a negative number, example -10.3 is converted to the negative integer that is less than or equal to the argument. -10.3 => -11.
INT Function VBA Syntax
Int ( number )
INT Function Arguments
| number | Required. Is a Double or any valid numeric expression. If number is 0 (zero) then 0 (zero) is returned. |
INT Function example
I used the following macro to show how the INT function behaves with different arguments.
Sub Macro1()
   For Each cell In Range("B3:B12")
       cell.Offset(, 1) = Int(cell.Value)
    Next cell
End Sub
1.4. How to use the JOIN function
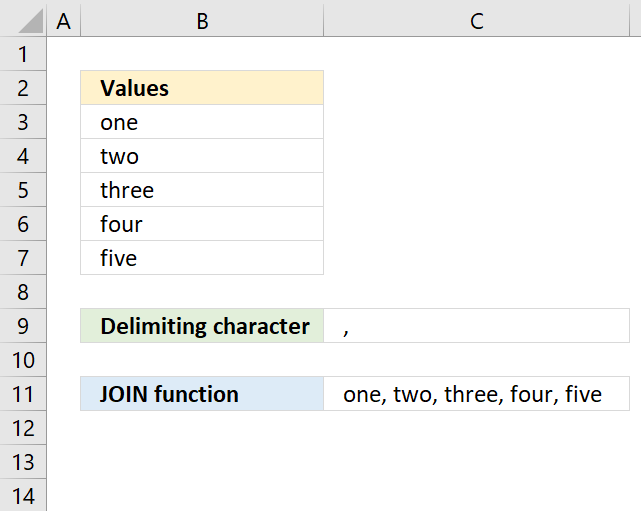
The JOIN function concatenates a set of substrings in an array, the image shows a user-defined function entered in cell C11.
Join Function VBA Syntax
JOIN(sourcearray, [delimiter])
Join Function Arguments
| sourcearray | Required. A one-dimensional array. |
| [delimiter] | Optional. A delimiting character, the default value is " " (space character). |
Join Function Example
The following user-defined function demonstrates the JOIN function.
Function JoinStrings(rng As Range, del As String)

rng1 = Application.Transpose(rng.Value)
JoinStrings = Join(rng1, del)

End Function
The JoinStrings function lets you use two arguments, the first one being a cell range and the second one a text string. The JOIN function concatenates the substrings in array variable rng1 using the delimiting character found in variable del.
1.5. How to use the LBOUND and UBOUND functions
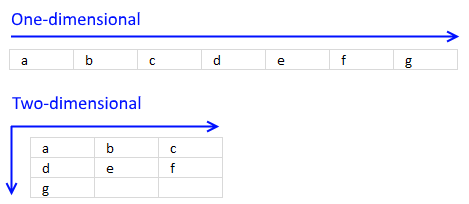
The Lbound and Ubound functions calculate the size of of an array. The Lbound returns the lower limit of an array and the Ubound function returns the upper limit.
Sub Macro4()

Rng = Range("D2:F6").Value

MsgBox "Lower bound(1): " & LBound(Rng, 1) & vbNewLine & _
        "Upper bound(1): " & UBound(Rng, 1) & vbNewLine & _
        "Lower bound(2): " & LBound(Rng, 2) & vbNewLine & _
        "Upper bound(2): " & UBound(Rng, 2)

End Sub
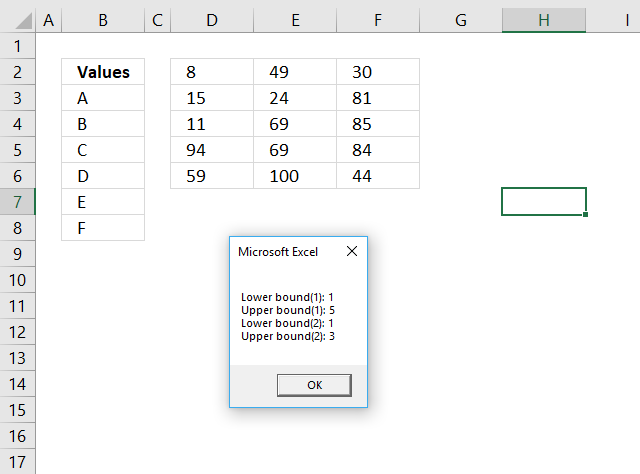
The macro above populates variable Rng with values from range D2:F6, the Lbound and Ubound functions then return the lower and upper limits for the first dimension (rows) and the second dimension (columns).
LBOUND and UBOUND functions VBA Syntax
LBound( arrayname, [dimension] )
UBound( arrayname, [dimension] )
LBOUND and UBOUND functions Arguments
| arrayname | Required. The array variable. |
| [dimension] | Optional. Which dimension to use, the default value is 1. |
LBOUND and UBOUND functions Example
The following macro creates array variable TestArray with one dimension, lower limit of 1 and upper limit of 3.
Sub Macro1()

Dim TestArray(1 To 3)
MsgBox LBound(TestArray) & vbNewLine & UBound(TestArray)

End Sub
This macro creates array variable TestArray with two dimensions, the first dimension has the lower limit of 1 and an upper limit of 3, the second dimension has the lower limit of 1 and the upper limit of 10.
Sub Macro2()

Dim TestArray(1 To 3, 1 To 10)
MsgBox "Lower bound(1): " & LBound(TestArray, 1) & vbNewLine & _
        "Upper bound(1): " & UBound(TestArray, 1) & vbNewLine & _
        "Lower bound(2): " & LBound(TestArray, 2) & vbNewLine & _
        "Upper bound(2): " & UBound(TestArray, 2)

End Sub
This macro populates array variable TestArray with values from cell range B3:B8, the first dimension has the lower limit of 1 and an upper limit of 6, the second dimension has the lower limit of 1 and the upper limit of 1.
Sub Macro3()

Rng = Range("B3:B8").Value
MsgBox "Lower bound(1): " & LBound(Rng, 1) & vbNewLine & _
        "Upper bound(1): " & UBound(Rng, 1) & vbNewLine & _
        "Lower bound(2): " & LBound(Rng, 2) & vbNewLine & _
        "Upper bound(2): " & UBound(Rng, 2)

End Sub
1.6. How to use the SGN function
The SGN function returns an integer that shows the sign of the number.
| Argument | SGN returns |
| Number greater than 0 (zero). | 1 |
| Number equal to 0 (zero). | 0 |
| Number less than 0 (zero). | -1 |
Excel Function VBA Syntax
SGN(number)
Arguments
| number | Required. Any valid numeric expression. If number is 0 (zero) then 0 (zero) is returned. |
Comments
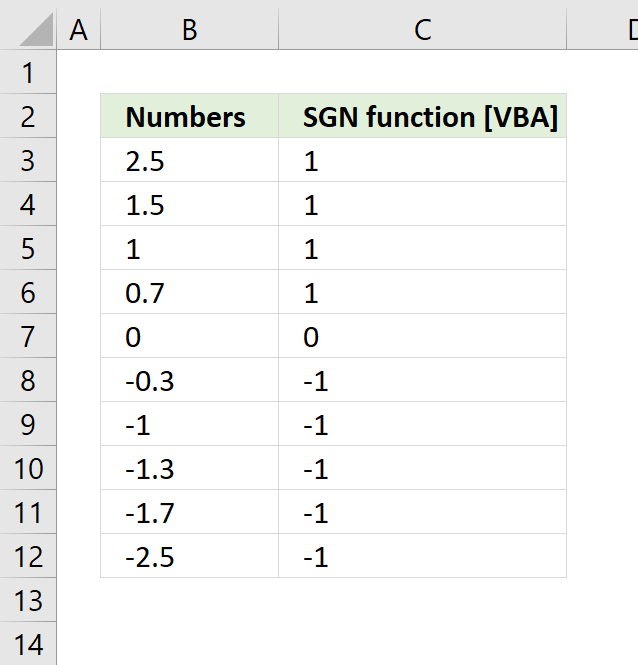
I used the following macro to show how the SGN function behaves with different numerical values demonstrated in the picture above.
Sub Macro1()
   For Each cell In Range("B3:B12")
       cell.Offset(, 1) = SGN(cell.Value)
    Next cell
End Sub
1.7. How to use the SPLIT function
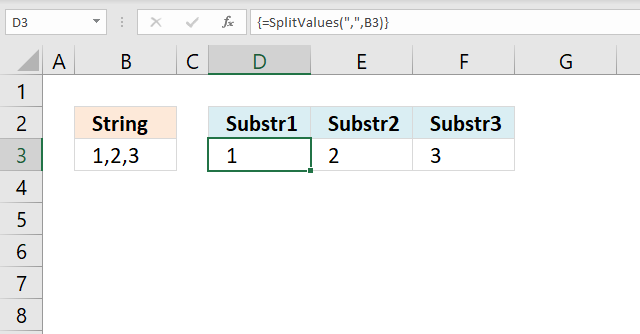
The picture above shows a user-defined function (UDF) that splits the string in cell C3 using a delimiting character ",". It then returns an array of values to cell range D3:F3.
The SPLIT function is a function you can use in Visual Basic for Applications, abbreviation VBA.
It returns a one-dimensional array containing substrings from a divided string based on a delimiting character.
The returning array is zero-based meaning the first substring starts with index 0 (zero), example below.
Array(0) = "a"
Array(1) = "b"
Array(2) = "c"
Array(3) = "d"
1.7.1 SPLIT Function Syntax - VBA
Split(expression ,[delimiter], [limit], [compare])
1.7.2 SPLIT Function Arguments - VBA
| expression | Required. A string you want to split. |
| [delimiter] | Optional. The delimiting character, default value is " ", in other words, a space character. |
| [limit] | Optional. How many substrings to be returned, default value is all substrings. |
| [compare] | Optional. A numeric value determining how Excel compares when processing. |
The following table shows the numeric values you can use in the compare parameter above.
| Constant | Value | Description |
| vbUseCompareOption | -1 | Comparison using the setting of the Option Compare statement. |
| vbBinaryCompare | 0 | Binary comparison |
| vbTextCompare | 1 | Textual comparison |
| vbDatabaseCompare | 2 | Microsoft Access only. Performs a comparison based on information in your database. |
1.7.3 Example 1
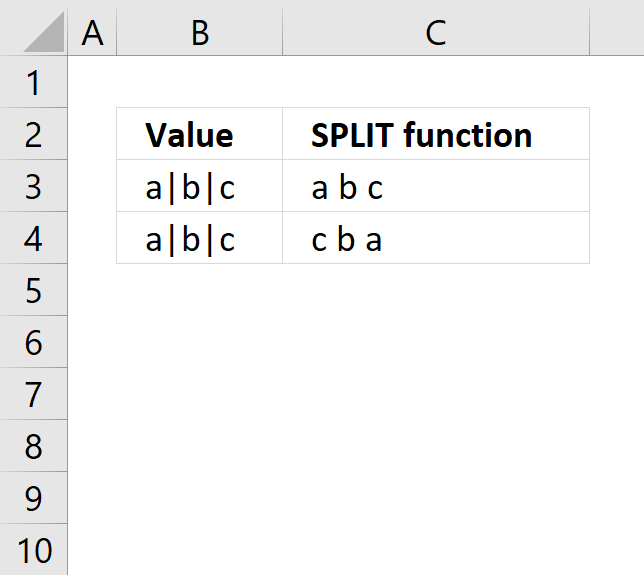
The following UDF is demonstrated in the picture above in cell C3, it uses "|" to split the string in cell B3. The substrings are then concatenated with a space character between substrings. The returning value is shown in cell C3.
'Name User Defined Function and arguments
Function SplitValues(rng As Range)

'Dimension variables and declare data types
Dim Arr() As String
Dim Str As Variant
Dim result As String

'Split value in variable Rng using delimiting character |
Arr = Split(rng, "|")

'Iterate through each substring
For Each Str In Arr

    'Concatenate each substring and save to variable result
    result = result & Str & " "
Next

'Return variable result to User Defined Function on worksheet
SplitValues = Trim(result)

End Function
1.7.4 Example 2
The second UDF is shown in cell C4, it does the same thing as the first UDF above except it returns the last substrings first, in other words, substrings are concatenated backward.
Function SplitValues1(rng As Range)
Dim Arr() As String
Dim Str As Variant
Dim result As String
Dim i As Integer

Arr = Split(rng, "|")

For i = UBound(Arr) To 0 Step -1
    result = result & Arr(i) & " "
Next i

SplitValues1 = Trim(result)

End Function
1.7.5 Split cell value using a delimiting character
The image above demonstrates a UDF in cell C1 that splits the cell value in cell A1 to substrings using a delimiting character.
The first argument is the delimiting character or characters, the second argument is a cell reference to a cell. The UDF is entered as an array formula if you use an Excel version that is older than Excel 365.
'Name User Defined Function and arguments
Function SplitValues(a As String, b As String)

'Dimension variables and declare data types
Dim Text() As String

'Split variable b using variable a as the delimiting character, save to variable Text
Text = Split(b, a)

'Return output stored in variable Text to User Defined Function
SplitValues = Text
End Function
1.7.5.1 How to use it
- Select cell range C1:E1.
- Type =SplitValues(",",A1) in the formula bar.
- Press and hold CTRL + SHIFT simultaneously.
- Press Enter once.
- Release all keys.
If you did this right, the formula has now a leading { and an ending }, like this {=SplitValues(",",A1)}. They appear automatically, don't enter these characters yourself.
1.7.5.2 Explaining the user-defined function
Function name and arguments
A user defined function procedure always start with "Function" and then a name. This udf has two arguments, a and b. Both a and b are strings.
Function SplitValues(a As String, b As String)
Declaring variables
Dim Text() As String
Text() is a dynamic string array. Read more about Defining data types.
Split function
Text = Split(b, a)
The Split function accepts a text string and returns a zero-based, one-dimensional array containing all sub strings. Split allows you also to specify a delimiting character, default is the space character. The substrings are stored as multiple strings in Text array.
The udf returns the substrings in Text
SplitValues = Text
End a udf
End function
A function procedure ends with the "End function" statement.
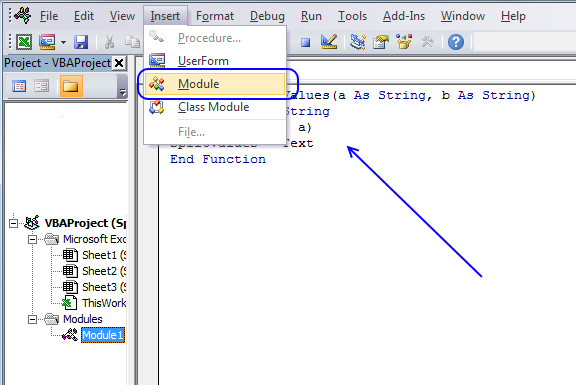
1.7.5.3 Where to put the code?
To build a user-defined function, follow these steps:
- Press Alt + F11 to open the visual basic editor
- Press with left mouse button on "Insert" on the menu
- Press with left mouse button on "Module"
- Copy the code above and paste it to the code module.
2.1 How to use the WITH ... END WITH statement
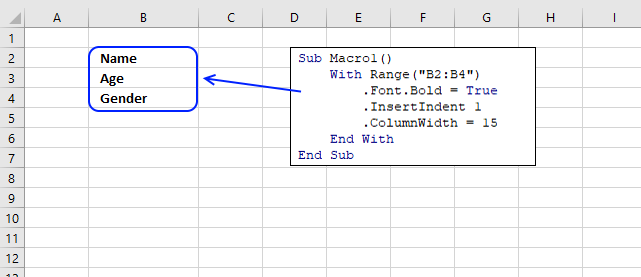
The With ... End With statement allows you to write shorter code by referring to an object only once instead of using it with each property.
The picture above shows a macro that changes a few properties of the Range Object.
Statement Syntax
With object
[ code]
End With
The following macro changes the cells in cell range B2:B4 to bold, indents the text and changes the column width to 15.
Sub Macro1()
With Range("B2:B4")
    .Font.Bold = True
    .InsertIndent 1
    .ColumnWidth = 15
End With
End Sub
2.2 How to use the SET statement
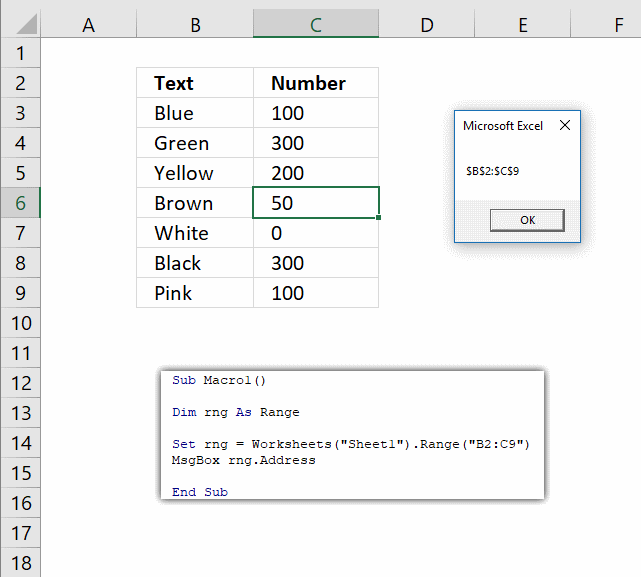
The SET statement allows you to save an object reference to a variable, the image above demonstrates a macro that assigns a range reference to a range object.
For example, the DIM statement (among others) only declare a variable but it will be empty, nothing is referred until you assign an object using the SET statement.
What is an Excel object? It can be a chart, worksheet, a cell range or a shape among other things basically. Each object has usually a number of properties that you may change, for example, a worksheet may be hidden by changing the visible property to False.
The following macro is used in the above example.
'Name macro
Sub Macro1()

'Declare variable
Dim rng As Range

'Assign object
Set rng = Worksheets("Sheet1").Range("B2:C9")

'Show object address
MsgBox rng.Address

End Sub
Excel Statement Syntax
Set objectvar = {[ New ] objectexpression | Nothing }
Syntax Explained
| Excel Name | Description |
| objectvar | The name of the object variable. |
| New | Optional. Is used to create an object. |
| objectexpression | A name of an object or another object variable with the same object type. |
| Nothing | Deletes object. Recommended if an object holds a lot of memory that you don't need anymore. |
Comments
How can I create a new worksheet and assign it to an object variable?
The following macro creates a new worksheet and then shows the worksheet name using the assigned object.
Sub Macro2()

Set obj = Sheets.Add
MsgBox obj.Name

End Sub
2.3 How to use the GOTO statement
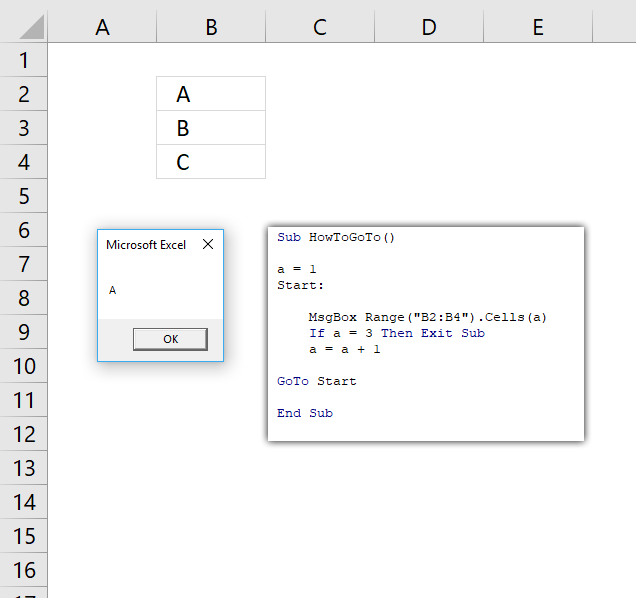
The image above demonstrates the GoTo statement. It "jumps" or "navigates" to another place in the code, in this case, "Start".
VBA code
Sub HowToGoTo()

a = 1
Start:

    MsgBox Range("B2:B4").Cells(a)
    If a = 3 Then Exit Sub
    a = a + 1

GoTo Start

End Sub
Explaining subroutine
- The subroutine begins with variable a setting it equal to 3.
- Start: is a label which the GoTo statement use in order to know where to "jump".
- The message box appears and shows the value in cell range B2:B4 based on what variable a contains.
- The IF THEN statement checks if variable a is equal to 3 and exits the subroutine if the condition is met.
- Variable a is added with number 1.
- The GoTo statement makes the code "jump" to label "Start:"
- The subroutine is repeated until a is equal to 3.
The GoTo statement is mostly used in error handling techniques. I recommend using For Next, Do While or Do Loop since they make your code easier to follow and understand.
2.4 How to use SELECT CASE statement
The SELECT CASE statement allows you to compare an expression to multiple values.
It is similar to the IF THEN ELSE statement except that the IF THEN ELSE statement can evaluate multiple expressions. The SELECT CASE statement evaluates one expression.
2.4.1. SELECT CASE statement Syntax
Select Case testexpression
[ Case expressionlist-n [ statements-n ]]
[ Case Else [ elsestatements ]]
End Select
2.4.2. SELECT CASE statement Parameters
| testexpression | Required. Any expression:
numeric expression - You can use variables, constants, keywords, and operators. The result is a number. string expression - Any expression that returns a string. |
| expressionlist-n | Required.
True - ignore empty cells in the third argument. False - adds empty cells to the result. |
| statements-n | Required. The cell range you want to concatenate. |
| elsestatements | Optional. Up to 254 additional cell ranges. |
2.4.3. SELECT CASE statement example 1
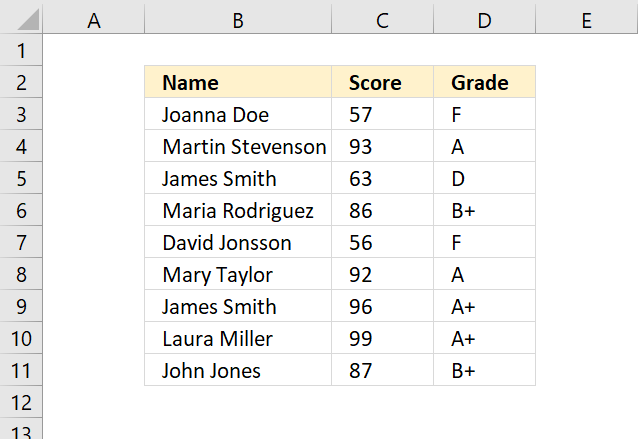
The User Defined Function above compares the score to several criteria and returns the corresponding grade.
The UDF is entered in column D and takes the score from column C and returns the grade.
UDF in cell D3:
VBA Code
Function Grade(score)

Select Case score
Case Is < 60
Grade = "F"
Case 61 To 64
Grade = "D"
Case 65 To 69
Grade = "D+"
Case 70 To 74
Grade = "C"
Case 75 To 79
Grade = "C+"
Case 80 To 84
Grade = "B"
Case 85 To 89
Grade = "B+"
Case 90 To 94
Grade = "A"
Case Else
Grade = "A+"
End Select

End Function
2.4.4. SELECT CASE statement example 2
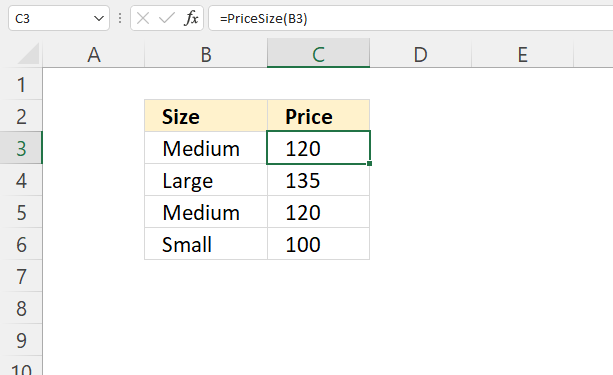
Formula in cell D3:
VBA Code
Function PriceSize(size)

Select Case size
    Case Is = "Small"
        PriceSize = 100
    Case Is = "Medium"
        PriceSize = 120
    Case Is = "Large"
        PriceSize = 135
    End Select

End Function
2.4.5. SELECT CASE statement - VBA alternative
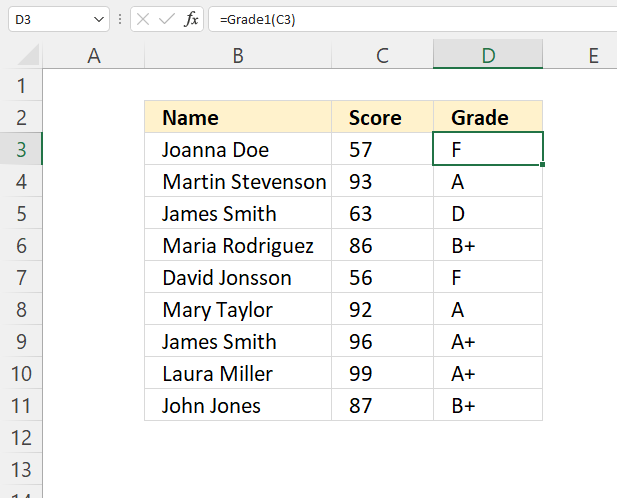
Formula in cell D3:
VBA Code
Function Grade1(score)

If score < 60 Then
    Grade1 = "F"

ElseIf score <= 64 And score >= 61 Then
    Grade1 = "D"

ElseIf score <= 65 And score >= 69 Then
    Grade1 = "D+"

ElseIf score <= 74 And score >= 70 Then
    Grade1 = "C"

ElseIf score <= 79 And score >= 75 Then
    Grade1 = "C+"

ElseIf score <= 84 And score >= 80 Then
    Grade1 = "B"

ElseIf score <= 89 And score >= 85 Then
    Grade1 = "B+"

ElseIf score <= 94 And score >= 90 Then
    Grade1 = "A"

Else
    Grade1 = "A+"

End If

End Function
2.4.6. SELECT CASE statement - Excel Function alternative
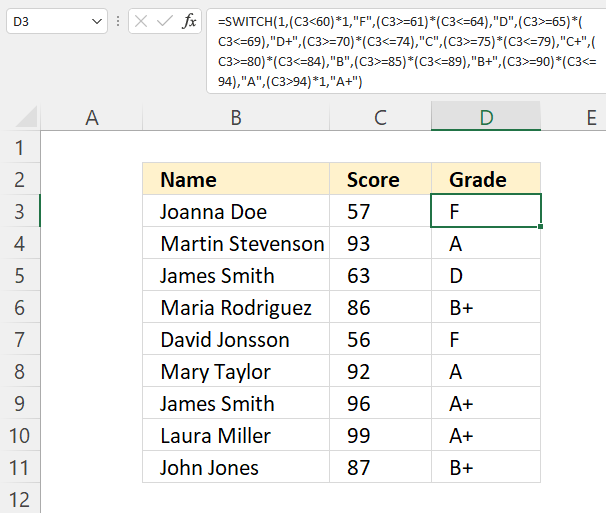
Formula in cell D3:
Get Excel *.xlsm file
How to use SELECT CASE statement.xlsm
2.5 How to use the FOR NEXT statement
Table of Contents
- FOR NEXT statement
- FOR NEXT with a counter variable
- FOR each NEXT example
- FOR NEXT with counter variable and STEP keyword
- FOR NEXT and EXIT FOR statements
- FOR each NEXT - array values
- Get Excel *.xlsx file
2.5.1. FOR NEXT Syntax
For counter = start To end Step step
... statements ...
[ Exit For ]
... statements ...
Next [ counter ]
counter is a variable
start, end, and step are numbers
2.5.2. FOR NEXT with a counter variable
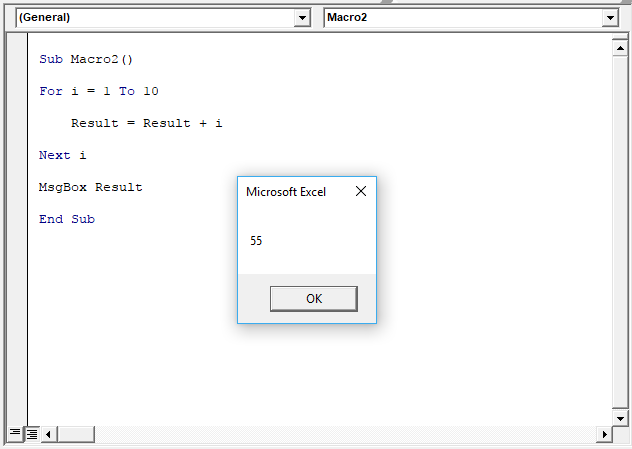
You can have a variable that counts for you, in this case, it is variable i. The FOR NEXT statement runs the lines between FOR and NEXT ten times incrementing variable i with 1 each time. See picture above.
It starts with 1 and continues up to 10. 1+2+3+4+5+6+7+8+9+10 = 55. It is not necessary to include the variable name after the NEXT statement, however, it will be easier to read your code if you do so.
The message box then displays the sum. As soon as you press with left mouse button on the OK button the macro ends.
'Name macro
Sub Macro1()

'For Next statement
For i = 1 to 10

'Add number stored in variable i to variable Result
Result = Result + i

'Continue with next number
Next i

'Display message box containing number stored in variable Result
MsgBox Result

'Exit macro
End Sub
2.5.3. FOR each NEXT example
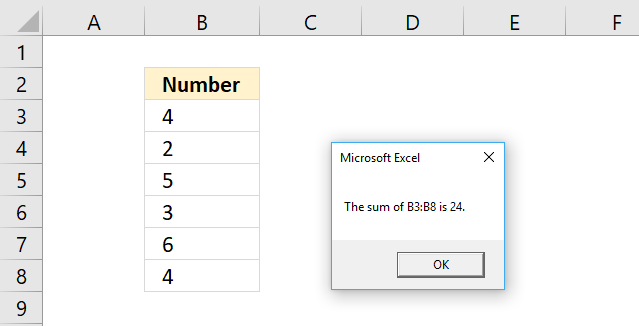
The picture above demonstrates a FOR NEXT statement that goes through each cell value in cell range B3:B8 and adds it to a total.
The Message box then displays the sum. 4+2+5+3+6+4 is 24. Here is the subroutine:
'Name macro
Sub Macro1()

'For each Next statement
For Each Value In Range("B3:B8")

    'Add value to variable Result
    Result = Result + Value

'Continue with next value in cell range
Next Value

'Display message box containing number in variable result
MsgBox Result

'Exit macro
End Sub
The Value variable stores the number from cell B3 in the first iteration then continues to B4 and overwrites the previous value, and so on. The Result variable adds each value in every iteration and builds a sum.
The macro repeats the lines between FOR and NEXT as many times as there are cells in Range("B3:B8).
The message box displays the sum and you then need to press with left mouse button on the OK button to proceed.
2.5.4. FOR NEXT with counter variable and STEP keyword
The STEP keyword allows you to increase or decrease the counter value with a number you specify.
If you use a negative step number make sure the end counter number is less than the start counter number to avoid your macro being in an endless loop.
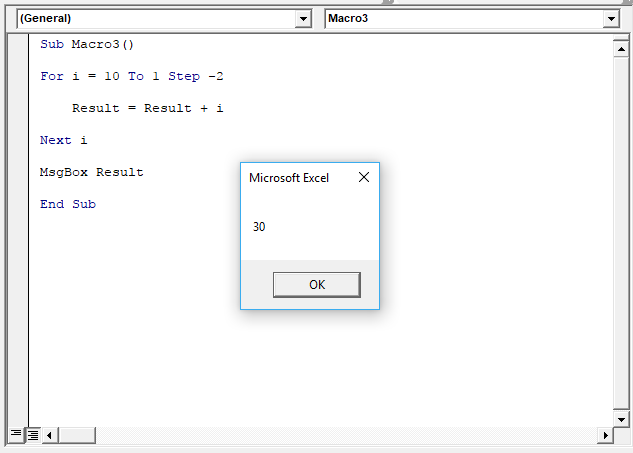
In the above example, the counter variable is i and it starts with 10 and ends with 1, the STEP value is -2. 10+8+6+4+2=30.
'Name macro
Sub Macro1()

'For each Next statement
For i = 10 To 1 Step -2

'Add value to variable Result
Result = Result + i

'Continue with next value in cell range
Next i

'Display message box containing number in variable result
MsgBox Result

'Exit macro
End Sub
2.5.5. FOR NEXT and EXIT FOR statements
The EXIT FOR statement allows you to stop iterating through a FOR NEXT statement which is handy if, for example, an error value shows up.
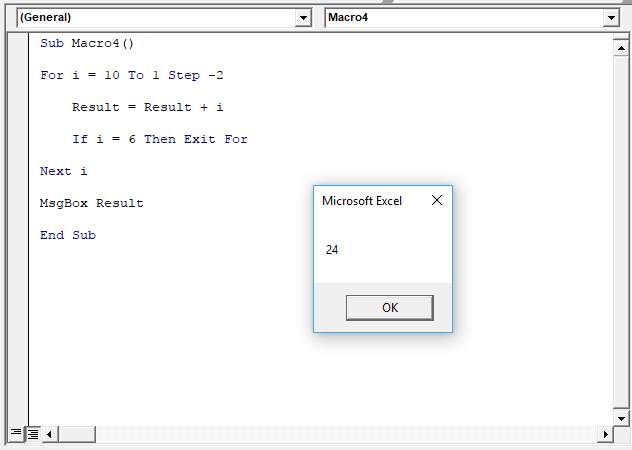
The picture above uses the IF THEN statement to check if counter variable i is equal to 6. 10 + 8 + 6 = 24.
'Name macro
Sub Macro1()

'For each Next statement
For i = 10 To 1 Step -2

'Add value to variable Result
Result = Result + i

'Check if variable i equals 6 and Exit For Next statement if true
If i = 6 then Exit For

'Continue with next value in cell range
Next i

'Display message box containing number in variable result
MsgBox Result

'Exit macro
End Sub
2.5.6. FOR each NEXT - array values
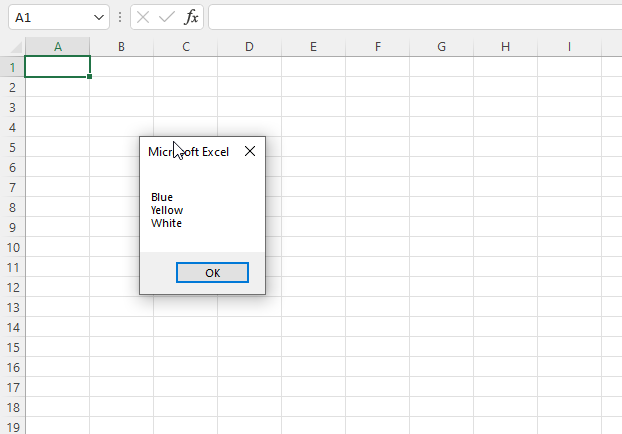
The code below demonstrates a FOR NEXT statement that goes through each value in an array variable.
The Message box then displays each array value on a new line. Here is the subroutine:
'Name macro
Sub Macro1()

'Save values to an array variable
arr = Array("Blue", "Yellow", "White")
'For each Next statement
For i = LBound(arr) To UBound(arr)

    'Concatenate array value to variable txt and a new line
    res = res & arr(i) & vbNewLine

'Continue with next value in array
Next i

'Display message box containing number in variable res
MsgBox res

'Exit macro
End Sub
2.5.7 Get Excel *.xlsx file
How to use the FOR NEXT statement.xlsm
2.6 How to use the DO LOOP statement
The Do Loop statement allows you to repeat specific code until a condition is met.
Table of Contents
- Introduction
- Syntax
- Example 1
- Example 2
- Example 3
- Example 4
- Example 5
2.6.1. Introduction
What is VBA?
VBA (Visual Basic for Applications) is a programming language and development environment that is integrated into various Microsoft Office applications, such as Excel, Word, PowerPoint, Access, and Outlook. It allows users to automate tasks, create custom functions, and develop sophisticated applications within the context of these Office programs.
Do I need VBA?
The latest version of Microsoft Excel, Excel 365, has introduced new built-in functions that allow users to create loops and recursive functions directly within the spreadsheet, without the need for VBA (Visual Basic for Applications) programming.
These new Excel functions provide a more native and user-friendly way to implement iterative and recursive logic which were previously only achievable through VBA code. This can be particularly useful for users who want to perform complex calculations or automate repetitive tasks without having to delve into the complexities of VBA.
This article: How to replace part of formula in all cells provides examples that demonstrate a recursive LAMBDA function. You can find more recursive LAMBDA functions here.
2.6.2. Syntax
There are several possible ways you can use Do Loop with the While statement, here is the first one.
Statement Syntax 1
DO WHILE [condition]
[CODE]
LOOP
As you can see the While statement is after the Do statement. This makes it possible to avoid the Do Loop altogether if the condition is not met.
Statement Syntax 2
DO
[CODE]
LOOP WHILE [condition]
You can also use the While statement after the Loop statement, this makes the macro go through the Do Loop statement at least one time even if the condition is not met.
Statement Syntax 3
DO WHILE [condition]
IF [condition] THEN EXIT DO
[CODE]
LOOP
The IF [condition] THEN EXIT DO statement within a DO WHILE loop in VBA is useful when you want to provide an additional condition to exit the loop, beyond the main loop condition.
This can be useful in situations where you need to check for a specific condition that should cause the loop to terminate, even if the main loop condition is still true. For example, you might have a loop that iterates through a range of cells, but you want to exit the loop if you encounter a specific value in one of the cells.
By using the IF [condition] THEN EXIT DO statement, you can add an additional layer of control to your loop, allowing you to exit it more precisely when a specific condition is met, without having to restructure the entire loop logic.
Statement Syntax 4
DO UNTIL [condition]
[CODE]
LOOP
The DO UNTIL [condition] loop is useful when you want to run a block of code repeatedly until a specific condition is met. This can be helpful in scenarios where you need to perform an action or retrieve data until a certain condition is satisfied such as waiting for user input, checking for the existence of a file, or processing data until a specific value on the worksheet is found.
2.6.3. Example 1 - Do While
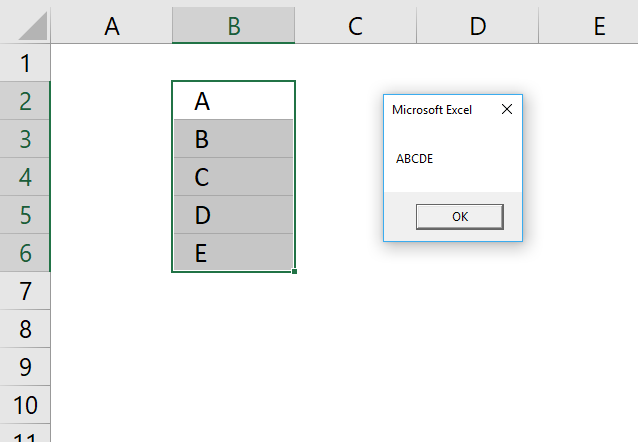
The macro below, demonstrated in above picture, concatenates values from cell range B2:B6 as long as variable r is smaller than 7. Cell range B2:B6 contains A, B, C, D, and E.
The macro displays a message box containing the values in cells B2 to B. It has an OK button that allows you to dismiss the message box after reading it.
Sub Macro1()

' Initialize row counter
r = 1

' Start a loop that continues while r is less than 6
Do While r < 6

    ' Concatenate the value of the current cell to the result string
    result = result & Range("B2:B6").Cells(r, 1)

    ' Increment the row counter
    r = r + 1

Loop

' Display the final result in a message box
MsgBox result

End Sub
The condition is at the beginning of the DO ... LOOP which makes the it skip the statements all together if the condition is not met.
2.6.4. Example 2 - Loop While
The macro below, demonstrated in above picture, concatenates values from cell range B2:B6 as long as variable r is smaller than 7. Cell range B2:B6 contains A, B, C, D, and E.
The macro displays a message box containing the values in cells B2 to B. It has an OK button that allows you to dismiss the message box after reading it.
Sub Macro2()

' Initialize row counter
r = 1

' Start a loop
Do

    ' Concatenate the value of the current cell to the result string
    result = result & Range("B2:B6").Cells(r, 1)

    ' Increment the row counter
    r = r + 1

'Continue the loop as long as r is less than 6
Loop While r < 6

' Display the final result in a message box
MsgBox result

End Sub
The condition is at the end of the DO ... LOOP which may go through the statements at least one time even if the condition is not met.
2.6.5. Example 3 - Exit Do
The Exit Do allows you to stop a Do Loop before the condition is met. The macro then continues with the line right below Loop, if there is one.
Statement Syntax
DO WHILE [condition]
IF [condition] THEN EXIT DO
[CODE]
LOOP
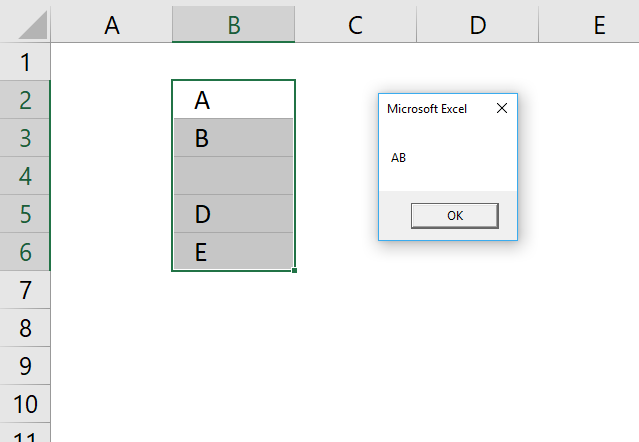
The following macro stops the Do Loop if cell value is empty, it then continues with the line just under Loop which is Messagebox.
This is why the message box displays only two concatenated values on the picture above, the third cell is empty.
Sub Macro3()

' Initialize the row index to 1
r = 1

' Start a loop that continues until the row index is less than 6
Do While r < 6

    ' Check if the cell in the current row is empty
    If Range("B2:B6").Cells(r, 1) = "" Then Exit Do

    ' Concatenate the value in the current cell to the result variable
    result = result & Range("B2:B6").Cells(r, 1)

    ' Increment the row index by 1
    r = r + 1

Loop

' Display the result in a message box
MsgBox result
End Sub
2.6.6. Example 4 - Do Until Loop
The While statement allows you to iterate through the Do Loop while the condition is true.
The Until statement runs the code until the condition is met.
Statement Syntax
DO UNTIL [condition]
[CODE]
LOOP
If the Until condition is not met the entire do loop structure is ignored, the macro continues with the row below Loop.
Example macro
Sub Macro4()

' Initialize the row index to 1
r = 1

' Start a loop that continues until the row index is equal to 6
Do Until r = 6

    ' Concatenate the value in the current cell to the result variable
    result = result & Range("B2:B6").Cells(r, 1)

    ' Increment the row index
    r = r + 1

Loop

' Display the result in a message box
MsgBox result
End Sub
2.6.7. Example 5 - Loop Until
Statement Syntax 2
DO
[CODE]
LOOP UNTIL [condition]
In this case the code between Do and Loop is rund at least once.
Example macro 2
Sub Macro5()

' Initialize the row index to 1
r = 1

'Start loop
Do

    ' Concatenate the value in the current cell to the result variable
    result = result & Range("B2:B6").Cells(r, 1)

    ' Increment the row index by 1
    r = r + 1

'Continue loop until variable r = 6
Loop Until r = 6

' Display the result in a message box
MsgBox result
End Sub
Get Excel *.xlsm file
How to use the Do Loop statement.xlsm
2.7 How to use the IF THEN ELSE ELSEIF END IF statement
This article demonstrates how to use the If ... Then statement in Visual Basic for Applications (VBA). You can combine the If ... Then statement with Else and ElseIf to make it more versatile and create more advanced conditions.
Table of Contents
- How to use the If ... Then statement (VBA)
- If ... Then condition: larger than
- If ... Then condition: equal to
- If ... Then condition: not equal to
- How to use the If ... Then ... End If statement (VBA)
- How to use the If Then Else Endif statement (VBA)
- How to use the If Then Elseif Else End if statement (VBA)
- Where to put the code?
- How to run a macro
- Get Excel *.xlsx file
2.7.1. How to use the If ... then statement
The picture above demonstrates an If ... Then statement using a condition, you can use logical operators like the:
- < less than sign
- > greater than sign
- = equal sign
- <> not equal signs meaning a smaller than and a larger than sign combined.
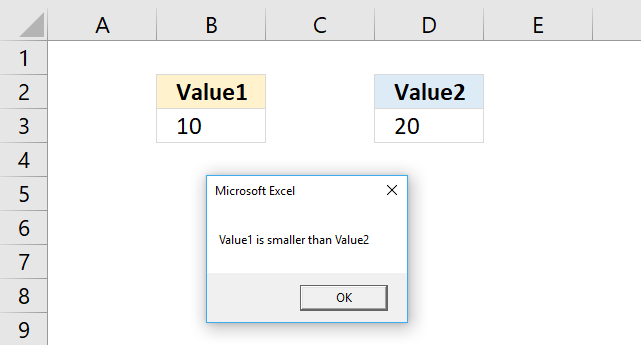
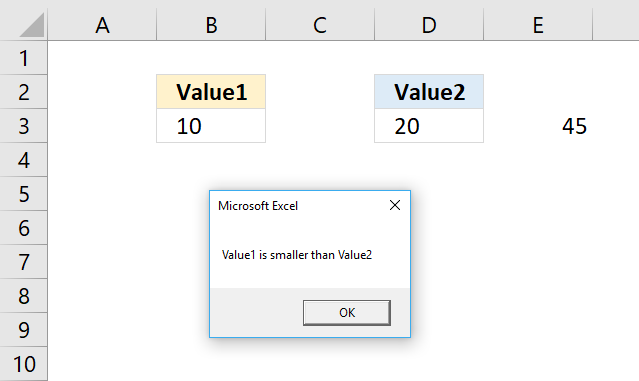
This particular example checks if the value in B3 is smaller than the value in cell D3. If true the If statement runs the remaining code after the Then statement, in this case, it shows a message box with text Value1 is smaller than Value2. See the image above.
VBA code
'Name macro
Sub Macro1()

'If ... Then statement
If Range("B3") < Range("D3") Then MsgBox "Value1 is smaller than Value2"

'Stop macro
End Sub
2.7.1.1 If ... Then condition: larger than
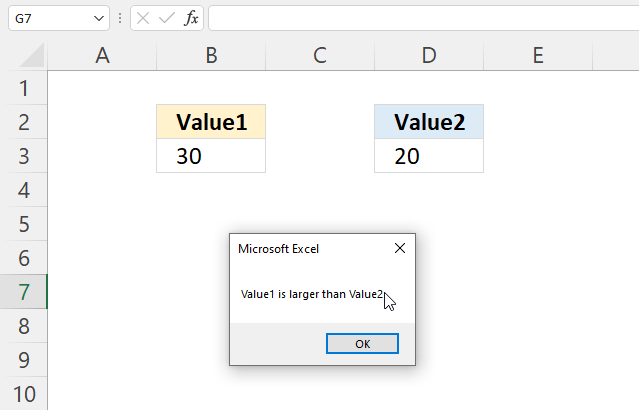
VBA code
'Name macro
Sub Macro1()

'If ... Then statement
If Range("B3") > Range("D3") Then MsgBox "Value1 is larger than Value2"

'Stop macro
End Sub
2.7.1.2 If ... Then condition: equal to
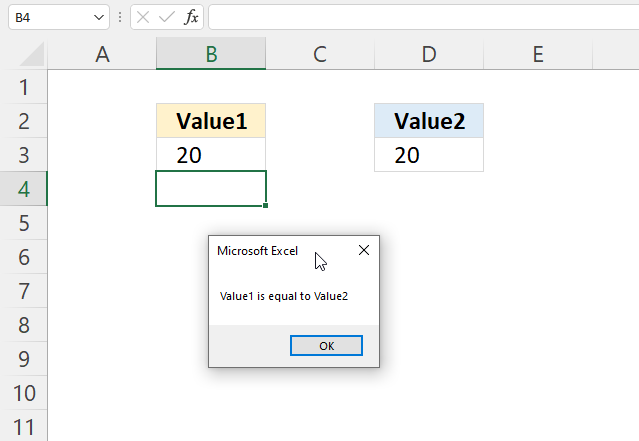
VBA code
'Name macro
Sub Macro1()

'If ... Then statement
If Range("B3") = Range("D3") Then MsgBox "Value1 is equal to Value2"

'Stop macro
End Sub
2.7.1.3 If ... Then condition: not equal to
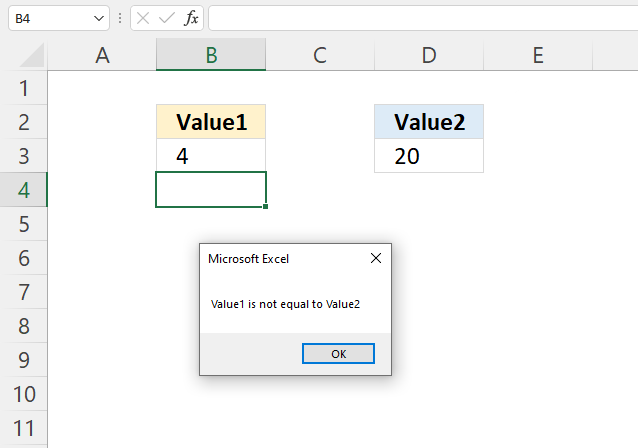
VBA code
'Name macro
Sub Macro1()

'If ... Then statement
If Range("B3") <> Range("D3") Then MsgBox "Value1 is not equal to Value2"

'Stop macro
End Sub
2.7.2. How to use the If ... Then ... End If statement
The If ... Then ... End If statement allows you to run multiple lines of code, the End if statement tells the subroutine when the lines have been run and the If ... Then ... End if statement is completed.
2.7.2.1 VBA code
'Name macro
Sub Macro2()

'If ... Then ... Endif statement
If Range("B3") < Range("D3") Then

'Save number 45 to cell E3 in current worksheet
Range("E3") = 45

'Show message box
MsgBox "Value1 is smaller than Value2"

End if

'Stop macro
End Sub
The subroutine above saves the number 45 to cell E3 if the value in cell B3 is smaller than the value in D3.
The msgbox function then displays a dialog box containing the message Value1 is smaller than Value2.
2.7.3. How to use the If ... Then ... Else ... End if statement
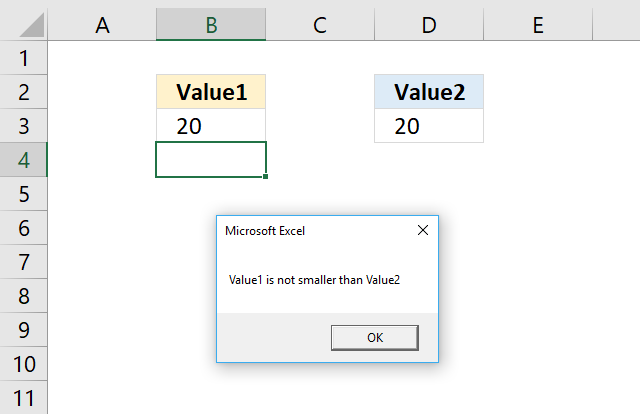
The ELSE statement allows you to run code if the logical expression is not met.
2.7.3.1 VBA code
'Name macro
Sub Macro3()

'If ... Then ... Else ... Endif statement
If Range("B3") < Range("D3") Then

    'Display message box
    MsgBox "Value1 is smaller than Value2"
Else

    'Display message box
    MsgBox "Value1 is not smaller than Value2"
End If

'Stop macro
End Sub
2.7.4. How to use the If ... Then ... Elseif ... Else ... Endif statement
The ELSEIF statement lets you create another logical expression, you may have multiple ELSEIFs in the statement.
2.7.4.1 VBA code
'Name macro
Sub Macro4()
'If ... Then ... ElseIf ... Else ... Endif statement
If Range("B3") < Range("D3") Then

    'Display message box
    MsgBox "Value1 is smaller than Value2"
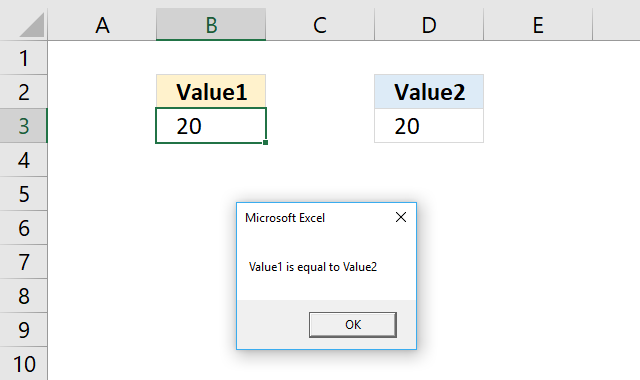
ElseIf Range("B3") = Range("D3") Then

    'Display message box
    MsgBox "Value1 is equal to Value2"
Else

    'Display message box
    MsgBox "Value1 is larger than Value2"
End If

'Stop macro
End Sub
2.7.5. Where to put the VBA code?
- Copy the VBA macro code.
- Press Alt and F11 to open the Visual Basic Editor (VBE).
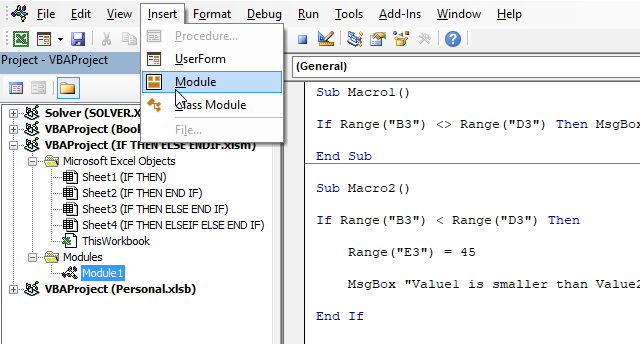
- Press with left mouse button on "Insert" on the top menu.
- Press with left mouse button on "Module", see the image above.
- A new module is inserted, see the Project Explorer above.
- Paste the VBA macro code to the code module.
- Exit VBE and return to Excel.
2.7.6. How to run a VBA macro
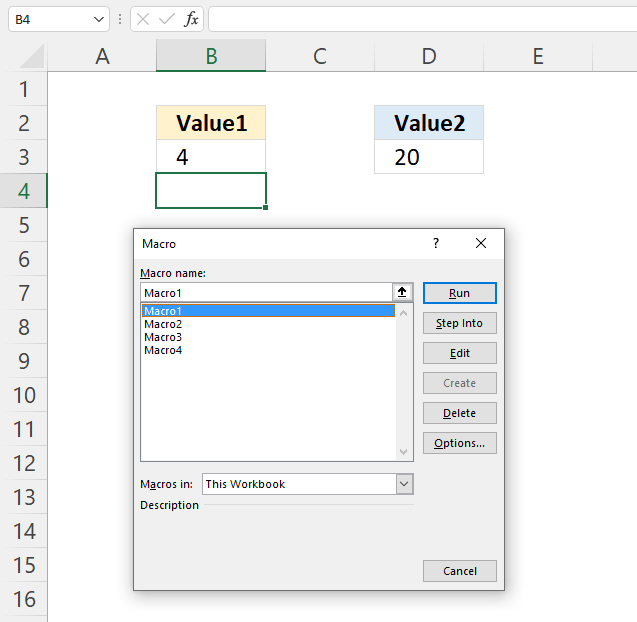
- Press Alt and F8, a dialog box appears.
- Select the macro you want to run.
- Press with left mouse button on "Run" button.
2.7.7 Get Excel *.xlsm macro-enabled file
3.1 How to use the EVALUATE method
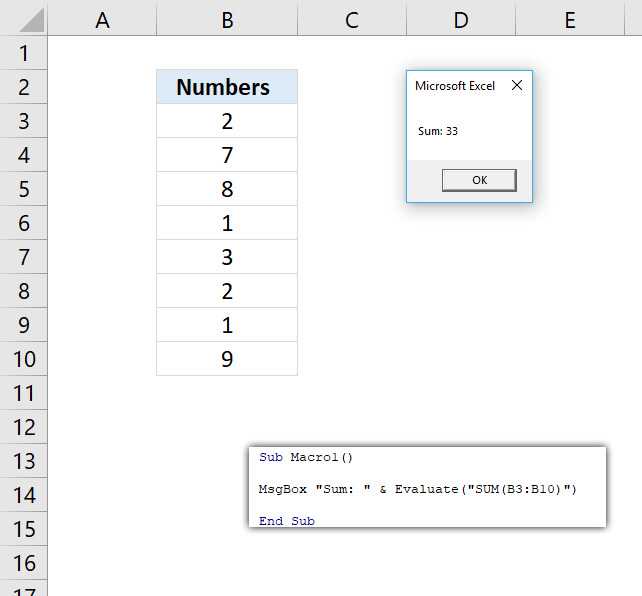
The Evaluate method converts an Excel name to an object or value.
The picture above demonstrates a macro that uses the Evaluate method to sum numbers in cell range B3:B10.
| Excel Name | Description |
| A1-style reference | Excel handles references as absolute references. |
| Range | The following characters are valid: Range (colon) Intersect (space) Union (comma) |
| Excel defined name | Any name. |
| External reference | You are allowed to refer to a cell in another workbook. |
| Chart object | Any chart object name. |
3.1.1 EVALUATE Method Syntax
expression.Evaluate( Name )
3.1.2 EVALUATE Arguments
| Name | Required. The object name, data type: Variant. |
3.1.3 EVALUATE example
Square brackets are the same as using the Evaluate method with a string parameter, examples:
| Evaluate | Square brackets |
| Evaluate("D4").Value = 10 | [D4].Value = 10 |
| Evaluate("MATCH(1,{2,3,4,1},0)") | [MATCH(1,{2,3,4,1},0)] |
3.2 How to use the RANGE.FIND method
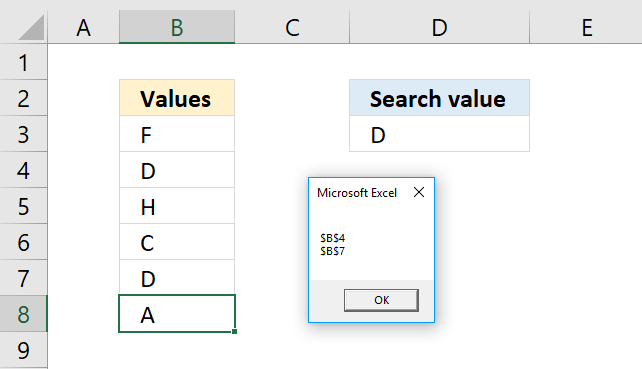
The Range.Find method returns a range object for the first cell that matches the lookup value.
Macro used in workbook above
Sub Macro1()

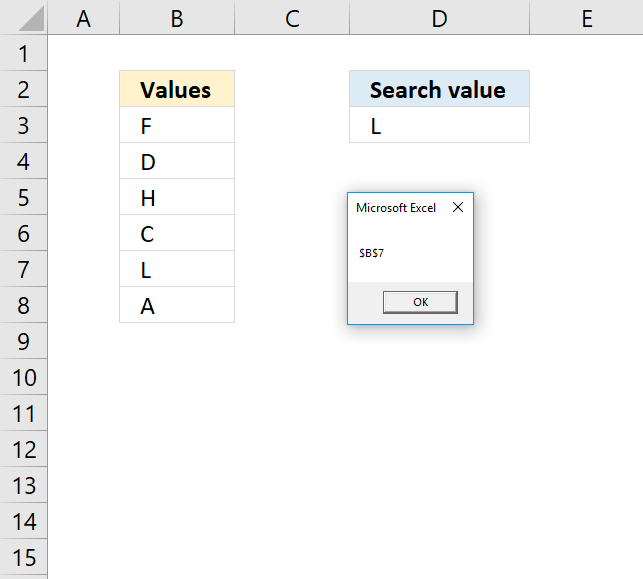
MsgBox Range("B3:B8").Find(Range("D3")).Address

End Sub
The macro above uses the Range.Find method to search cell range B3:B8 for the lookup value in cell D3. A message box shows the address of the found cell.
3.2.1. Range.Find Syntax
expression.Find( What , After , LookIn , LookAt , SearchOrder, SearchDirection , MatchCase , MatchByte , SearchFormat )
| expression | Required. Range object. |
| what | Required. The lookup value. |
| after | Optional. Where you want the search to begin. Note, it begins searching the cell after this cell. Must be a single cell. Default cell is A1. |
| lookin | Optional. XlFindLookIn constants: xlFormulas - xlValues - xlNotes - |
| lookat | Optional. XlLookat constants: xlWhole xlPart |
| searchorder | Optional. XlSearchOrder constants: xlByRows xlByColumns |
| searchdirection | Optional. XlSearchDirection constants: xlNext (1) - Search for the next matching value in range. xlPrevious (2) - Search for the previous matching value in range. |
| matchcase | Optional. True - Case sensitive search. Default value is False. |
| matchbyte | Optional. For double-byte characters support. True - Double-byte characters match double-byte characters. False - Double-byte characters match single-byte characters. Default value. |
| searchformat | Optional. |
3.2.3. Range.Find Comments
The Find method is not going to change the selection or the active cell, it only returns the range object of the found value.
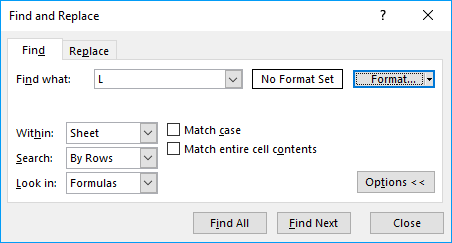
The LookIn, LookAt, SearchOrder, and MatchByte are automatically saved each time you use the Find method. The saved values are used if don't specify these arguments. The Find dialog box changes these settings as well and vice versa meaning the Find method changes the Find dialog box settings. Make sure you specify these arguments each time you use the Find method to prevent unpredictable behavior.
It also looks like that the what argument is also saved to the Find dialog box.
3.2.4. Example 1 - Value not found
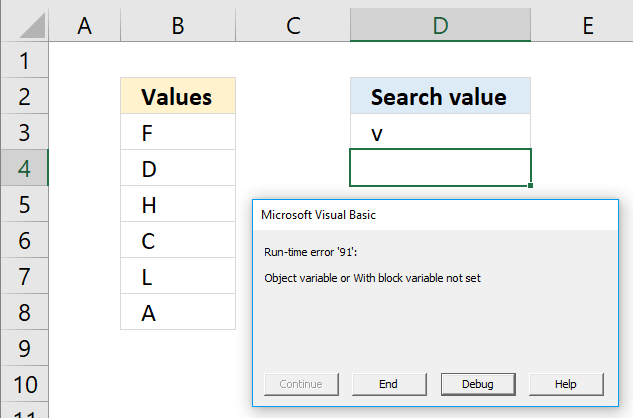
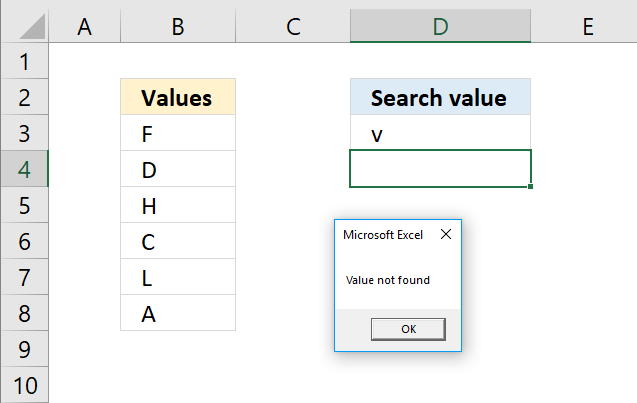
The macro returns an error if the value is not found. Run-Time error '91': Object variable or With block variable not set. To handle the error see the following macro.
Sub Macro2()

If Range("B3:B8").Find(Range("D3")) Is Nothing Then
    MsgBox "Value not found"
Else
    MsgBox Range("B3:B8").Find(Range("D3")).Address
End If

End Sub
3.2.5. Example 2 - Find multiple values
The following macro iterates through each found value and saves the cell address to a variable, the msgbox then shows the variable.
Sub Macro3()
With Range("B3:B8")
    If .Find(Range("D3")) Is Nothing Then
        MsgBox "Value not found"
    Else
        Set a = .Find(Range("D3"))
        Set b = a
        c = a.Address
        Do While Not .FindNext(b) Is Nothing And a.Address <> .FindNext(b).Address
            c = c & vbNewLine & .FindNext(b).Address
            Set b = .FindNext(b)
        Loop
    End If
End With
MsgBox c
End Sub
3.2.6. Example 3 - Return adjacent value
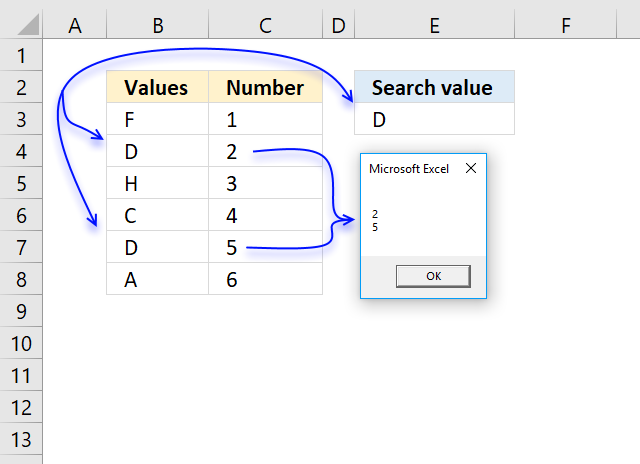
The image above demonstrates the macro below, it saves the adjacent values to each found value in cell range B3:B8 using the lookup value in cell E3 to a variable. The msgbox then shows the contents of the variable.
Sub Macro4()
With Range("B3:B8")
    If .Find(Range("E3")) Is Nothing Then
        MsgBox "Value not found"
    Else
        Set a = .Find(Range("E3"))
        Set b = a
        c = a.Offset(, 1).Value
        Do While Not .FindNext(b) Is Nothing And a.Address <> .FindNext(b).Address
            c = c & vbNewLine & .FindNext(b).Offset(, 1).Value
            Set b = .FindNext(b)
        Loop
    End If
End With
MsgBox c
End Sub
Get Excel *.xlsm
How to use the Range.Find method.xlsm
3.3 How to use the TEXTTOCOLUMNS method
The TextToColumns method puts a cell that contains a string into substrings and distributes them horizontally using a delimiting character or based on a fixed width.
Table of Contents
3.3.1. TEXTTOCOLUMNS Method Syntax
expression.TextToColumns (Destination, DataType, TextQualifier, ConsecutiveDelimiter, Tab, Semicolon, Comma, Space, Other, OtherChar, FieldInfo, DecimalSeparator, ThousandsSeparator, TrailingMinusNumbers)
3.3.2. TEXTTOCOLUMNS Method Arguments
| parameter | Description |
| Destination | Optional. A Range object that points to a location on a worksheet. |
| DataType | Optional. The text format of the source data. |
| TextQualifier | Optional. Text qualifiers: single, double, or no quotes. |
| ConsecutiveDelimiter | Optional. True - Consecutive delimiters as one delimiter. The default value is False. |
| Tab | Optional. True - DataType be xlDelimited and the tab character is a delimiter. The default value is False. |
| Semicolon | Optional. True - DataType be xlDelimited, the semicolon is a delimiter. The default value is False. |
| Comma | Optional. True - DataType be xlDelimited, the comma is a delimiter. The default value is False. |
| Space | Optional. True - DataType be xlDelimited, the space character is a delimiter. The default value is False. |
| Other | Optional. True - DataType be xlDelimited, the character specified by the OtherChar argument is the delimiter. The default value is False. |
| OtherChar | Optional. Required if Other is True; the delimiter character when Other is True. |
| FieldInfo | Optional. An array containing parse information for the individual columns of data. The interpretation depends on the value of DataType. When the data is delimited, this argument is an array of two-element arrays, with each two-element array specifying the conversion options for a particular column. The first element is the column number (1-based), and the second element is one of the XlColumnDataType constants specifying how the column is parsed. |
| DecimalSeparator | Optional. A decimal separator that Excel uses to recognize numbers. The default setting is the system setting. |
| ThousandsSeparator | Optional. The thousands separator that Excel uses to recognize numbers. The default setting is the system setting. |
| TrailingMinusNumbers | Optional. Negative numbers, in other words, numbers that begin with a minus character. |
3.3.3. Record macro while running TextToColumns Wizard?
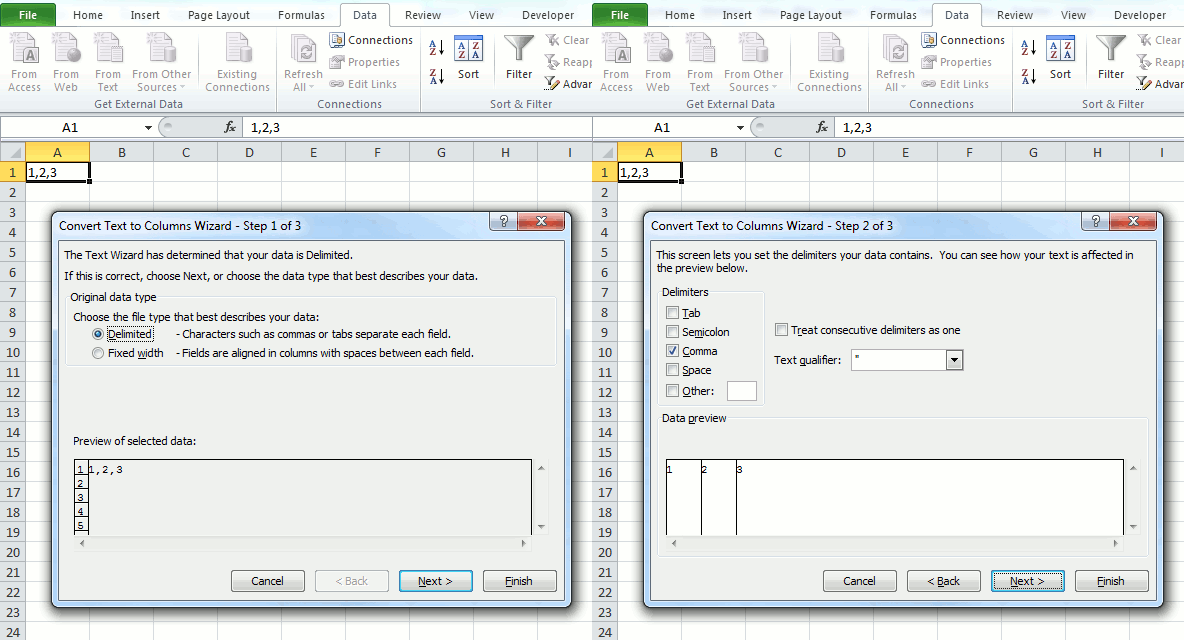
The "Text to columns" feature in excel lets you split multiple values in a single cell using a delimiting character, across columns.
Where is this button?
- Go to tab "Data" on the ribbon.
- Press with left mouse button on the "Text to columns" button.
A dialog box appears, see the animated image above.
What happens if we record a macro while performing this action? This is what the macro recorder returns:
Sub Macro1()
Selection.TextToColumns Destination:=Range("A1"), _
DataType:=xlDelimited, _
TextQualifier:=xlDoubleQuote, _
ConsecutiveDelimiter:=False, _
Tab:=False, _
Semicolon:=False, _
Comma:=True, _
Space:=False, _
Other:=False, _
FieldInfo _
:=Array(Array(1, 1), Array(2, 1), Array(3, 1)), _
TrailingMinusNumbers:=True
End Sub
3.3.4. TextToColumns method - dot as delimiting character
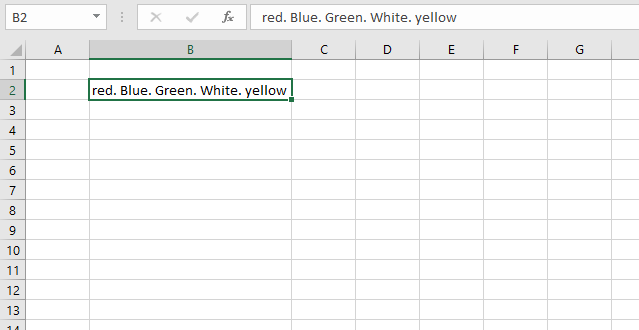
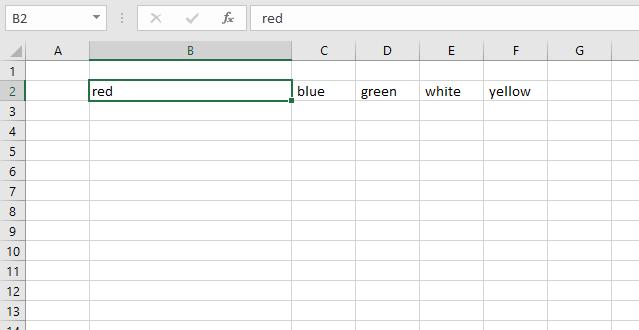
The image above shows a cell containing colors separated by a dot. The following VBA macro splits the string into substrings and distributes them to a cell each horizontally.
Sub Macro4()
Selection.TextToColumns Destination:=Range("B2"),  _
DataType:=xlDelimited, _
TextQualifier:=xlDoubleQuote,  _
ConsecutiveDelimiter:=False,  _
Tab:=False, _
Semicolon:=False,  _
Comma:=False,  _
Space:=False,  _
Other:=True,  _
OtherChar :=".",  _
FieldInfo:=Array(Array(1, 1), Array(2, 1), Array(3, 1), _
Array(4, 1), Array(5, 1)), TrailingMinusNumbers:=True
End Sub
3.3.5. TextToColumns method - comma as delimiting character
Sub Macro3()
Selection.TextToColumns Destination:=Range("B2"), _
DataType:=xlDelimited, _
TextQualifier:=xlDoubleQuote,  _
ConsecutiveDelimiter:=True,  _
Tab:=False, _
Semicolon:=False,  _
Comma:=False,  _
Space:=True,  _
Other:=False,  _
FieldInfo :=Array(Array(1, 1), Array(2, 1), Array(3, 1), Array(4, 1), _
Array(5, 1)), TrailingMinusNumbers:=True
End Sub
3.3.6. Where to put the code?

- Press Alt + F11 to open the VIsual Basic Editor (VBE).
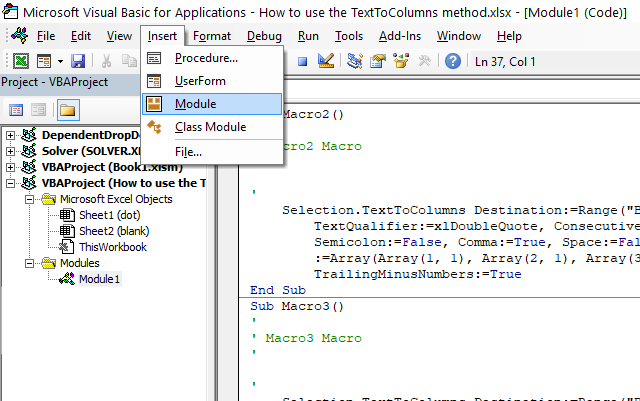
- Press with left mouse button on "Insert" on the top menu.
- Press with left mouse button on "Module" to create a new module.
- Copy and paste VBA code to the module.
- Return to Excel.
How to use the TextToColumns method
Text to columns: Split words in a cell [Array formula]
4.1 How to use the RANGE.OFFSET property
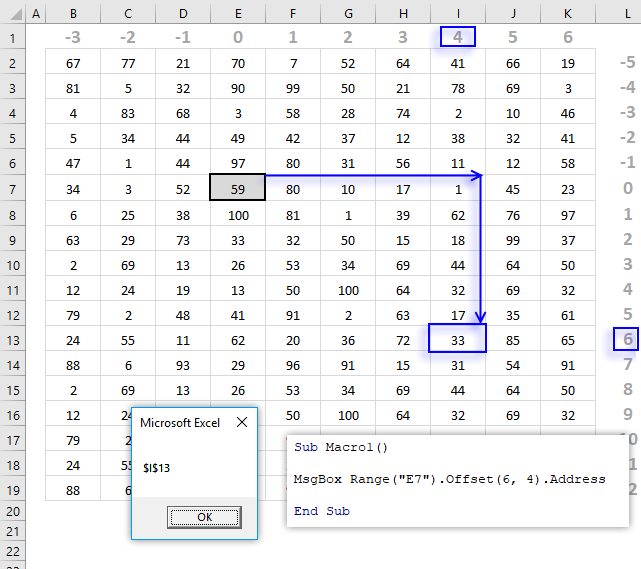
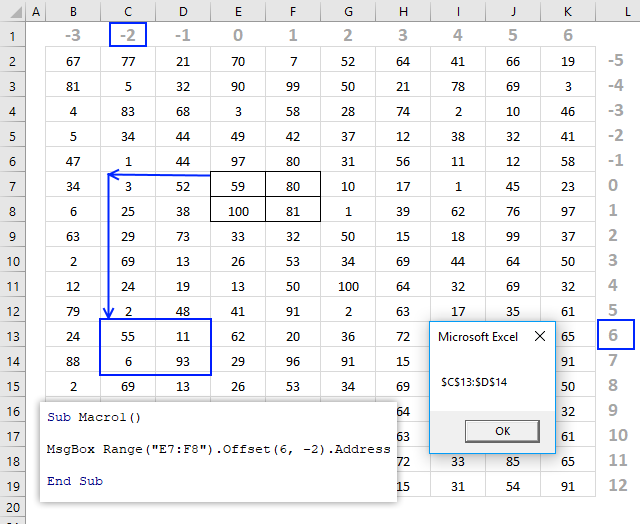
The OFFSET property returns a Range object based on a row and column number. The image above shows a macro that uses cell E7 and applies an offset with 6 rows and 4 columns. The Msgbox displays the address of the Range object.
Excel Property Syntax
expression.Offset(RowOffset, ColumnOffset)
Arguments
| expression | Required. Range object. |
| RowOffset | Optional. How many rows the range object is to be offset. If omitted 0 (zero) is used. The argument may be a positive or negative value. |
| ColumnOffset | Optional. How many columns the range object is to be offset. If omitted 0 (zero) is used. The argument may be a positive or negative value. |
Comments
It is possible to offset a cell range containing multiple cells as well. The image below demonstrates the OFFSET property with a ColumnOffset argument of -2.
4.2 How to use Application.Caller property
Syntax
expression.Caller (Index)
Arguments
| Name | Required/Optional | Data type | Description |
| Index | Optional | Variant | An index to the array. This argument is used only when the property returns an array. |
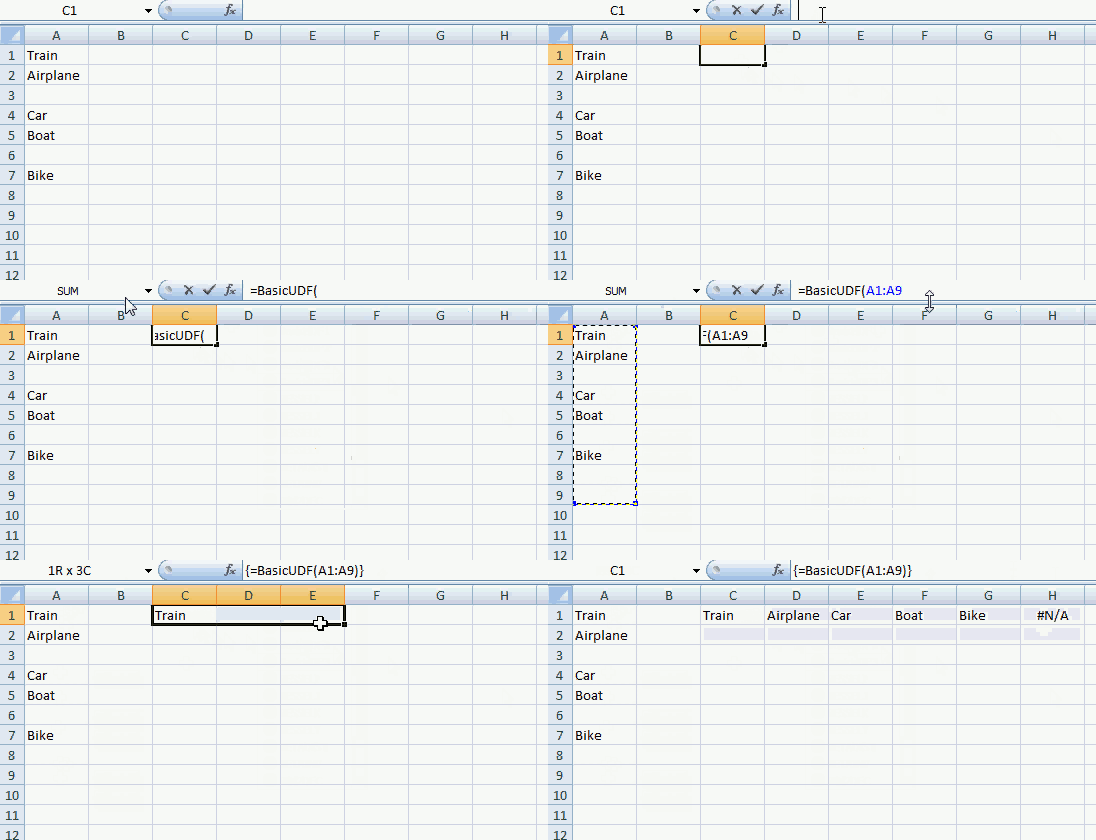
The first example is not utilizing the application caller property at all, it is only there to demonstrate the difference.
Example 1
The values are returned horizontally and #N/A are returned when there are no more values to show.
User defined function
Function BasicUDF(Rng As Range)
Dim Cell As Variant
'Create an array
Dim temp() As Variant
ReDim temp(0)
'Process every cell in Range
For Each Cell In Rng
    'Check if cell is empty
    If Cell <> "" Then
        'Copy cell value to the last position in array
        temp(UBound(temp)) = Cell
        'Increase array size with 1
        ReDim Preserve temp(UBound(temp) + 1)
    End If
Next Cell
'Remove the last value in array
ReDim Preserve temp(UBound(temp) - 1)
'Return values
BasicUDF = temp
End Function
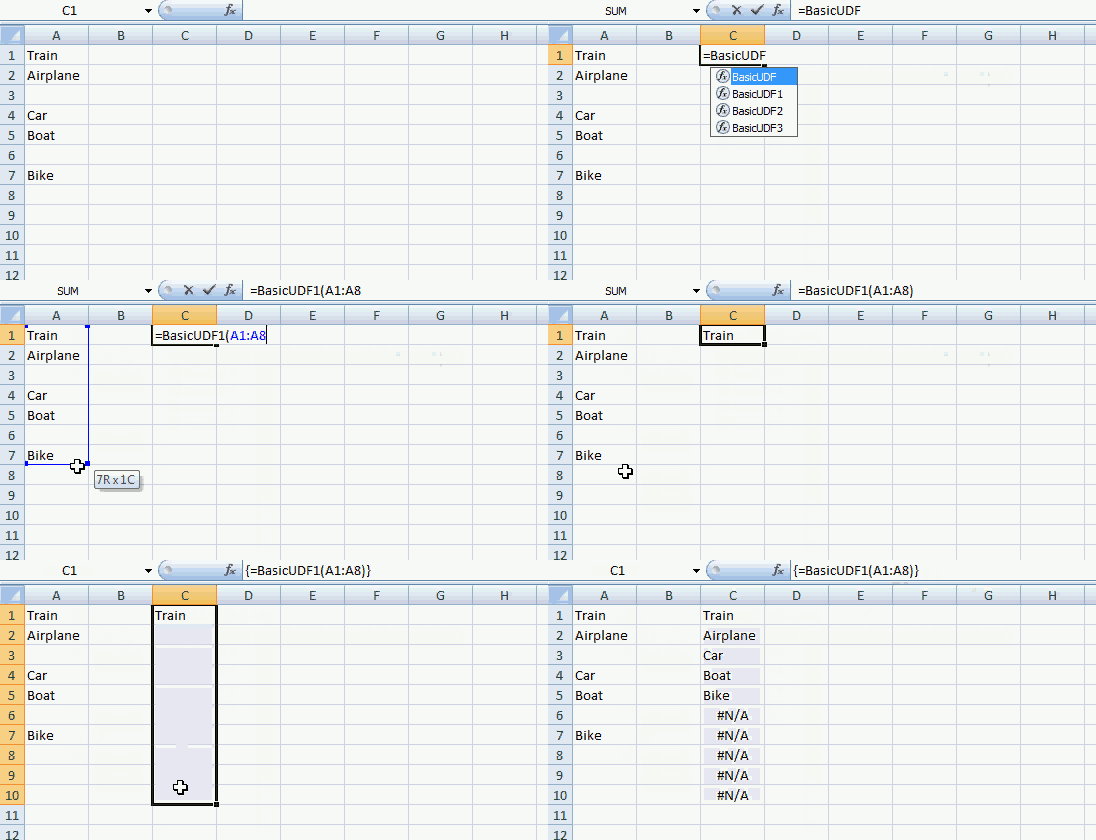
You can return values vertically by changing the last line to BasicUDF = Application.Transpose(temp). See animated gif below.
Values are transposed vertically.
Example 2
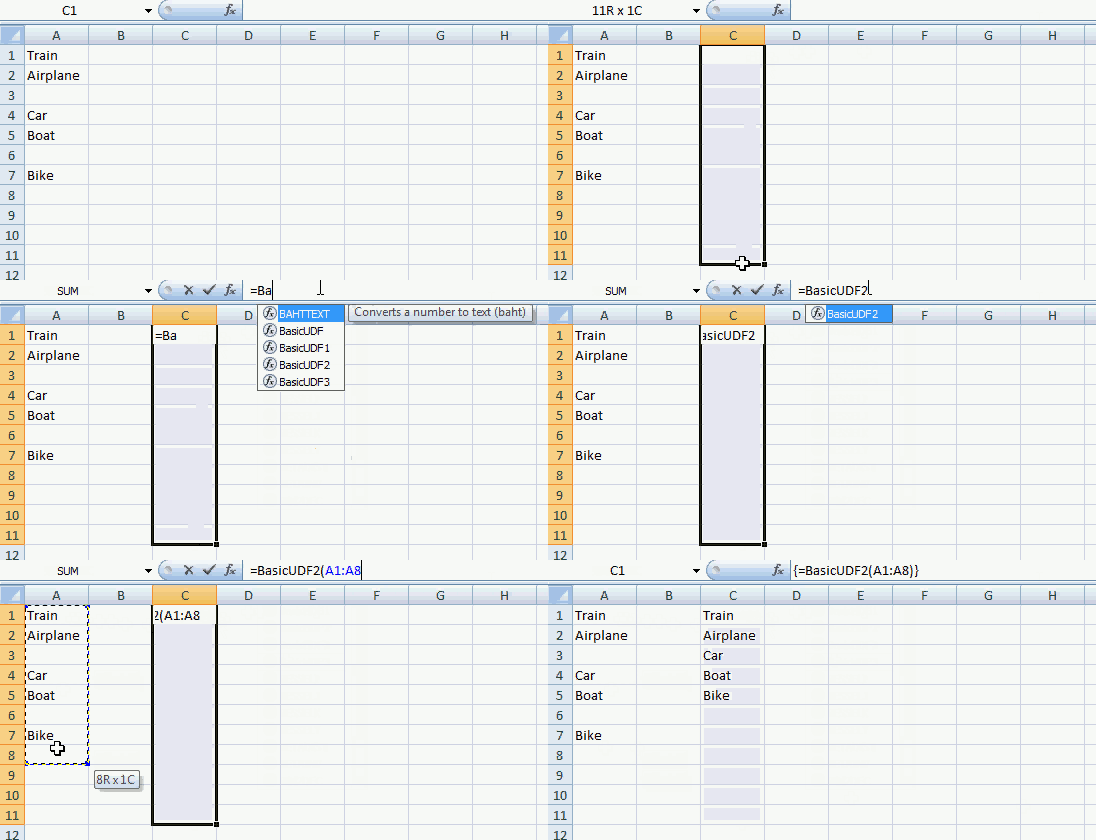
This user defined function returns values vertically and replaces #N/A with blanks.
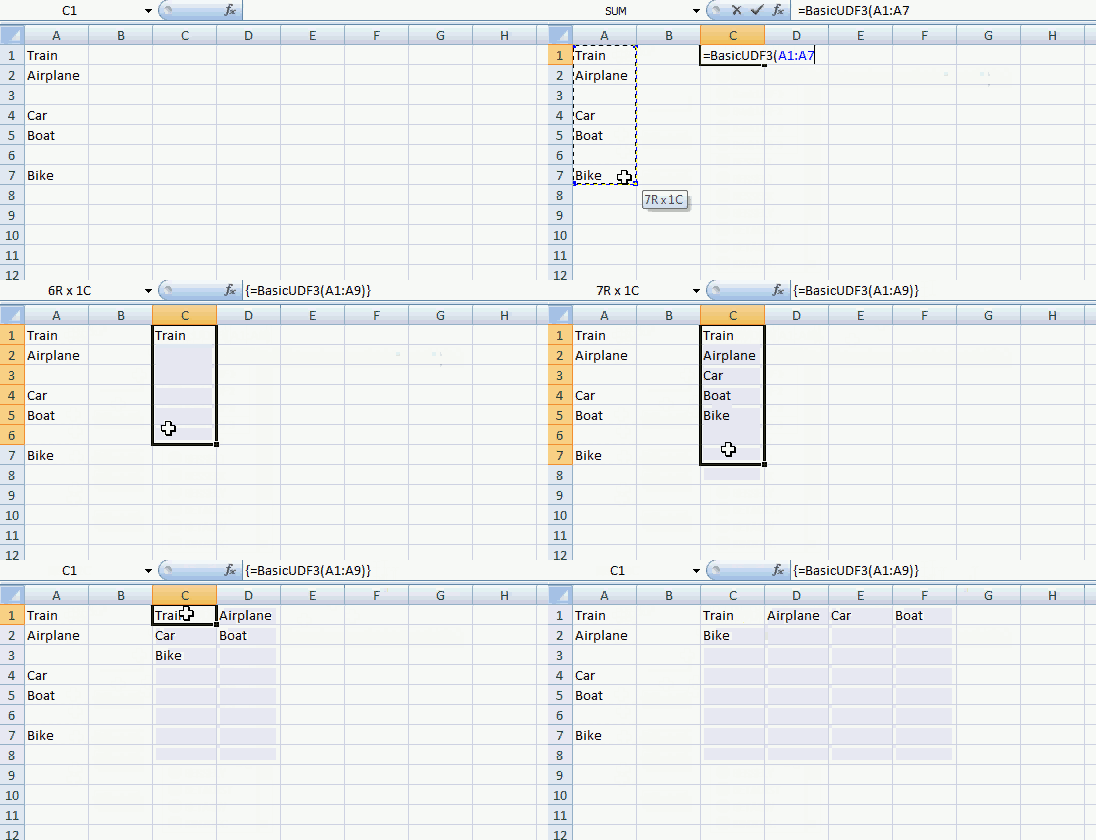
Application.Caller.Rows.Count returns the number of rows from the cell range where you entered the udf. This makes it possible to add blanks when the udf is out of values.
User defined function
Function BasicUDF2(Rng As Range)
Dim Cell As Variant
Dim row As Single
'Create an array
Dim temp() As Variant
ReDim temp(0)
'Process every cell in Range
For Each Cell In Rng
    'Check if cell is empty
    If Cell <> "" Then
        'Copy cell value to the last position in array
        temp(UBound(temp)) = Cell
        'Increase array size with 1
        ReDim Preserve temp(UBound(temp) + 1)
    End If
Next Cell
'Add remaining blanks to array
For row = UBound(temp) To Application.Caller.Rows.Count
    temp(UBound(temp)) = ""
    ReDim Preserve temp(UBound(temp) + 1)
Next row
'Remove last blank
ReDim Preserve temp(UBound(temp) - 1)
'Transpose temp array from horizontal to vertical and return values to sheet
BasicUDF2 = Application.Transpose(temp)
End Function
Example 3
This user defined function returns values in every cell, also if you entered the user defined function in multiple columns. The remaining cells are returned as blanks. See animated gif.
Values are transposed to fill the entire selection, #N/A are replaced with blank cells.
User defined function
Function BasicUDF3(Rng As Range)
Dim Cell As Variant
Dim row As Single, i As Single
'Create an array
Dim temp() As Variant
'Dim array with same size as selection
ReDim temp(Application.Caller.Columns.Count - 1, 0)
i = 0
'Process every cell in Range
For Each Cell In Rng
    'Check if cell is empty
    If Cell <> "" Then
        'Copy cell value to the last position in array
        temp(i, UBound(temp, 2)) = Cell
        i = i + 1
        'Add a new row to the array
        If i = Application.Caller.Columns.Count Then
            i = 0
            ReDim Preserve temp(UBound(temp, 1), UBound(temp, 2) + 1)
        End If
    End If
Next Cell
'Process remaining cells in selection
Do
    'Remaining value are blanks
    temp(i, UBound(temp, 2)) = ""
    'Count current column
    i = i + 1
    'Check if current column is equal to the number of columns in selection
    If i = Application.Caller.Columns.Count Then
        'Start over at column 1 (0)
        i = 0
        'Add a new row in array
        ReDim Preserve temp(UBound(temp, 1), UBound(temp, 2) + 1)
    End If
Loop Until UBound(temp, 2) > Application.Caller.Rows.Count - 1
'Remove last row in array
ReDim Preserve temp(UBound(temp, 1), UBound(temp, 2) - 1)
'Return values
BasicUDF3 = Application.Transpose(temp)
End Function
How to create an array formula
- Select a cell range
- Type user defined function in formula bar
- Press and hold Ctrl + Shift
- Press Enter
Where do I copy the vba code?
- Open VB Editor or press Alt+ F11
- Press with left mouse button on "Insert" on the menu
- Press with left mouse button on "Module"
- Copy/Paste vba code to code module
- Return to excel
Get excel *.xlsm file
More than 1300 Excel formulasExcel categories
13 Responses to “Excel VBA functions”
Leave a Reply
How to comment
How to add a formula to your comment
<code>Insert your formula here.</code>
Convert less than and larger than signs
Use html character entities instead of less than and larger than signs.
< becomes < and > becomes >
How to add VBA code to your comment
[vb 1="vbnet" language=","]
Put your VBA code here.
[/vb]
How to add a picture to your comment:
Upload picture to postimage.org or imgur
Paste image link to your comment.

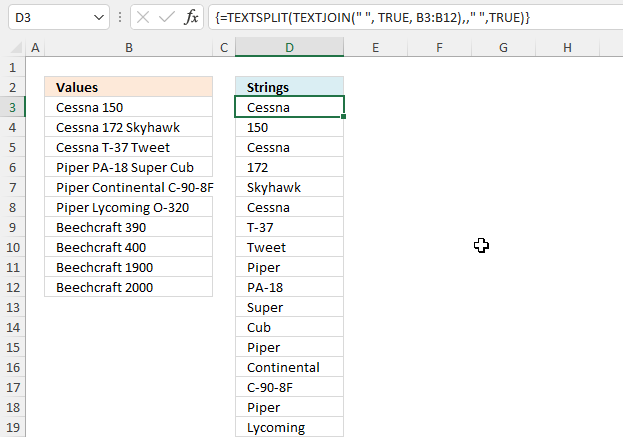
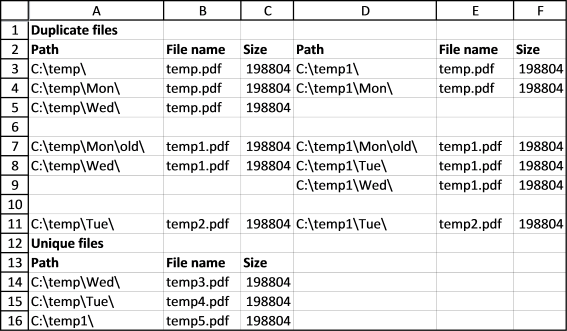
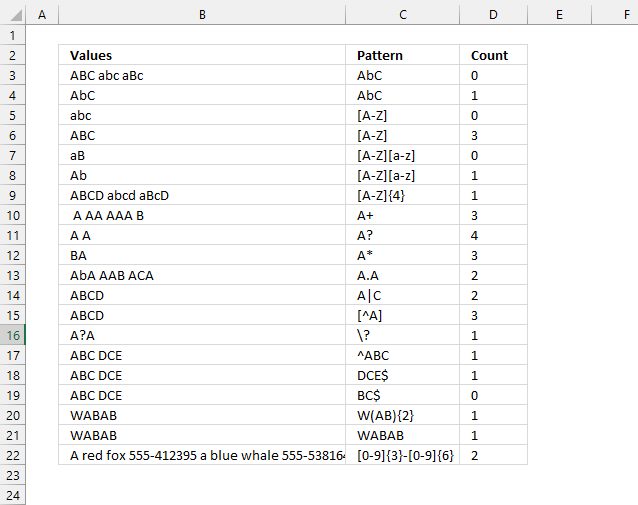


Here is an extra-credit challenge for your readers. Once this article makes sense to them, they should try to figure out how this shorter UDF (which does what your basicUDF3 does) works...
Function BasicUDF3(Rng As Range) As Variant Dim ArrIn As Variant, ArrOut() As Variant, V As Variant Dim X As Long, Z As Long, Item As Long, Rw As Long, Col As Long ArrIn = Rng.Value ReDim ArrOut(1 To Application.Caller.Rows.Count, _ 1 To Application.Caller.Columns.Count) For Each V In ArrIn If Len(V) Then Item = Item + 1 Rw = 1 + Int((Item - 1) / UBound(ArrOut, 2)) Col = 1 + ((Item - 1) Mod UBound(ArrOut, 2)) ArrOut(Rw, Col) = V End If Next For X = 1 To UBound(ArrOut) For Z = 1 To UBound(ArrOut, 2) If IsEmpty(ArrOut(X, Z)) Then ArrOut(X, Z) = "" Next Next BasicUDF3 = ArrOut End FunctionRick Rothstein (MVP - Excel),
I am going to change this post, it is clear as mud! ;-)
Thanks for your contribution!
Hi. I am trying to make it very fast for a UDF to return its original value under certain conditions. I created a test Excel file that has close to 60,000 cells that will either return the current time or return the original caller value.
If I don't access the caller value it will calculate in 6 seconds. (About 4 seconds if I am not in debug mode). But if I access the caller value, it takes 4 to 5 times longer.
I was hoping there was another way to return the caller value that would be faster. If it's not an easy answer, I was wondering if I bought a higher version of ADX with the source code, are there any opportunities to adjust the source code to accomplish this? Speed is really everything for what I am trying to accomplish.
I am using an XLL/XLA C# project. I am open to other methods to accomplish the goal.
I can send you my test project if needed. I would have attached, but I don't know how to attach to this post.
Thanks for your help.
Dwipayan Das,
Contact Charles Williams
https://fastexcel.wordpress.com/
Hi Oscar,
To avoid array formula,and use Text to columns, can be used:
Sub Splitcell()
[A1].TextToColumns [A1].Offset(, 2), xlDelimited, , , 0, 0, 1, 0, 0
End sub
PS
Your site is excellent. One of the best of the best.
Ingolf
Ingolf,
thank you!
Two points about your SplitValues UDF...
First, when the Split function will be called only once during a procedure, there is no need to assign the output from the Split function to an intermediary dynamic array in order to work with its output (doing so similar to selecting a range and then woring with the Selection object instead of the range itself); rather, you can work directly with the Spiit function itself...
Second, the way you have implemented your function, you need to know, in advance, how many substrings the 'b' argument will split into so that you can select exactly that amount of cells to array-enter your formula in, otherwise, any excess selected cells will display the #N/A error which, of course, looks kind of ugly but would be necessary if the text passed into the 'b' argument could vary in the number of delimiters over time. We can eliminate the #N/A errors for any excess selected cells fairly easily using the Application.Caller object like so...
Rick Rothstein (MVP - Excel),
Interesting comment, as always.
Your second point was new to me.
[quote]
Second, the way you have implemented your function, you need to know, in advance, how many substrings the 'b' argument will split into so that you can select exactly that amount of cells to array-enter your formula in, otherwise, any excess selected cells will display the #N/A error which, of course, looks kind of ugly but would be necessary if the text passed into the 'b' argument could vary in the number of delimiters over time.
[/quote]
Not too sure..
Sub SplitCell()
With Range("A1", Cells(Rows.Count, "A").End(xlUp))
.TextToColumns .Offset(, 2), xlDelimited, , , 0, 0, 1, 0, 0
End With
End Sub
I was referring to problems associated with implementing the UDF in my previous posting... macros (like what you posted) are completely different than UDFs and do not have the same (or virtually any such) restrictions. As for determining the vertical extent of the cells to apply the Text-To-Columns method to... that is not necessary as Text-To-Columns will only work on cells with data, so applying it to the entire column will work the same as restricting it to your calculated range...
Columns("A").TextToColumns .Offset(, 2), xlDelimited, , , 0, 0, 1, 0, 0
I'm wondering if I can have a list of 40 Names and combine them in pairs without repeating the name pairs. Example:
Anna
Marc
Peter
Rawn
Result:
Anna - Marc
Peter - Rawn
I would be very greatful if you could help me :-)! Thank you.
Edmund,
There is a UDF you can try found here: https://www.get-digital-help.com/return-all-combinations/
how to use nonconsecutive rows for listbox
Thank you