Create a Print button – macro

This article describes how to create a button and place it on an Excel worksheet, then assign a macro to that button allowing the user to print the worksheet when the button is pressed on.
Table of Contents
- Create a Print button on a worksheet - macro
- Create a Print button in a cell
- Create a Print button on a worksheet without macro
- Create a Print button - multiple sheets
- Create a Print button - pdf
- Create a Print button - selection
- Print screen the entire worksheet
- Print consecutive page numbers across multiple worksheets
- Repeat headers on each page
- Remove print preview lines (Page Breaks)
1. Create a Print button on a worksheet - macro

A print button located on a worksheet is a great feature that allows the user to quickly print a worksheet. You need a form control button and a macro to build a print button on a worksheet.
What is the biggest downside with a macro assigned to a button?
Most companies have macros disabled because of security reasons.
What is a macro?
A subroutine that contains lines of code made of VBA which is an abbreviation of visual basic of application.
Is it complicated to set up?
No, it is easy and you will learn something new that will be interesting.
1.1 Create a button and place it on the worksheet
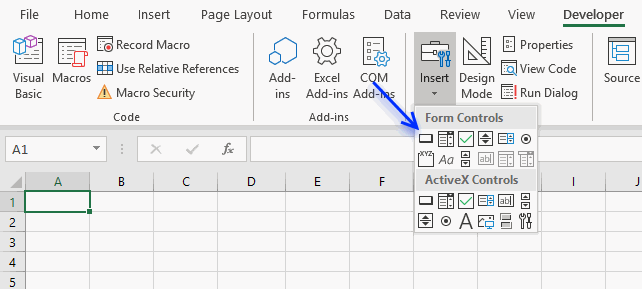
The button is found in the Form Controls group, here are the steps:
- Press with left mouse button on "Developer tab" on the ribbon.
Developer tab missing? - Press with left mouse button on the "Insert" button. A popup menu appears containing multiple controls.
- Press the "Button (Form Control)" shown on the image above next to the blue arrow.
- Press and hold with mouse button on the worksheet where you want it located.
- Drag with mouse while holding the mouse button to adjust the button size.
- Release the mouse button.
- A dialog box shows up telling you to assign a macro. Press with left mouse button on "Cancel", we need to assign the macro after putting the code in a module explained below.
Change the button name to Print.
1.2 Create macro
You need the following code to be able to assign the macro to the button.
Sub Macro1()
  Application.Dialogs(xlDialogPrint).Show
End Sub
1.3 Where to put the code?
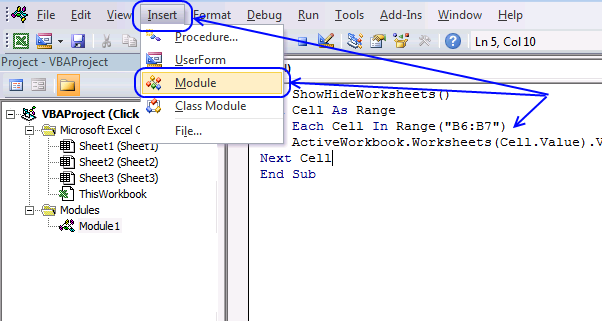
(The macro shown in the image above is not used here in this article, it only demonstrates where to paste the code.)
- Press Alt-F11 to open the visual basic editor
- Press with mouse on "Module" on the "Insert" menu, see the image above.
- Copy and paste "Sub Macro1" code below to code module.
- Go back to Excel.
1.4 Assign the macro the button
- Press with right mouse button on with the mouse on the button. A popup menu appears.
- Press on "Assign Macro..". A dialog box appears containing available macros to assign.
- Select the macro you want to assign, in this case Macro1.
- Press the "OK" button.
Save the Excel file as a *.xlsm in order to keep the macro attached to the workbook. The reason is that a *.xlsx file can't contain macros.
1.5 Watch a video where I explain the steps to insert a print button
2. Create a Print button in a cell

This section describes how to align and resize a print button to a specific cell, the image above shows a print button with the same size as cells H6 and I6.
The instructions here are for those that have already created a print button. If you have not go to section 1 above and create one first.
How to select a form control without running the assigned macro?
- Press and hold the CTRL button on the keyboard.
- Select the format control "button".
- Release the CTRL key.
How to align the button border to a cell border?
- Make sure the button is already selected, you can tell it is selected if the "handles" around the format control button are shown.
- Press and hold the "Alt" key.
- Press and hold with mouse button on one of the "handles".
- Drag with mouse to the cell border you want to align with. It snaps automatically in place if you get close enough.
- Repeat with the remaining "handles".
Go back to section 1.2 above and follow the instructions there to complete the setup.
3. Create a Print button on a worksheet without macro

To my knowledge it is not possible to run the "Print" command by pressing a button located on a worksheet without using a macro. However, you have a few other options:
- Create instructions on the worksheet to use the shortcut keys CTRL + P to quickly print a spreadsheet.
- You can easily put a print button on the Quick Access Toolbar.
- Enable a print button on the ribbon.
I will now show you how all three examples above are created.
3.1 Use a text box to inform the user about the shortcut keys CTRL + P
The image above demonstrates a basic text box containing instructions on how to use the shortcut keys to command a print. A text box requires no macro or VBA code. Here is how to create it:
- Go to tab "Insert" on the ribbon.
- Press on "Text box" button.
- Press and hold with mouse button on the worksheet where you want it located. Don't worry, you can move it later on if a mistake is done.
- Drag with mouse to resize the text box.
- Release the mouse button.
Press with the mouse on the "text box" to select it.
Press with the mouse on the "text box" text to show the prompt. You can now change the text inside the "text box".
The handles around the "text box" allow you to resize the "text box".
A new tab on the ribbon is shown when the "text box" is selected, it is named "Shape Format". It has settings that allow you to change the background color, the shape outline and so on.
3.2 Print button on the Quick Access toolbar

The image above shows how to create a print button on the Quick Access Toolbar. The downside with this approach is that it is only a customization to your Excel application only, it is not transferred to other users if you send them a copy of your workbook.
- Press with mouse on the "arrow" button on the top menu bar. A popup menu appears.

- Enable the "Quick Print" button or the "Print Preview and Print". The "Quick Print" button prints the active worksheet without any preview at all.

The "Print" button appears on the Quick Access Toolbar.
The "Print Preview and Print" button lets you preview the print before sending it to the printer.
3.3 Enable a print button on the ribbon

The downside with this approach as well is that it is only a customization to your Excel application only. It is not transferred to other users if you send them a copy of your workbook.
- Press with right mouse button on an empty space on the ribbon. A popup menu appears.

- Press with mouse on "Customize the Ribbon...", a dialog box appears.

- Create a new group in the "Home" tab, see the image above.
- Rename the group if you like.

- Go to "Choose commands from:" and select the File Tab. See the image above step 1.
- Scroll down to "Print Preview and Print" and select it.
- Press the "Add >>" button to move it to the new custom group you just created.
- Press the OK button to apply changes.
The "Print Preview and Print" button appears on the ribbon.
4. Create a Print button - multiple sheets

The following vba macro is assigned to a print button shown in the image above. It selects the specified worksheets and then shows the print dialog box.
Section 1 above demonstrates how to:
- Create a button on the worksheet.
- Where to put the vba macro.
- How to assign the macro to a print button.
- Save the workbook as a *.xlsm file to keep the macro attached.
I recommend you follow those steps. Only the macro below is needed.
Sub Print_multiple_ws()

'Dimesnion variables and declare data types
Dim ws_list As Variant

'Specify worksheet names and save array to variable
ws_list = Array("Invoice", "Data")

'Select worksheets
Worksheets(ws_list).Select

'Show print dialog box
Application.Dialogs(xlDialogPrint).Show


End Sub
5. Create a Print button - pdf

This example demonstrates a button on the worksheet that asks for the file name of the PDF to be saved, then saves the PDF and opens it using the default PDF software.
Here is what happens when you press the "Print to PDF" button:
- A dialog box appears asking for the file name.
- A PDF is generated, saved, and opened with the default PDF software.
Here is how to build the Print to PDF button:
5.1 Copy vba code
Copy the VBA code below.
Sub Print_pdf()

'Dimesnion variables and declare data types
Dim ws_name As Variant

'Ask for the file name
ws_name = InputBox("PDF file name?")

'Check if file name is not empty
If StrPtr(ws_name) <> 0 Then

    'Export the worksheet to a PDF
    ActiveSheet.ExportAsFixedFormat Type:=xlTypePDF, _
                                    Filename:=ws_name, _
                                    Quality:=xlQualityStandard, _
                                    IncludeDocProperties:=False, _
                                    IgnorePrintAreas:=False, _
                                    OpenAfterPublish:=True

End If

End Sub
5.2 Put the vba code in a module
(The vba code shown in the image above is not used here in this example, it only demonstrates where to paste the code.)
- Press Alt-F11 to open the visual basic editor.
- Press with left mouse button on Module on the Insert menu.
- Copy and paste "Sub Print_pdf" code above to code module.
- Go back to Excel.
5.3 Create the worksheet button
The button is found in the Form Controls group, here are the steps:
-
- Press with left mouse button on "Developer tab" on the ribbon.
Developer tab missing? - Press with left mouse button on the "Insert" button. A popup menu appears containing multiple controls.
- Press the "Button (Form Control)" shown on the image above next to the blue arrow.
- Press with left mouse button on "Developer tab" on the ribbon.
- Press and hold with mouse button on the worksheet where you want it located.
- Drag with mouse while holding the mouse button to adjust the button size.
- Release the mouse button.
- A dialog box shows up telling you to assign a macro. Press with left mouse button on "Cancel", we need to assign the macro after putting the code in a module explained below.
Change the button name to "Print to PDF".
6. Create a Print button - selection

This VBA macro is assigned to a print button shown in the image above. It lets you specify a cell range you want to print and then shows the print dialog box.
Section 1 above demonstrates how to:
- Create a button on the worksheet.
- Where to put the vba macro.
- How to assign the macro to a print button.
- Save the workbook as a *.xlsm file to keep the macro attached.
I recommend you to follow these steps. Only the macro below is needed.
Sub Print_selection()

'Dimesnion variables and declare data types
Dim rng As Range

'Define cell range to print
Set rng = Application.InputBox("Select a cell range to print: ", , , , , , , 8)

'Select worksheets
rng.Select

'Show print preview
rng.PrintOut Preview:=True


End Sub
7. Print screen the entire worksheet
This article demonstrates different techniques on how to take a screenshot of your worksheet. You can do that by simply pressing the PrintScreen key on your keyboard. Paste it into your favorite image editing software and you are done.
What if you want to take a screenshot of a large dashboard or a dataset larger than the screen?
Yes, you can zoom out to a certain extent but eventually the font size will be too small to read. Excel actually allows you to take a screenshot of the selected cell range, whatever size. I will show you how below.
When to take a screenshot of a larger cell range?
It can be very useful as an attachment in an email when you don't want to send the entire workbook.
How to create a macro that automatically saves the screenshot?
I'll also demonstrate a macro, later in this article, that automatically saves the screenshot to a folder you specify. There is a macro-enabled file for you to get at the end of this article.
What's on this section
- How to take a screenshot of a large area in Excel
- Format Picture
- Format Bitmap
- Include row/column labels
- Macro recorder
- Print screen and save the picture to a folder automatically (vba macro)
- Where to put the code
- How to run the macro
Check out the macro category for more useful VBA subroutines.
7.1. Screenshot of a large cell area

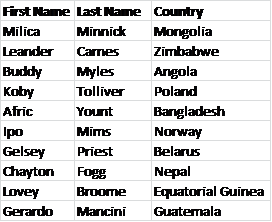
The image above shows a part of a data set containing random data, here is how to quickly select a larger data set without scrolling.
How to quickly select a large cell range?
- Press with left mouse button on and select any cell in the data set.
- Press shortcut keys CTRL + A, this selects the entire data set as long as data cells have no blank rows and/or columns in between.
How to take a screenshot of the selected cell range only?
- Select the cell range you want to capture a screenshot of.
- Go to the "Home" tab on the ribbon.
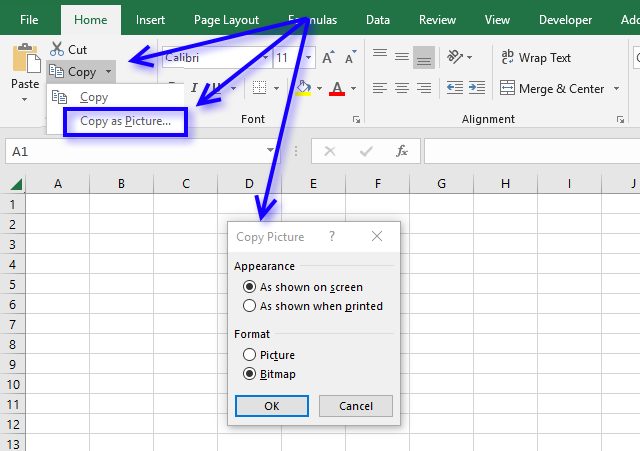
- Press with left mouse button on the black arrow near the copy button, see image below.
- A popup menu appears. Press with left mouse button on "Copy as picture..".
- A dialog box appears, here you can select if you want it "As shown on screen" or "As shown when printed".
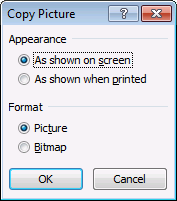
I will explain these settings in greater detail below.
7.1.1 Copy picture dialog box - Format Picture
If you select the radio button named "As shown on screen" you can choose from "Picture" or a "Bitmap".
The "Picture" setting returns a terrible image, shown here:
7.1.2 Copy picture dialog box - Format Bitmap
The "Bitmap" setting returns a much nicer looking image:
This is the setting I would choose.
7.1.3 Copy picture dialog box - As shown when printed
The "As shown when printed" setting returns a really large image and I am not going to show the full-size image here to you, for obvious reasons.

The image above shows the dialog box when the radio button "As shown when printed" is selected. Format - Picture and Bitmap are greyed out.
7.1.3 Copy picture dialog box - include row and column headings
It is possible to include headings but you must select "As shown when printed" and then resize the picture in your image editing software.
How to include row and column headings?
- Go to tab "Page Setup" on the ribbon.
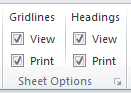
- Enable check boxes for Print "Grid lines" and Print "Headings"
How to create an image of the selected cell range with column and row headings?
- Go to tab "Home".
- Press with left mouse button on the arrow near the copy button, see image below. A popup appears.

- Press with left mouse button on "Copy as Picture...".

- A small dialog box appears. Select radio button "As shown when printed".
- Press with left mouse button on OK button.
- Paste the picture in your favorite image editing software which allows you to rescale the image to a smaller size.

The image above shows a screenshot with settings "As shown when printed" resized to fit this webpage.
7.2. Copy picture VBA macro
How to record a macro while copying a cell range as a picture?
- Select the cell range you want to copy.
- Go to tab "Developer" on the ribbon".
Developer tab missing? - Press the "Record Macro" button. This starts the recorder.
What VBA code does the macro recorder create while taking a screenshot of a cell range?
7.2.1 Bitmap
The images below shows the steps I did while recording a macro.
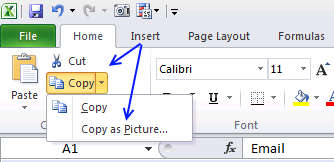
- Go to tab "Home" on the ribbon.
- Press the "Copy" button, a popup menu appears.
- Press on the "Copy as Picture..." with the left mouse button. A dialog box appears.
- Press the radio button next to "Bitmap" to select it.
- Press the "OK" button.
Go to tab "Developer" and press the Button "Stop Recording".
The following code is generated by the Macro recorder.
Selection.CopyPicture Appearance:=xlScreen, Format:=xlBitmap
7.2.2 Picture
The images below shows the steps I did while recording a macro.
- Go to tab "Home" on the ribbon.
- Press the "Copy" button, a popup menu appears.
- Press on the "Copy as Picture..." with the left mouse button. A dialog box appears.
- Press the radio button next to "Picture" to select it if it is not already selected.
- Press the "OK" button.
Go to tab "Developer" and press the Button "Stop Recording".
The following code is generated by the Macro recorder.
Selection.CopyPicture Appearance:=xlScreen, Format:=xlPicture
7.2.3 As shown when printed
The images below shows the steps I did while recording a macro.
- Go to tab "Home" on the ribbon.
- Press the "Copy" button, a popup menu appears.
- Press on the "Copy as Picture..." with the left mouse button. A dialog box appears.
- Press the radio button next to "As shown when printed" to select it.
- Press the "OK" button.
Go to tab "Developer" and press the Button "Stop Recording".
The following code is generated by the Macro recorder.
Selection.CopyPicture Appearance:=xlPrinter, Format:=xlPicture
7.3. Print screen and save the picture to a folder automatically
This macro takes a screenshot of the selected cell range and saves the image to c:\temp\temp.gif.
'Name macro
Sub SavePicToFile()

'CopyPicture method with parameters xlscreen and xlBitmap using the selected cell range
Selection.CopyPicture xlScreen, xlBitmap

    'Hides alerts
    Application.DisplayAlerts = False

    'The SET statement allows you to save an object reference to a variable
    'Save a new chart object to variable tmp
    Set tmp = Charts.Add

    'The With ... End With statement allows you to write shorter code by referring to an object only once instead of using it with each property
    With tmp

        'Delete first series collection
        .SeriesCollection(1).Delete

        'Paste picture
        .Paste

        'Save to filename temp.gif in folder c:\temp with Filtername parameter gif
        .Export Filename:="C:\temp\temp.gif", Filtername:="gif"

        'Delete tmp object
        .Delete
    End With
End Sub
7.3.1 Where to put the code?

- Press shortcut keys Alt + F11 to open the Visual Basic Editor.
- Press with left mouse button on "Insert" on the top menu, see image above.
- Press with left mouse button on "Module" to create a module. The module named Module1 is now visible in the Project Explorer window located to the left in the image above.
- Copy VBA code.
- Paste VBA code to empty module.
- Exit VB Editor and go back to Excel.
7.3.2 How to run the macro?

- Select the cell range you want to create an image of.
- Press Alt + F8 to run the "Macro" dialog box, see image above.
- Press with left mouse button on the name of the macro you want to run, in this case, press with left mouse button on "SavePicToFile".
- Press with left mouse button on "Run" button.
The dialog box closes automatically and the macro is then rund.
Check folder c:\temp for an image named temp.gif.
8. Print consecutive page numbers across multiple worksheets

This article explains how to print multiple worksheets so the page numbers are in sequence across all selected worksheets.
The problem is that when you print each worksheet individually, the page numbering resets to 1 for each new worksheet. To overcome this, you can use the methods described below to print specific worksheets or all worksheets with continuous page numbering that spans across all worksheets.
What you will learn in this section:
- How to select multiple worksheets.
- How to enable the "Header and Footer" edit mode.
- How to insert page numbers to the footer of each page.
- How to exit the "Header and Footer" tab.
- How to exit the "Header and Footer" edit mode.
- How to print preview the selected worksheets.
- Navigate pages in "print preview" mode.
- Verify page numbers in "print preview" mode.
- How to deselect or "ungroup" worksheets.
- The issues you may experience if you don't deselect worksheets.
Instructions:
- Select all worksheets you want to show page numbers on. Press with right mouse button on on one of the tabs located at the bottom left corner of your screen. A pop-up menu appears. Press with mouse on "Select All Sheets."

If you want to only select a specific range of worksheets, use the SHIFT key. Here is how:- Press with mouse on the first worksheet tab (usually labeled "Sheet1") at the lower left corner of the Excel window.
- Press and hold the SHIFT key on your keyboard.
- While holding the shift key, press with left mouse button on the last worksheet tab (usually labeled "SheetX", where X is the number of worksheets).
This will select all worksheets in between the first and last tabs. You can now perform actions on all selected worksheets, such as showing page numbers etc.

The image above shows three highlighted tabs (Ex 2, Ex 3, and array) and one regular tab (Sheet1).Tip!Use the CTRL key on your keyboard to select specific worksheets instead of all worksheets if needed.
- Go to tab "Insert" on the ribbon.
- Press with left mouse button on "Header and Footer" button.

- A new tab named "Header & Footer" appears on the ribbon, you are now in the "Header & Footer" edit mode.
- Press with left mouse button on "Go to Footer" button. This takes you to one of three boxes in the footer. Press with mouse on one of the boxes where you want the page number to show up.

- Press with left mouse button on "Page number" button. This creates the page number. The "Header & Footer" edit mode shows &[Page] in the selected Footer box.

- Press with left mouse button on in an empty box next to the footer box. Press Escape key on your keyboard to exit the "Header & Footer" tab on the ribbon.
The "Header & Footer" edit mode is, however, still active. Go to "View" tab on the ribbon", press with left mouse button on the "Normal" button to show the regular worksheet again. - Go to "File" on the ribbon.
- Press with mouse on "Print", a "print preview" box is now visible on the right side of the screen and print settings on the left side of the screen.
- Check that page numbers are shown at the bottom of the "print preview" box.

- Press with left mouse button on the black arrow at the bottom of the screen to go to the next page, see the image above. Check that all your pages contain page numbers.
- Press with left mouse button on Print button to print the select worksheets.
The next step is important, make sure you ungroup the select tabs before continuing your work with your workbook. If you don't ungroup tabs (worksheets) after selecting all of them, any changes you make to one worksheet will be applied to all selected worksheets. This can lead to unintended consequences, such as:
- Formatting changes: If you change the formatting of one worksheet, it will be applied to all selected worksheets.
- Data changes: If you enter or edit data in one worksheet, it will be replicated in all selected worksheets.
- Deletions: If you delete data or cells in one worksheet, it will be deleted in all selected worksheets.
- Insertions: If you insert new rows, columns, or cells in one worksheet, it will be inserted in all selected worksheets.
To avoid these issues, it's essential to ungroup the worksheets. Here is how:
8.2 How to ungroup tabs
- Press with right mouse button on on one of the tabs. A popup menu appears, see the image above.
- Press with mouse on "Ungroup Sheets".

The image above shows only one worksheet selected, this means that the tabs are now ungrouped.
9. Repeat headers on each page

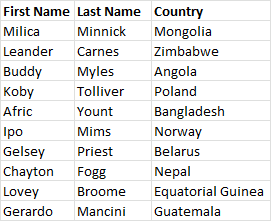
The image above shows a data table containing four columns: Username, Name, Industry, and State. This section of the article demonstrates how to repeat these header names across all printed papers automatically.
This will improve readability and make it easier to understand the data when readers turn the pages. Instructions:
- Go to tab "Page Layout" on the ribbon.
- A dialog box appears.Go to tab "Sheet" on the dialog box.

- Press with left mouse button on the arrow next to field "Rows to repeat at top:".
- Select the row that contains the header names you want repeat across all printed pages.
- Press with left mouse button on the "Print preview" button, see the image above.
- A new window appears named "Print".
- Use the arrows located at the very bottom to navigate through the pages.

- Verify that each page has the selected column names at the very top.

The image above shows the second page in "print preview", the data has the column names repeated to this page as well. - Press the "Print" button to print the pages or press with left mouse button on the back arrow to go back to Excel.
10. Remove print preview lines (Page Breaks)
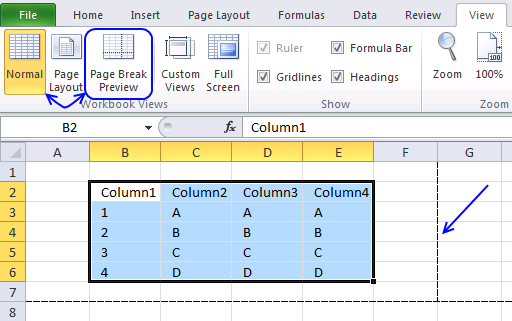
Have you ever wondered how these lines got there on a worksheet?
They are called "print preview lines" and they show where pages will break. In other words, they show how much of the worksheet that will be printed on a single paper or pdf.
Why do print preview lines appear?
They show up after you print or after you go to the print dialog box and then press with left mouse button on the "Cancel" button.
They also appear if you press with left mouse button on the Page Break Preview button on the tab "View" on the ribbon and then press with left mouse button on the "Normal" button, however, they don't disappear automatically.
So how do you get rid of the print preview lines?
You can't easily disable them by press with left mouse button oning a button on the ribbon, you have a few options described below.
What are print preview lines for?
They allow you to preview how your spreadsheet will look when printed. They show page breaks - where one printed page ends and the next will begin. They help identify what data will print on each page.
How to adjust preview lines?
- Go to tab "View" on the ribbon.
- Press the "Page Break Preview" button.
The screen changes and thicker blue lines appear. Move these lines to your needs. - Press the "Normal" button to return to the default Excel grid style.
What's on this section
- How to delete print preview lines [Excel 2010-2016]
- How to remove print preview lines using Immediate window
- How to delete print preview lines [Excel 2007]
- How to delete print preview lines [Excel 2003]
- How to delete print preview lines [Mac Excel 2011]
- How to remove Print preview lines programmatically (VBA)
I made a macro, demonstrated later in this article, that you can use to quickly disable the print preview lines, put it in your personal toolbox and use it whenever necessary.
Why use a macro?
You can quickly turn off the "print preview lines" and save a some time.
There is also a macro-enabled workbook for you to get further down in this post. It seems that if you close the workbook and then open it again the print preview lines disappear, however, this is in my opinion to much work to only remove the lines.
10.1. How to remove dotted lines (Excel Options)
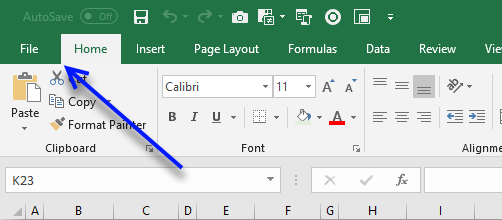
- Press with mouse on tab "File" on the ribbon.
- Press with mouse on "Options"
- Press with mouse on tab "Advanced".
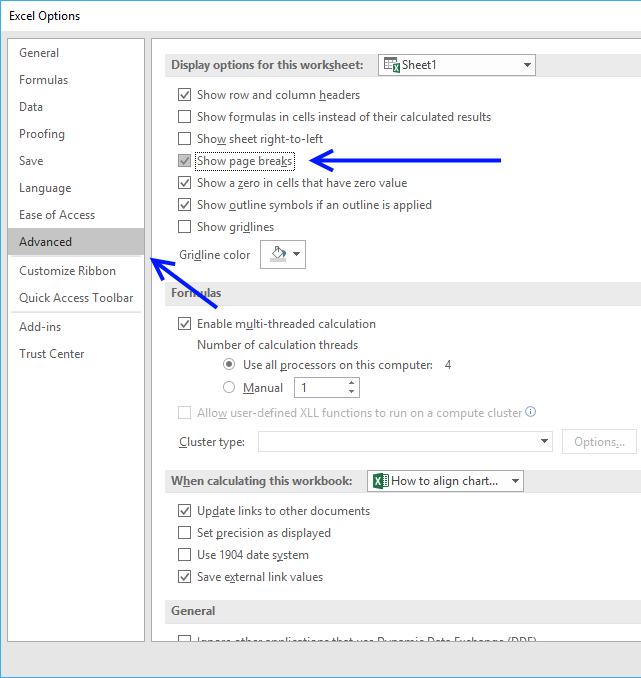
- Scroll down to "Display Options for this worksheet".
- Disable check box next to "Show Page Breaks", see the image above.
- Press with left mouse button on "OK" button to apply changes.
10.2. How to remove dotted lines (Immediate window)
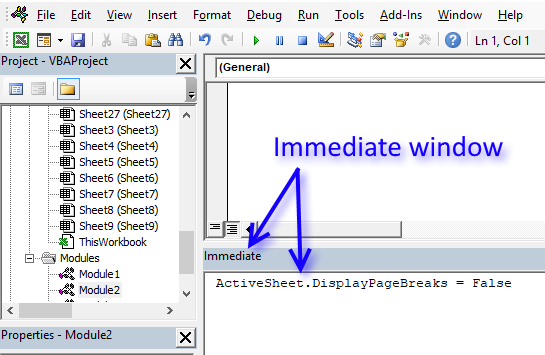
If you are familiar with the Immediate window in the Visual Basic Editor you can probably more quickly delete the print preview lines than through Excel Options.
- Copy code below.
- Press Alt+F11 to open the VB Editor.
- Paste code to the Immediate window
- Press Enter
- Return to Excel
ActiveSheet.DisplayPageBreaks = False
10.3. How to remove print preview dotted lines [Excel 2007]
- Press with left mouse button on the Office button located at the top left side of your screen.
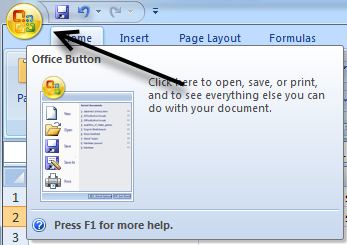
- Press with left mouse button on "Excel Options".
- Press with left mouse button on tab "Advanced" in the left window.
- Find "Display Options for this Worksheet".
- Disable the check box "Show Page Breaks"
- Press with left mouse button on "OK" button.
10.4. How to remove print preview dotted lines [Excel 2003]
- Go to the Tools menu.
- Press with left mouse button on Options.
- Press with left mouse button on the View tab.
- Disable checkbox Page Breaks found in Windows Options.
- Press with left mouse button on OK button.
Excel 2011 Macintosh

- Go to "Preferences" on the menu.
- Press with left mouse button on View in "Authoring".
- Disable checkbox "Show Page Breaks" located below "Windows Options"
10.5. Build a macro and automate these steps
If you often disable print preview lines manually why not build a macro that does it for you? It is not hard, simply copy the macro and paste it to your workbook module.
If you want to use it any workbook you open, put it in a personal macro workbook and link it to the Quick Access Toolbar or the ribbon.

In fact, you can save useful macros in your personal macro workbook and become a lot more efficient in your work.
10.5.1 Macro to disable print preview lines
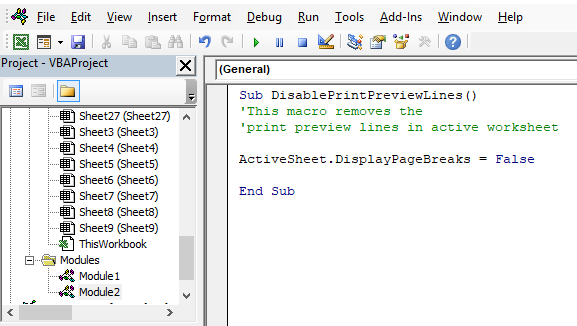
What happens if we record a macro while disabling "Page Breaks" in Excel options? This is what the macro recorder returns:
Macro1()
ActiveSheet.DisplayPageBreaks = False
End Sub
Use the above line in the examples below if you don't want to toggle print preview lines.
10.5.2 Macro toggles print preview lines on the active worksheet
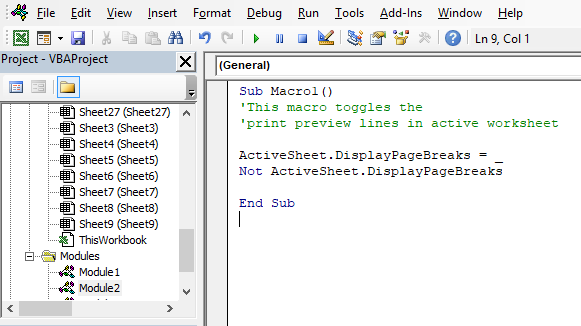
Using that code you can now show or hide "Page Breaks" on the active sheet with a macro. Meaning, if "Page Breaks" are visible this macro hides them. If "Page Breaks" are hidden, the macro makes them visible.
Sub Macro1()
ActiveSheet.DisplayPageBreaks = Not ActiveSheet.DisplayPageBreaks
End Sub
10.5.3 Macro toggles print preview lines on every sheet in the workbook
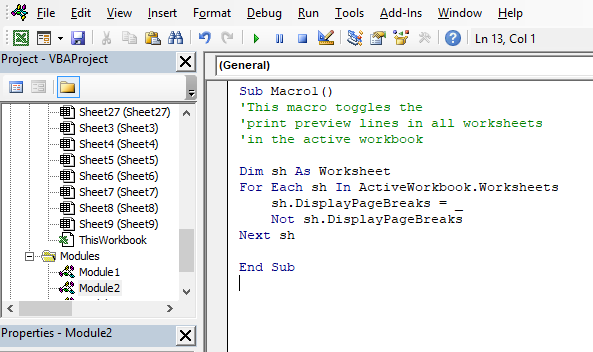
The following macro shows or hides "Page Breaks" on every sheet in the current workbook.
Sub Macro2()
Dim sh As Worksheet
For Each sh In ActiveWorkbook.Worksheets
    sh.DisplayPageBreaks = Not sh.DisplayPageBreaks
Next sh
End Sub
10.5.4 Macro toggles print preview lines on every sheet in all open workbooks
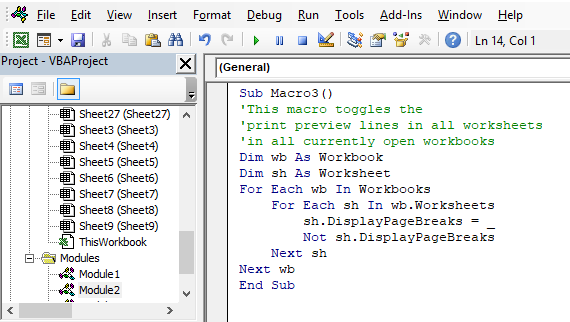
This macro toggles "Page Breaks" on every sheet in every open workbook.
Sub Macro3()
Dim wb As Workbook
Dim sh As Worksheet
For Each wb In Workbooks
    For Each sh In wb.Worksheets
        sh.DisplayPageBreaks = Not sh.DisplayPageBreaks
    Next sh
Next wb
End Sub
10.5.5 Watch a video where I explain how to use the macros above
10.5.6 Where to put the code
- Copy the preferred macro above.
- Go to Visual Basic Editor (VBE). (Alt + F11)
- Press with left mouse button on "Insert" on the menu.
- Insert a new module.
Don't forget to save the workbook as a macro-enabled workbook (*.xlsm file) or the macro is gone the next time you open the workbook.
Here is how to put this macro on the Excel ribbon:
Recommended articles
Save links to your favorite macros in a personal tab on the ribbon for easy access and to become more […]
Get
Form controls category
This blog post demonstrates how to create, populate and change comboboxes (form control) programmatically. Form controls are not as flexible […]
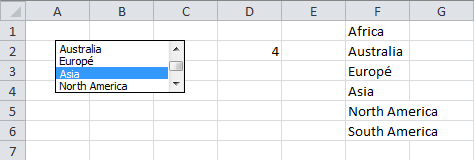
This blog post shows you how to manipulate List Boxes (form controls) manually and with VBA code. Table of Contents […]
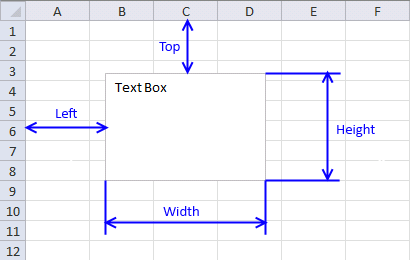
What is a Text Box? A Text Box (Form Control) in Excel is an interactive element that allows users to […]
Macro category
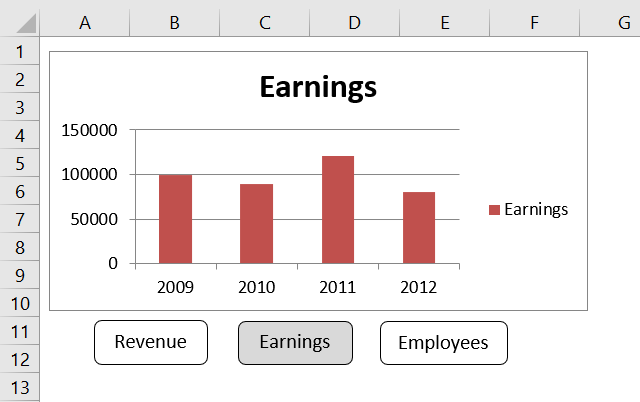
Table of Contents How to create an interactive Excel chart How to filter chart data How to build an interactive […]

Table of Contents Excel monthly calendar - VBA Calendar Drop down lists Headers Calculating dates (formula) Conditional formatting Today Dates […]
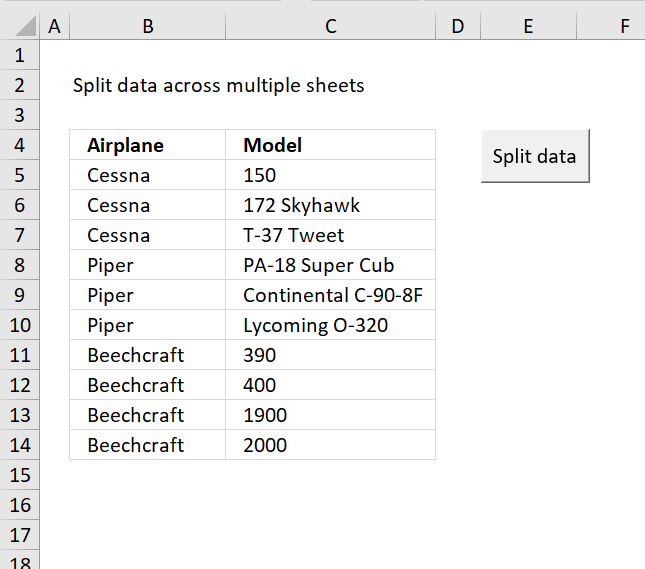
Table of Contents Split data across multiple sheets - VBA Add values to worksheets based on a condition - VBA […]
Print category
More than 1300 Excel formulasExcel categories
24 Responses to “Create a Print button – macro”
Leave a Reply
How to comment
How to add a formula to your comment
<code>Insert your formula here.</code>
Convert less than and larger than signs
Use html character entities instead of less than and larger than signs.
< becomes < and > becomes >
How to add VBA code to your comment
[vb 1="vbnet" language=","]
Put your VBA code here.
[/vb]
How to add a picture to your comment:
Upload picture to postimage.org or imgur
Paste image link to your comment.
This is what i looking for...
after long searching, finally i found here
thnks Oscar
Dear Sir/Madam
I am very glade to see your site. It very useful for me.
But I am so sorry I can not done it form number 4 till finish.
Best regards
want to try this impressive technology,thanks alot.
Thank you for this information.
I'll try it and I need it very much.
I have a question.
If I have three or more columns A. B. C.
in each of them figures up to 50 lines.
How can I make a new column D. contains the figures of the three columns under each other.
That was good but when I try to close the excel file, a popup window says this file can't be saved and they are not related to vb.
Hi Ibraheem
maybe you saved the file previously but saved it as xls. with a macro added to the sheet you need to resave the file (file-save as-, save as type: "macro enabled worksheet")this is to save the workbook with macros attached as when you attached the print button you have also changed the file type you are working on from xls to a file with macros
i have copied the said macro "Sub Macro1()
Application.Dialogs(xlDialogPrint).Show
End Sub"
But it is not working. the message shows: "Can not run the macro. The macro may not be available in the workbook."
Pls. give me the solution.
file-save as-, save as type: "macro enabled worksheet"
I also face this problem i i get solution by this rout.
enjoy your work.
//////
Hello:
I am working with Excel 2013 trying to add a macro to print too but it's not working. Yes, I have saved it as .xlsm but there is no option to "add macro" when I right-press with mouse over the command button. I can add the macro in VBA but it's like I can't get the two to talk to each other. I'm just getting started with java scripts, macros, etc. and I am addicted! Matter of fact, I probably spend too much time trying to learn about them while at the office. Anyway, thanks for your site. Still helpful - I'll keep researching. I'm sure I'm missing something simple. :)
Hello Colleagues
I what to create Enter button that will update data to the next sheet and print the data sheet at the same time. Please help.
Hi
What shall I add in macros if I want to print more than 1 copy ?
Hi - I am using a mac and getting a "Run-time error 5941" - the requested member of the collection does not exist.
Michael Salim,
I don't have a Mac and I can't find a solution to your problem.
Can you provide the code Excel returns if you record a macro while printing a page?
it so helpful for me
thanks a lot
Thank you! You helped me remove the print preview lines. I'm so grateful!
Olivia,
You are welcome!
Oscar...
I need to insert a control that will print the active worksheet to a .pdf file.
How do I make this happen?
Thanks in advance.
God Bless...
Chuck Bradley
Sir please add new invoice button that will auto increment the invoice number
Hi,
i am looking for command to print by Buttons in sheet1 when i select Button A then this will print sheet2 and when i select Button B in sheet1 then this button will print Sheet3.
Please help me how to set this commant.
thank you for this which I was looking for
how to make calling button Find and Replace with Macro in Excel
First result in google, and is what I needed to know. +1 for SEO, thanks!
thanks so much lol
looking for script to print to a network printer, have several printers on network but keeps printing to the default printer.